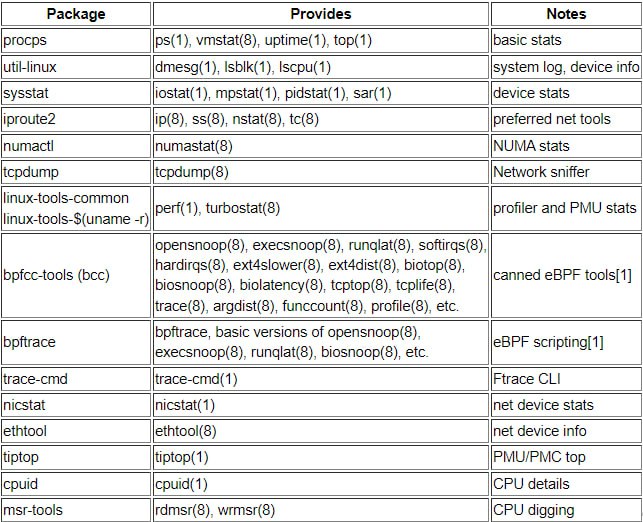
- Отдельная статья про оперативную память
- Отдельная статья про диски (эта)
- Отдельная статья про права
-
Основные мониторинг объекты хранения:
- утилизация памяти (дисков/ram/swap)
- 100% утилизация в df под snap/cd/dvd это нормально т.к. Snap всегда полностью утилизированы – они доступны только на read
- Iops (inout/output operations per second – read/write)
- Методы добавления места
- (0) Сначала убедиться что то, что занимает место хранения это легитимные файлы (du)
- (1) LVM, если используется, позволяет в сценариях необходимости добавления памяти хорош – просто добавляем к старому диску еще один новый и пользуемся
- (2) Перенести часть тяжеловесных директорий со старого диска на новый и смонтировать их туда
- (3) Склонировать полностью старый диск на новый более объемный
- утилизация памяти (дисков/ram/swap)
- Все в Linux есть файл. Для понимания типа файла есть соответсвующая команда file.
root@debian# file README
README: ASCII text
root@debian# file isic.c
isic.c: C source, ASCII text
root@debian# file install-sh
install-sh: POSIX shell script, ASCII text executable
root@debian# file isic
isic: ELF 64-bit LSB shared object, x86-64, version 1 (SYSV), dynamically linked, interpreter /lib64/ld-linux-x86-64.so.2, for GNU/Linux 2.6.32, BuildID[sha1]=81fd0e4362545acc48d18866f8a84d4ab8731075, not stripped
- (файлы/процессы) lsof – показывает какие файлы используются какими процессами (включая библиотеки/логи и про). А т.к. в linux все есть файлы – это зачастую очень полезная утилита, полезна, например, для размонтирования флешек, поиска места, куда пишет лог процесс, какие библиотеки использует.
root@spr:~# lsof | grep squ
squid 526 root cwd DIR 8,1 4096 2 /
squid 526 root rtd DIR 8,1 4096 2 /
squid 526 root txt REG 8,1 7076024 144505 /usr/sbin/squid
squid 526 root mem REG 8,1 282752 139004 /usr/lib/x86_64-linux-gnu/libnss_systemd.so.2
squid 526 root mem REG 8,1 55792 131763 /usr/lib/x86_64-linux-gnu/libnss_files-2.28.so
squid 526 root mem REG 8,1 35224 132160 /usr/lib/x86_64-linux-gnu/libffi.so.6.0.4
squid 526 root mem REG 8,1 26616 136067 /usr/lib/x86_64-linux-gnu/libmnl.so.0.2.0
log_file_ 2307 proxy 3w REG 8,1 0 3671227 /var/log/squid/access.log
pinger 2308 proxy cwd DIR 8,1 4096 3672167 /var/spool/squid
pinger 2308 proxy txt REG 8,1 80536 144498 /usr/lib/squid/pinger
pinger 2308 proxy 2u REG 8,1 5928 3672498 /var/log/squid/cache.log
- Про объекты данных (напр. LUN) см. статью RAID
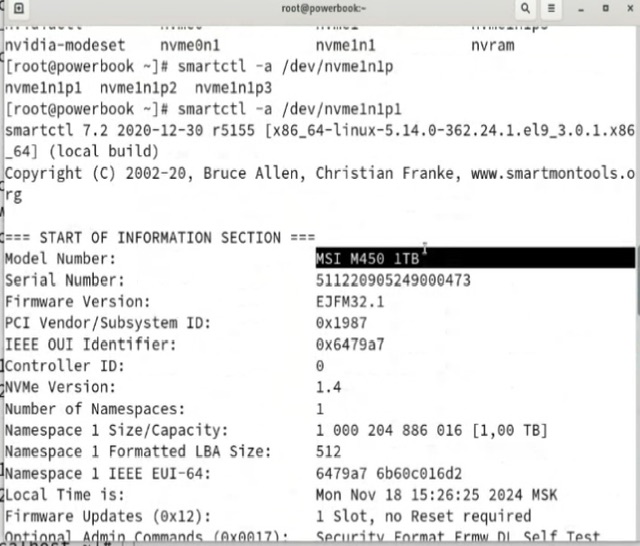
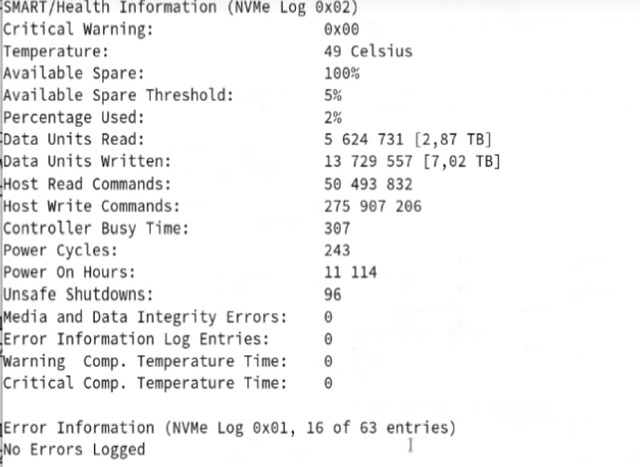
- SMART – self-monitoring, analysis and reporting technology
- smartctl -a <device> – утилита для просмотра SMART информации
-
Screenshot 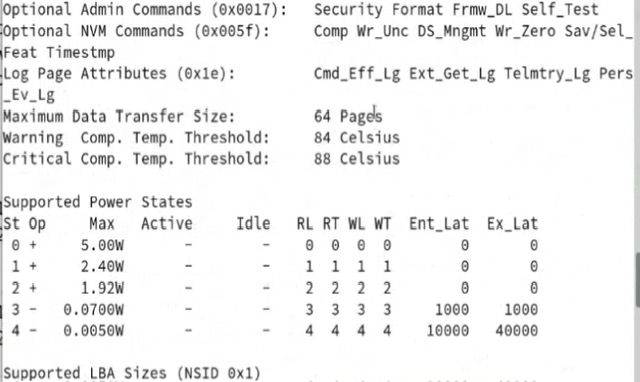
- Изменения конфигурации с дисками/файловыми системами зачастую опасны, и зачастую есть риски потери данных, поэтому рекомендуется делать бекап данных перед тем, как делать потенциально опасные операции, например
- изменение одной файловой системы на другую чаще всего не поддерживается (исключение ext2 > ext3 > ext4),
- увеличение (grow)/уменьшение (shrink) раздела может быть опасно (возможны data loss сценарии) и хотя на практике увеличение зачастую безболезненно утилитами типо resize2fs или xfs_admin, redhat не рекомендует этим пользоваться! По факту в Linux возможно применение LVM, который позволит объединить несколько разделов так, что resize не потребуется, подробнее ниже в отдельном разделе LVM.
- более стандартно это изменение uuid диска (напр. деплой из clonezilla образа системы)
- disk label (смотри ниже в mount)
- FHS (англ. Filesystem Hierarchy Standard, «стандарт иерархии файловой системы») — стандарт, унифицирующий местонахождение файлов и каталогов с общим назначением в файловой системе UNIX. На данный момент большинство UNIX-подобных систем в той или иной степени следует этим правилам. Например, обычная база данных о пользователях всегда хранится в файле /etc/passwd.
- Filesystem Hierarchy Standard is a distribution neutral description of locations of files and directories, it is a reference describing the conventions used for the layout of Unix-like systems. It is maintained by the Linux Foundation and the latest version is 3.0
- var – директория для хранения изменяемых данных, изменения в которых не должны обнуляться после перезагрузки. Рекомендуется в соответствии с
Filesystem Hierarchy Standard для размещения на отдельном разделе т.к. может расширяться непредсказуемо и привести к общей нестабильности системы.
The top-level system directory that is used for files and data that change regularly while the system is running and are to be kept between reboots is /var. The /var directory contains variable data that changes in size as the system runs. For instance, log files, mail directories, databases, and printing spools are stored in /var. These files and data are not temporary and need to be preserved across system reboots. The /var directory is one of the few directories that are recommended to be on a separate partition, according to the Filesystem Hierarchy Standard (FHS). This is because the /var directory can grow unpredictably and fill up the / partition, which can cause system instability or failure. By having /var on a separate partition, we can limit the amount of disk space that can be used by variable data and prevent users from affecting the / partition. The /var directory is also a common target for malicious attacks, so having it on a separate partition can improve the security and isolation of the system. References:
- /usr/share/man директория для хранения MAN в соответствии с FHS, а /usr/share/doc для хранения документации
In compliance with the FHS, in which of the directories are man pages found?

A. /usr/share/man

B. /opt/man

C. /usr/doc/

D. /var/pkg/man

E. /var/man
Answer: A
In compliance with the FHS (Filesystem Hierarchy Standard), man pages are found in the '/usr/share/man' directory. Option A is the correct answer. The FHS is a standard that defines the directory structure and layout of a Linux or Unix-like operating system. It specifies the location of various types of files, including man pages. According to the FHS, man pages are documentation files that provide detailed information about system commands and utilities. They are usually accessed through the 'man' command, which displays the man page for a specified command or utility. In compliance with the FHS, man pages are stored in the '/usr/share/man' directory. This directory is divided into several subdirectories, each containing man pages for a specific section. For example, the '/usr/share/man/man1' directory contains man pages for executables in the '/usr/bin' directory, while the '/usr/share/man/man3' directory contains man pages for library functions in the '/usr/lib' directory.

Note: Some systems may store man pages in a different location, depending on how the system was configured. However, in compliance with the FHS, man pages are stored in the '/usr/share/man' directory.
In compliance with the FHS, in which of the following directories are documentation files found?
A. /usr/share/documentation
B. /usr/local/share/documentation
C. /var/share/doc
D. /usr/share/doc
E. /etc/share/doc
Answer: D
https://dev.to/softwaresennin/linux-directory-structure-simplified-a-comprehensive-guide-3012
- Defragmentation (Дефрагментация) – перемещение данных одного файла в секторы рядом с друг другом для ускорения работы. Применяется в HDD, чтобы меньше перемещать головку/не ждать еще одного оборота для прочтения. Нужно в большей степени в Windows, в Linux система старается не допустить фрагментации. Делается автоматически на современных версиях Windows. Windows сохраняет файлы как можно ближе к началу свободного пространству volume близко к друг другу (в fat друг за другом, в ntfs с некоторым буфером), тем самым приводя к фрагментации файлов при росте их объема. Linux же (ext2-3-4) не кладет файлы рядом, а раскидывает их по всему диску в некотором рандоме. Кроме того, если Linux не может выделить пространство сразу после текущих секторов файла, он не запишет в другие (далекие) сектора добавленную информацию, а попытается переместить весь файл в последовательность ячеек в которую файл поместится весь. Поэтому фрагментацию в Linux можно встретить только на дисках с загрузкой более 80%. В случае фрагментации на Linux (посмотреть можно в fsck по интигатору “non-contiguous nodes”) простейший способ исправления проблемы – увеличение пространства и перезаливка через удаление существующих файлов.
- Cleaning– при чистке диска, такой как через службу очистки в Windows, помимо удаления temp/корзины может происходить сжатие редко используемых файлов.
- Trim – полезная вещь уже для SSD. Позволяет “вернуть в оборот” неиспользуемое пространство диска.
- Shortcut (в Windows) – это link на основе операционной системы, не на основе файловой системы. Операционка реже рассматривает shortcut как замену файлу в сравнении с link’ами (видно например при попытке открыть такой файл notepad через shell).
- Data buffer – когда мы копируем данные с одного носителя на другой, мы сначала перемещаем их в оперативную память, а уже потом на фактический диск.
- Inode
Inode в файловых системах UNIX и UNIX-подобных операционных системах — это структуры данных, которые хранят информацию о файлах и каталогах. Каждый файл или каталог на диске ассоциируется с одним inode, который содержит метаданные файла, такие как его размер, разрешения, временные метки, ссылки на блоки данных и т.д. Количество inode на файловой системе обычно определяется в момент её создания и не может быть изменено без переформатирования или значительных изменений в файловой системе.

По какой причине inode могут закончиться ?
Причины исчерпания
1️⃣Большое количество мелких файлов: Одной из наиболее частых причин исчерпания inode является наличие очень большого количества маленьких файлов на файловой системе. Поскольку каждый файл использует как минимум один inode, системы с большим количеством мелких файлов могут исчерпать доступные inode, даже если дисковое пространство по-прежнему доступно.
2️⃣Недостаточное количество выделенных inode: При создании файловой системы, если количество выделенных inode было рассчитано неправильно (слишком мало для предполагаемого использования), это может привести к раннему их исчерпанию. Это особенно актуально для серверов или систем, где ожидается большое количество файлов.
3️⃣Особенности файловой системы: Некоторые файловые системы, такие как Ext3 или Ext4, имеют фиксированное соотношение inode к объёму файловой системы, которое задаётся при их создании. Если создать файловую систему с недостаточным количеством inode для конкретного случая использования, то в дальнейшем это может стать проблемой.

Решения проблемы исчерпания
1️⃣Проверка использования: С помощью команды df -i можно проверить, сколько inode используется и сколько ещё доступно в вашей файловой системе. ((подробнее ниже))
2️⃣Очистка файловой системы: Удаление ненужных или временных файлов может освободить inode.
3️⃣Изменение файловой системы: Если возможно, можно увеличить количество inode путём изменения файловой системы или пересоздания файловой системы с более высоким количеством inode. Для файловых систем, таких как XFS или некоторые конфигурации Btrfs, можно динамически добавлять inode.
4️⃣Использование других файловых систем: Переход на другую файловую систему, которая не имеет строгих ограничений на количество inode (например, Btrfs или ZFS), может быть решением для систем с большим количеством маленьких файлов.
5️⃣Архивирование: Программы и процессы, которые создают большое количество мелких файлов, могут модифицироваться для хранения данных в формате архивов вместо отдельных файлов, что снижает потребление inode.
Управление inode требует понимания специфики работы и нагрузки на файловую систему, а также может потребовать административных изменений для оптимальной настройки и эксплуатации системы хранения данных.
файловая система (ФС)
- Бывают очень разные ФС и достаточно «странные»/неклассические
- SWAP одна из самых «странных» файловых систем
- Gluster FS – полагается на другие ФС (подробнее ниже)
- full disk encryption технологии шифрования ФС (типо bitlocker, firevault)
- Linux поддерживает работу с flash с файловой системой NTFS, а Windows не поддерживает flash с ext4
- Количество inode в файловой системе зависит от типа файловой системы (подробнее в inode)
 Encryption is a technique that protects data from unauthorized access by using a secret key to transform the data into an unreadable form. Encryption can be implemented at the disk level, by using tools such as dm-crypt or LUKS, or at the file system level, by using tools such as eCryptfs or EncFS.
Есть файл, есть атрибуты файла (методанные). Для хранения методанных обычно используется специальная таблица (MFT в NTFS, inode в ext), при создании файлов в эту таблицу добавляется запись/записи, при удалении – удаляются. В методанных хранятся данные о идентификатор записи в таблице методанных (file record number, например для создания hard link к файлу), правах доступа к файлу, имя файла (inode не хранит), местоположение файла, сжат/зашифрован ли файл, время редактирования/создания/просмотра и прочая служебная информация. Какие ФС используются:
-
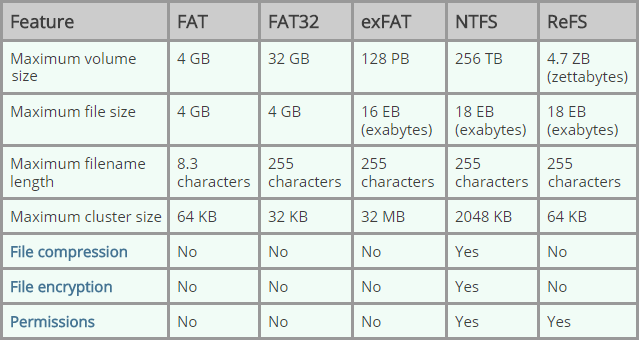
- FAT32 – The FAT32 filesystem is great for cross-platform compatibility, but has lots of limitations that don’t make it useful for large data storage: It doesn’t support files larger than 4GB, Its filesystem size can’t be larger than 32GB. Для работы во всех системах рекомендуется flash делать с FAT32 (если не будет файлов более 4гб и размер флешки не более 32гб).
- NTFS – Windows. NTFS использует Master File Table для хранения методанных файлов на volume, можно выбирать размер Allocation Unit в зависимости от размера хранимых данных
-
- You want to format a partition with NTFS, and know that the data you’ll be storing will consist mostly of many small files. In order to use as little space as possible, should you choose a larger or smaller Allocation Unit Size during the formatting process.
-
- FAT – FAT32 – exFAT – NTFS – ReFS
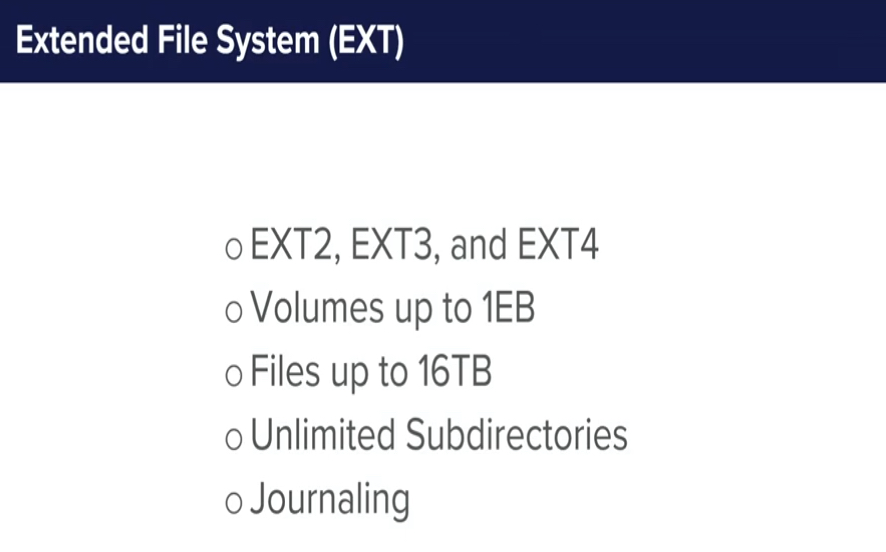
- Extended file system – actual EXT4 (default Debian и во многих других дистрибутивах, был и default в Rhel) – the most widely used Linux filesystem type. Поддерживается всеми возможными Linux дистрибутивами и даже частично в windows/macos (read). Ext крут тем, что все его актуальные версии ext2-3–4 это по сути одна файловая система с добавлением новых фич в новых версиях. Утилиты для работы одни и есть поддержка апгрейда файловой системы со старой в новую версию.
-
- Ext2 -> ext3 было добавлено журналирование (journaling support). Под журналированием подразумевается то, что при записи в файл по факту запись производится не напрямую в файл, а в промежуточное место и только после того как запись успешна на 100% старый файл подменяется на новый. Это сделано для того, чтобы в случае проблемы с записью по середине процесса записи (напр. питание пропало) не был потерян оригинальный файл. В таком случае при загрузке ФС после сбоя поврежденный журнал с частичной/изменной записью дропается и восстанавливается нетронутая копия изначального (неизмененного) файла. Чаще всего это происходит автоматически – или за счет ядра или за счет fsck, но в крайнем случае журнал можно дропнуть вручную
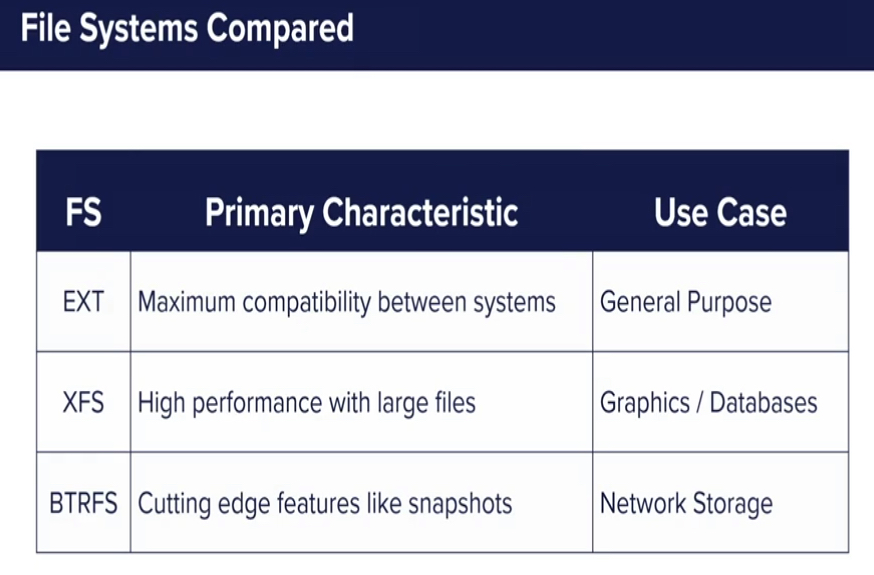
- Ext3 -> ext4 были добавлены extents (extents support / block ranges). Extents по сути это более эффективный способ указания большого размера файлов – без extent в файловой таблице файлу соотносится набор блоков с перечислением каждого блока, extents же позволяют меньше расходовать память – задавать диапазон блока, которые относятся к файлу. Это и более экономно и позитивно влияет на производительность (that really shrinks up lookup table and makes it more effecient).
-
-
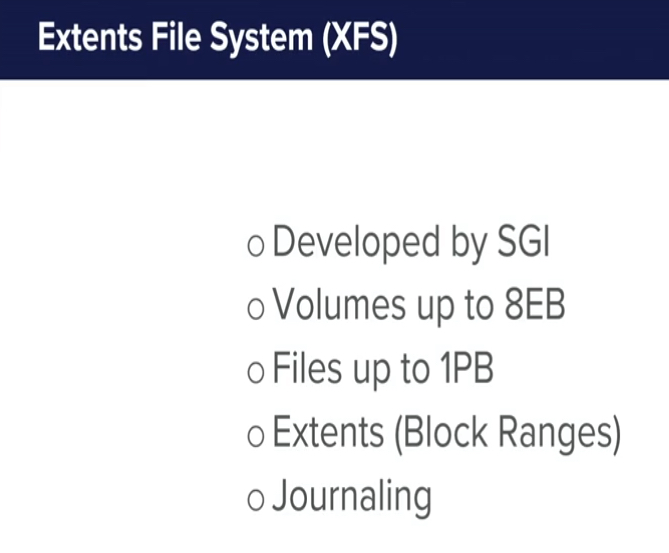
- Extents file system – XFS (default RHEL), поддерживает extents нативно, а не на уровне доработки (как в случае с ext4), так же потенциально позволяет хранить файлы 1 петабат (в сравнении с 16 терабайт ext4). В целом изначальной задачей, которую решал XFS это поддержка больших файлов.
- xfs_growfs – расширяет автоматически ФС до макс. объема
- Extents file system – XFS (default RHEL), поддерживает extents нативно, а не на уровне доработки (как в случае с ext4), так же потенциально позволяет хранить файлы 1 петабат (в сравнении с 16 терабайт ext4). В целом изначальной задачей, которую решал XFS это поддержка больших файлов.
-
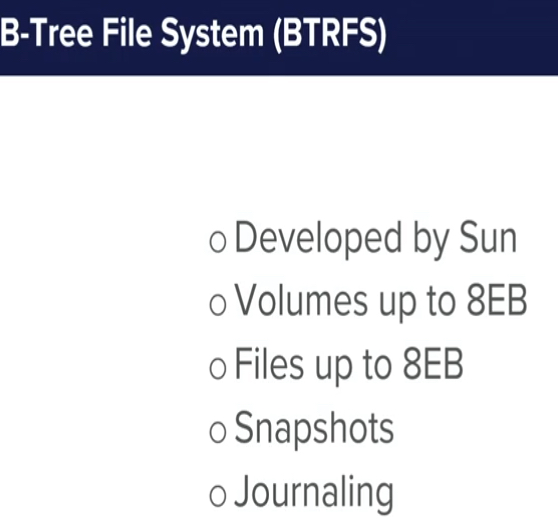
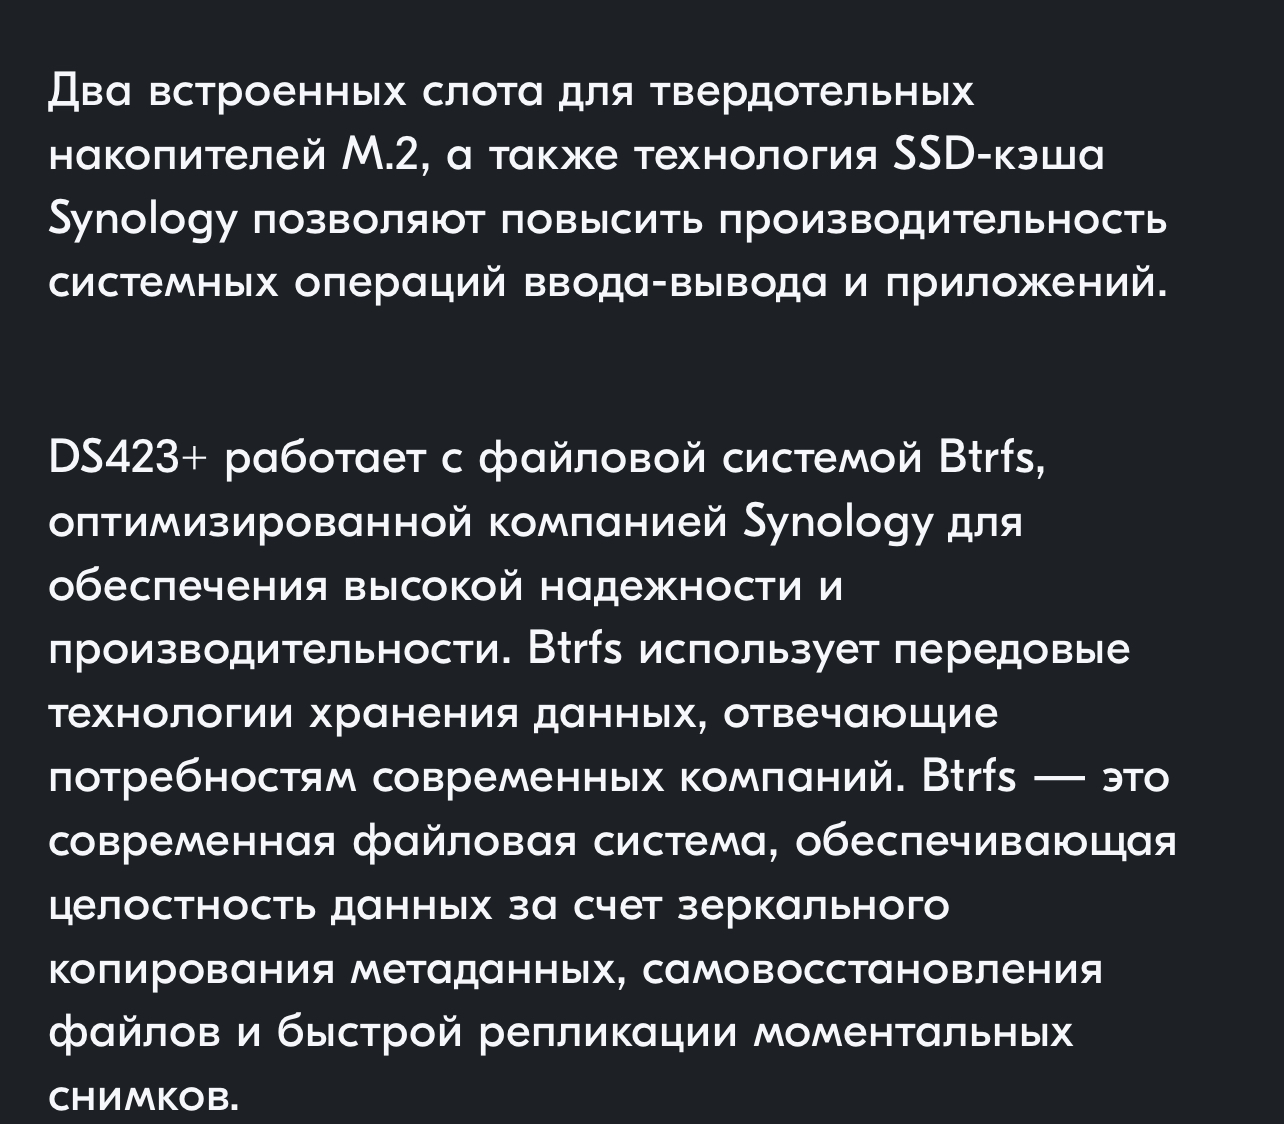
- BTRFS – B-tree file system – пока похож на softEtherVPN “ЗВЕЗДОЛЕТ ГОВНА” (every bell and whistle for FS) т.к. поддержка максимальных объемов, много крутых фич типо snapshot на уровне ФС, динамически расширяемые разделы, logical volume manager в ФС, основа для работы дедупликаторов данных (подробнее о дедупликации в BTRFS/ZFS) но работает все это нестабильно, настолько, что Red Hat выпилили поддержку btrfs из RHEL, хотя какое то время оффициально поддерживали. С другой стороны Synology активно использует BTRFS, но! она у них доработана ими.
- Достаточно редкие в продкшне
- ZFS – похож на BTRFS (именно похож, что-то, типо дедупликации реализовано по другому), но имеет дополнительные проблемы с лицензиями oracle
- ReiserFS – в некоторых сценариях возможны потери данных
- GlusterFS – отдельно ниже
GlusterFS
- Ни что не мешает директорию реплики glusterfs добавить в NFS шару
- (С курса LPIC, надо проверять) в современном gluster при подключении одной ноды к клиенту при создании связности от сервера к клиенту будет передана инфа о том, какие сервера отвечают за volume (данные), как профит клиенту не нужно укывать адреса всех fail-safe серверов этого volume при моноровании – они подхватятсч автоматически; но на старых версия это не работает и нужно явно указывать fail-safe сервера при монтировании ((препод))
- (С курса LPIC, надо проверять) все распределение между серверами glusterfs происходит при взаимодействии сервер-сервер, а не сервер-клиент. Клиент всегда пишет на один сервер, а далее этот сервер-нода определяет нужно ли файл продублировать (реплика) или удалить и отдать на другой сервер.
- REPLICA VOLUME (MIRROR, RAID 1) по сети (называется replicated configuration/volume) с полным дублированием информации между нодами.
- DISTRIBUTION VOLUME (STRIPE, RAID 0) по сети (называется distributed configuration/volume) – со стороны клиентов gluster будет один storage со всеми файлами, но по факту часть файлов будет хранится на одном сервере, а часть на другом и при отказе (в случае отсутствия резерва) будут теряться данные
-
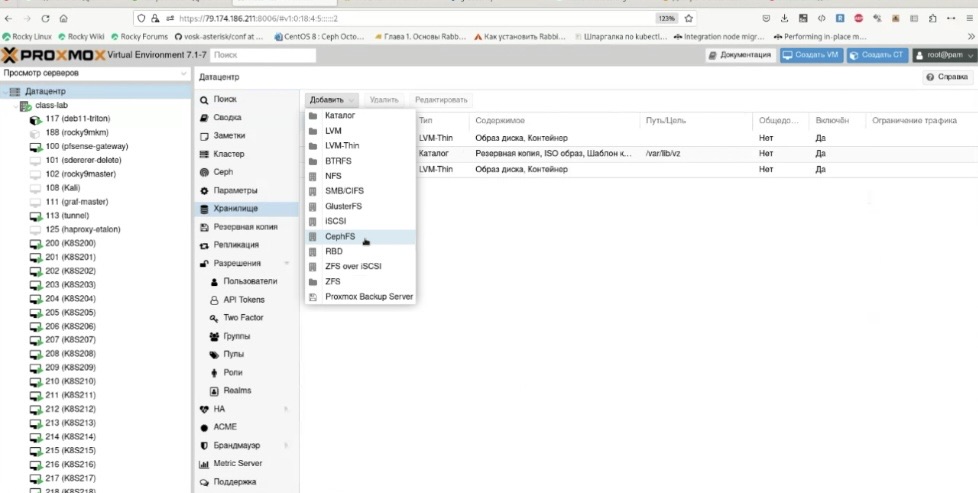
- Прописываем оба узла в hosts (и себя и соседа; в среднем это даже надежнее dns) или реализуем их резолвинг через dns (динамичнее, но в среднем менее надежно), проверяем базовую связность ping по доменному имени; в целом все взаимодействие для gluster лучше сразу делать по доменным именам, а не по IP – нод между собой, клиентов с нодами. По ip может не заработать впринципе (ниже пример proxmox), типовая настройка сторон с использованием доменных имен.
-
Screenshot 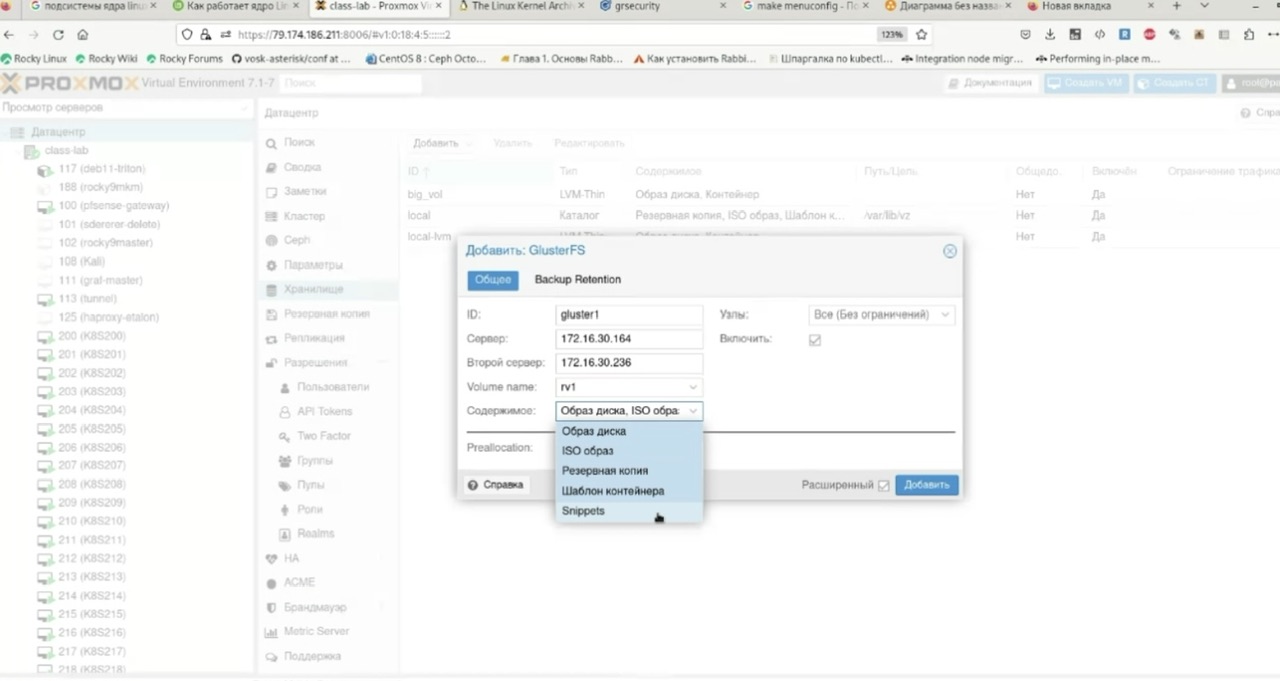
Screenshot 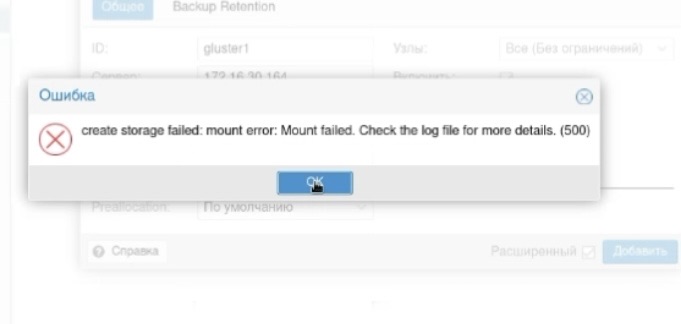
Screenshot 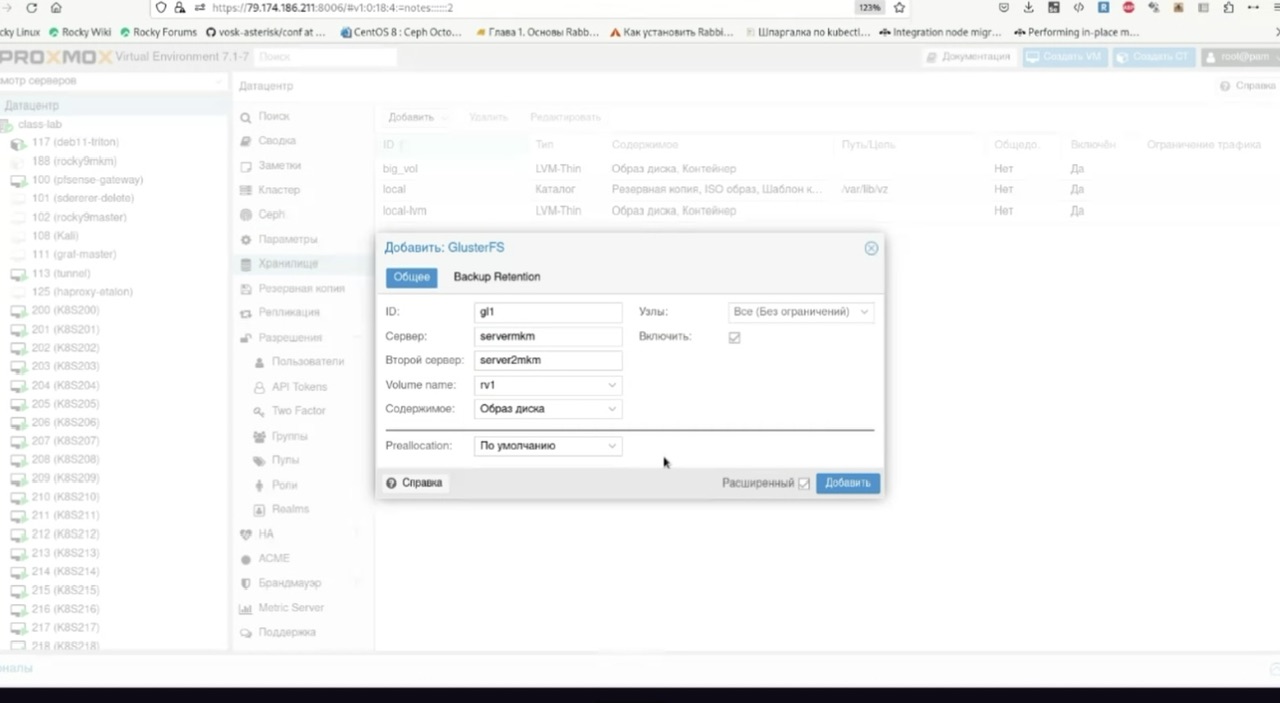
Screenshot 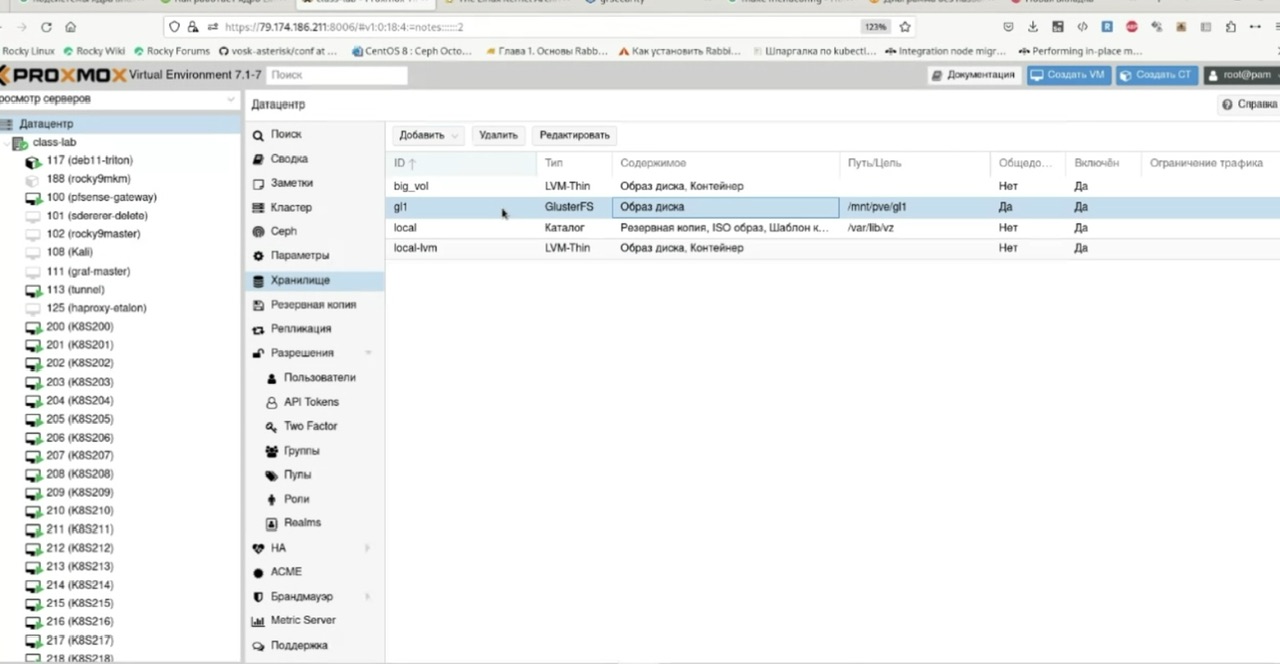
Screenshot 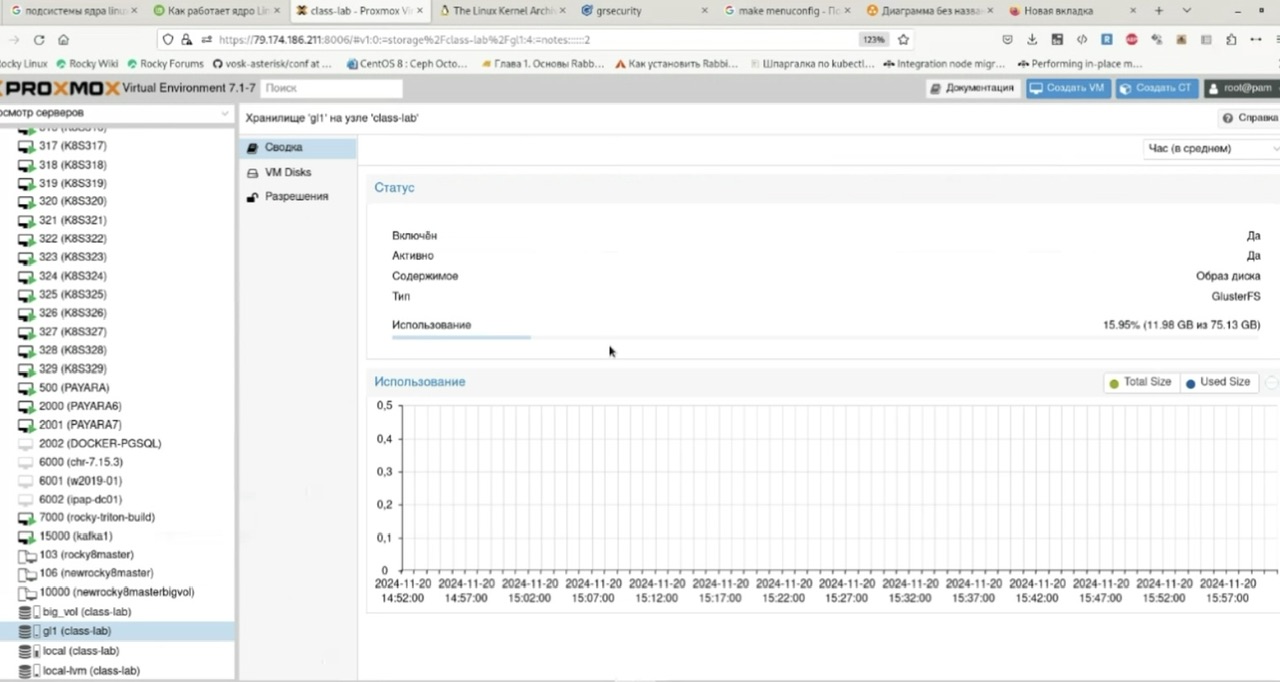
Screenshot
-
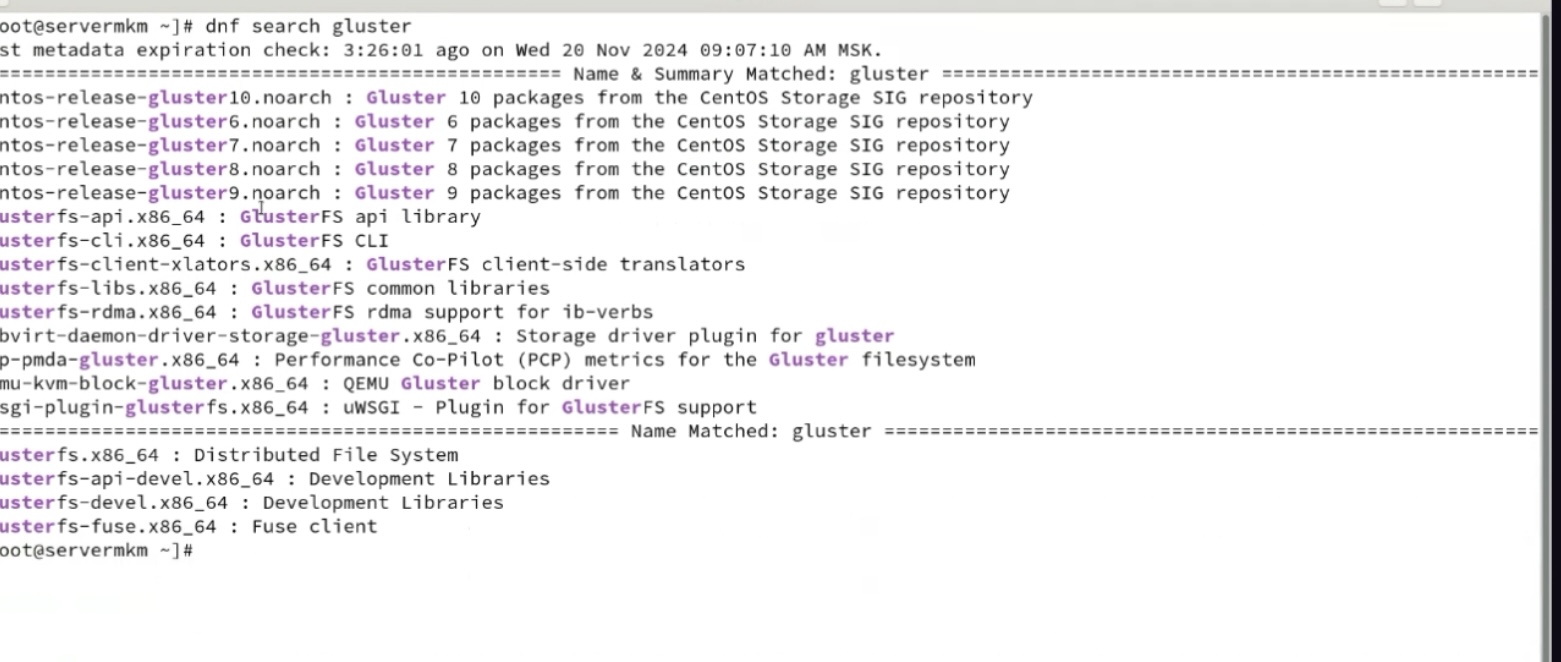
- В случае отсутствия необходимой версии в дефолтных репозиториях добавляем репозиторий glusterfs. Не забываем что часть репозиториев centos (mirrorlist.centos.org) поломана и нужно указать живые в baseurl.
-
> dnf search gluster
> dnf repolist
> dnf install centos-release-gluster9
> vim /etc/yum.repos.d/CentOS-Gluster-9.repo
-
Screenshot 
Screenshot 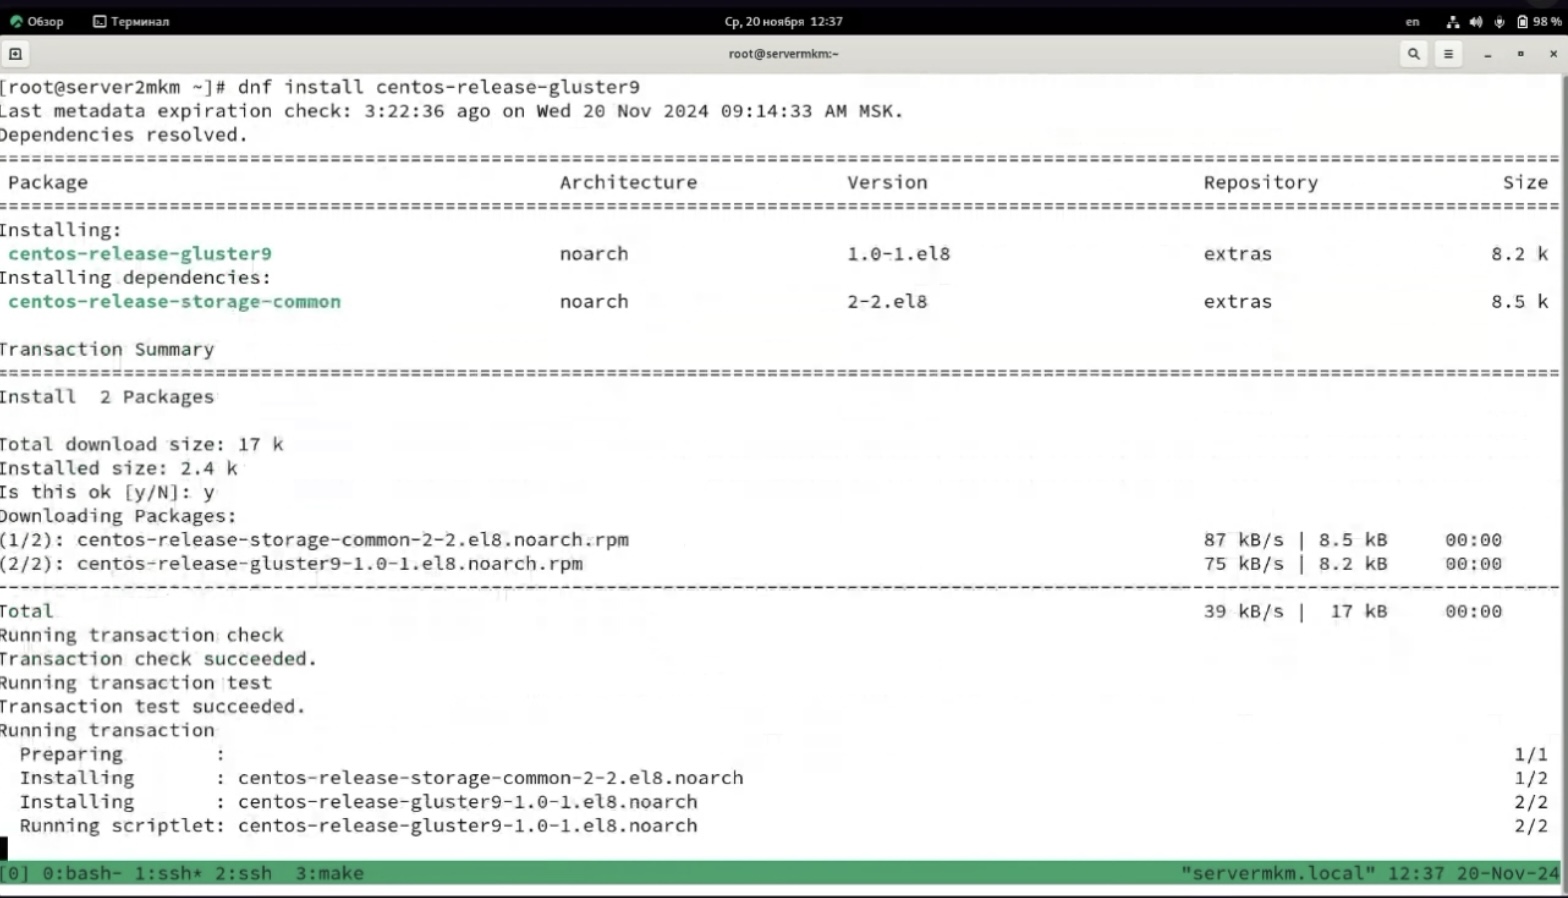
Screenshot 
Screenshot 
Screenshot 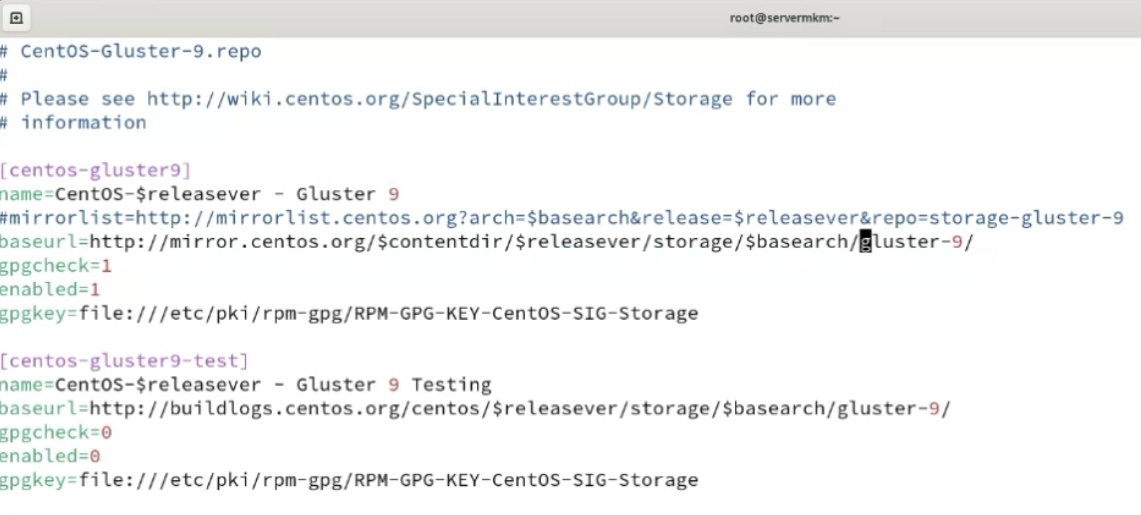
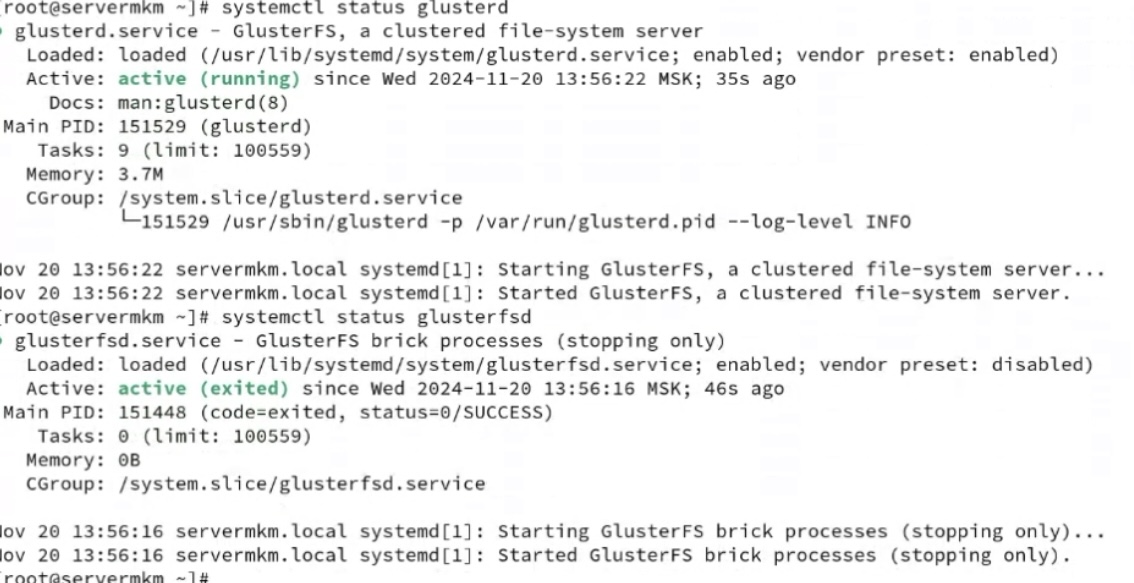
Screenshot - Устанавливаем и включаем (для centos нужно включать glusterfs, glusterfsd), проверяем связность glusterfs peer probe по доменному имени
- Прописываем оба узла в hosts (и себя и соседа; в среднем это даже надежнее dns) или реализуем их резолвинг через dns (динамичнее, но в среднем менее надежно), проверяем базовую связность ping по доменному имени; в целом все взаимодействие для gluster лучше сразу делать по доменным именам, а не по IP – нод между собой, клиентов с нодами. По ip может не заработать впринципе (ниже пример proxmox), типовая настройка сторон с использованием доменных имен.
> dnf install -y glusterfs glusterfs-libs glusterfs-fuse glusterfs-server

> service glusterd start
> service glusterfsd start
> service glusterd enable
> service glusterfsd enable
> service glusterd status
> service glusterfsd status
> gluster peer probe server2mkm
> gluster peer status
> gluster pool list

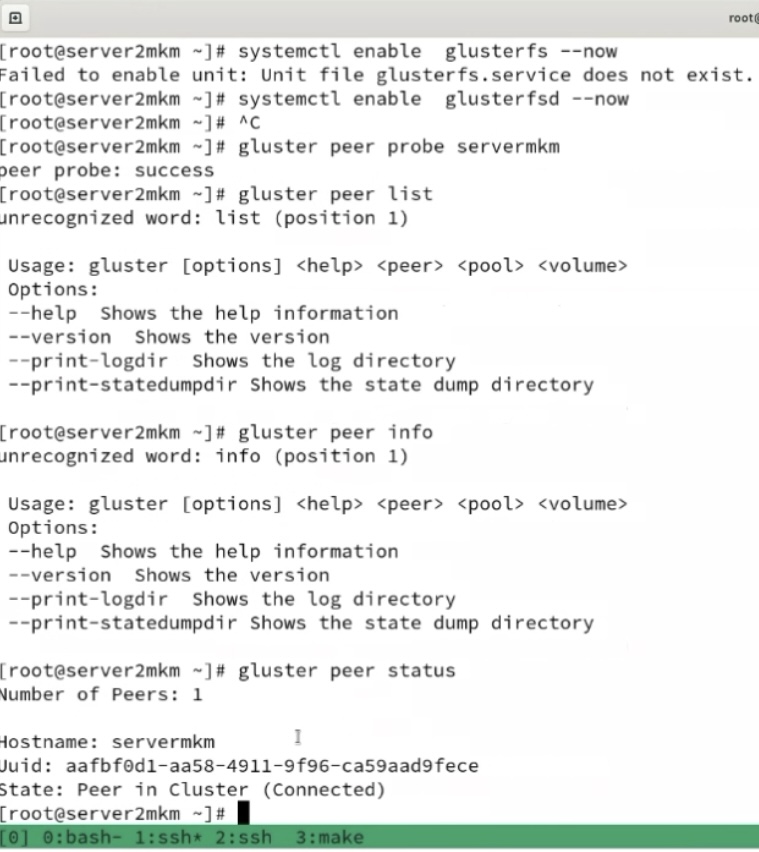
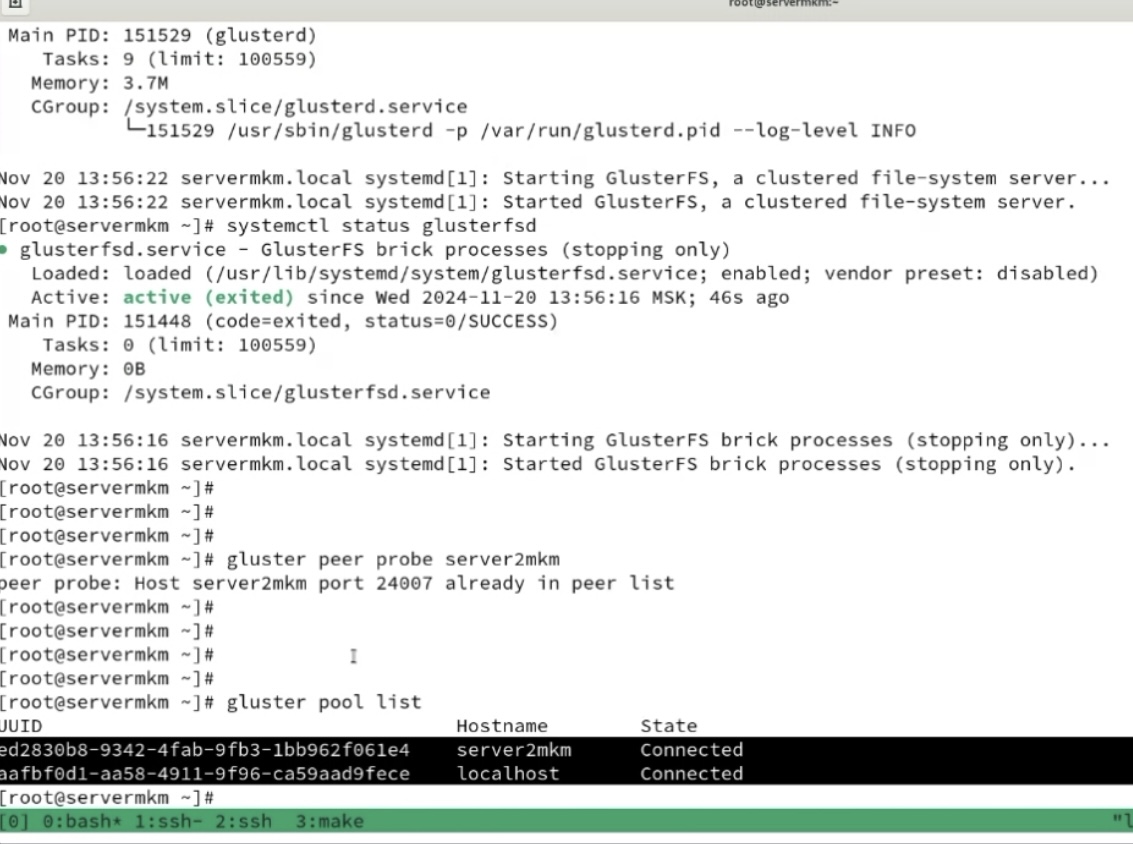
> mkdir /for_repliction_stor
# REPLICA VOLUME (MIRROR, RAID 1)
> gluster volume create rv1 replica 2 transport tcp servermkm:/for_repliction_stor server2mkm:/for_repliction_stor force

# DISTRIBUTION VOLUME (STRIPE, RAID 0)
> gluster volume create dv1 transport tcp servermkm:/for_repliction_stor server2mkm:/for_repliction_stor force
> gluster volume start rv1

> gluster volume info
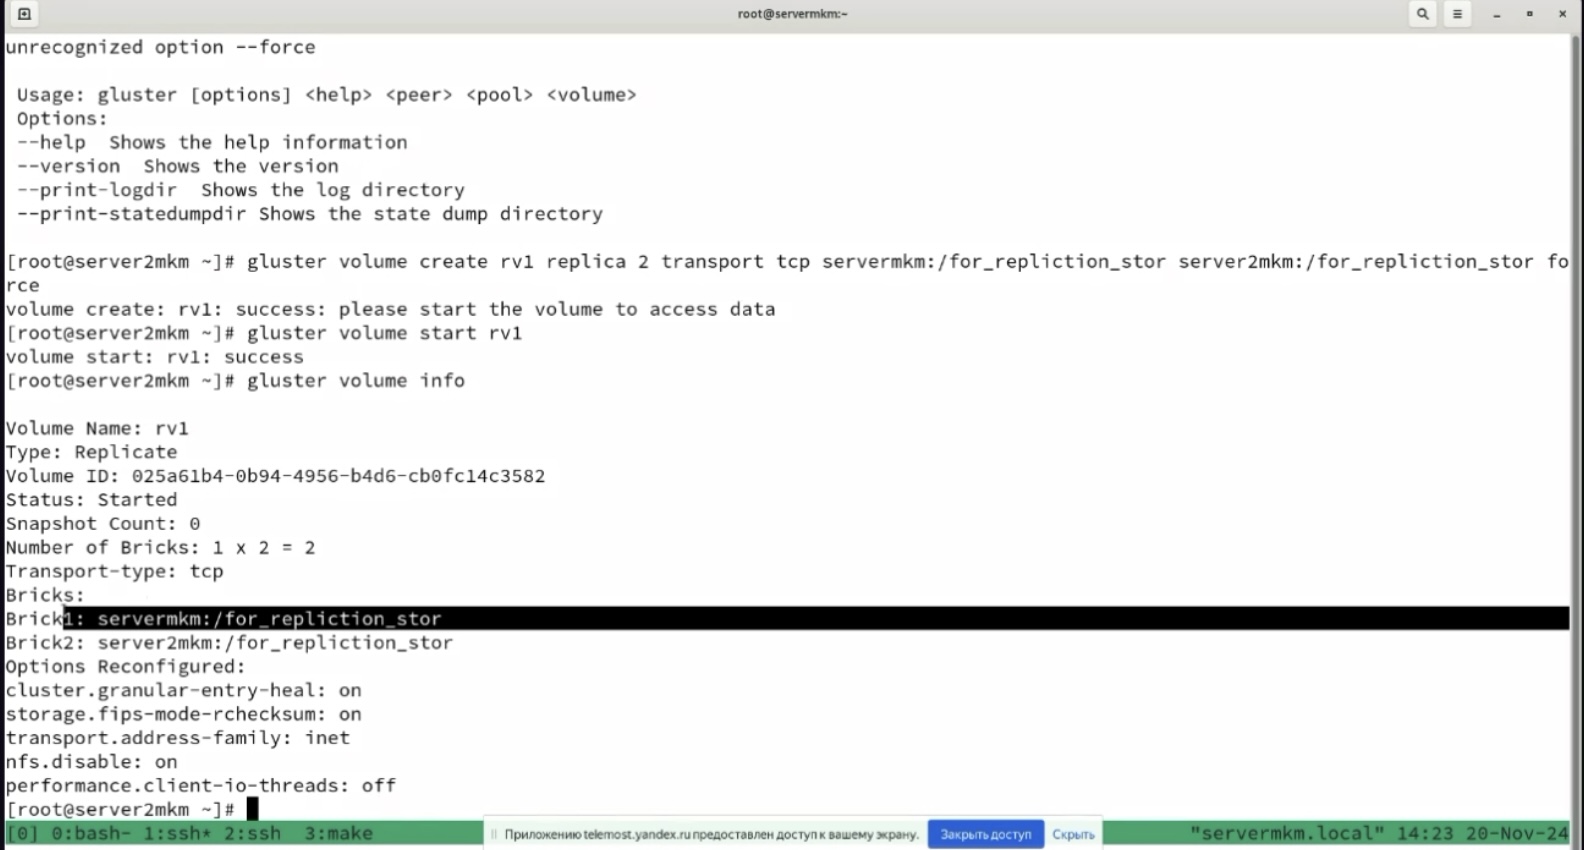
# REPLICA VOLUME (MIRROR, RAID 1)
mount -t glusterfs servermkm:/rv1 /rvstore/
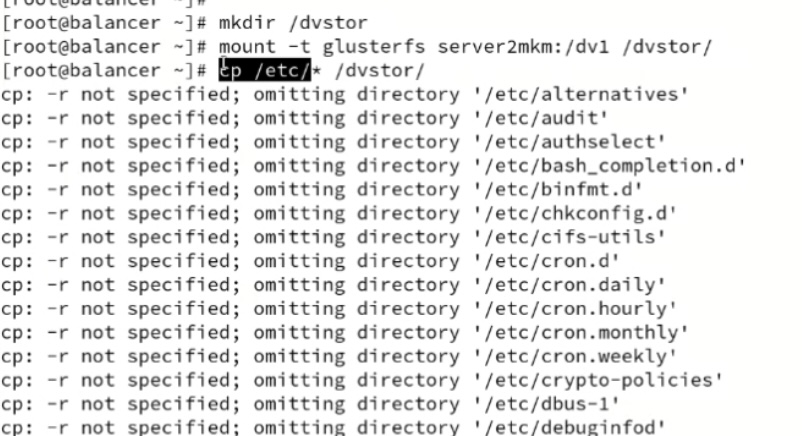
# DISTRIBUTION VOLUME (STRIPE, RAID 0)
mount -t glusterfs servermkm:/dfv1 /dvstore/
Пример DISTRIBUTION VOLUME (STRIPE, RAID 0)


-
- client ->
- (cluster) external proxy ->
- 2 x web apache (независимые) ->
- (cluster) glusterFS share/replica ->
- (cluster) internal proxy ->
- 2 x bd (master-master)
- крайне желателен кворум для всех кластеров – mysql/mariadb, haproxy и реплик glusterfs (по 3 сервера в кластере, а не два), для защиты от split brain через кворум/арбитра в виде третьей машины, иначе нужно шаманить с конфигами для обхода дефолтного ограничения на необходимость кворума (см. примеры ниже)
- haproxy для балансировки к нескольким незавимым web серверам wordpress; кластер haproxy active-passive реализуется за счет использования одинаковых конфигов (можно просто копипастить, а можно забирать с шары-smb/glusterfs или из git) между тремя (кворум) и использования специальных демонов, которые реализуют переключение: pacemaker (его юзали в курсе LPIC, проще настраивается и нет мультикаста) или keepalived (на базе vrrp, требует работающий мультикаст, желательно настройка отдельного vlan/аутентификации). IP активной ноды присваивается на пассивную в случае недоступности активной ноды. При этом pacemaker может в качестве разделяемой сущности использовать не только IP адрес, но и другие объекты (препод LINUX: блочные, демоны). И pacemaker и keepalived используется во взрослых промышленных эксплуатациях. Pacemaker без тюнинга позволяет сконвергироваться с секунды – пример потери одного ping при переключении (pcs rouserse move jниже👍
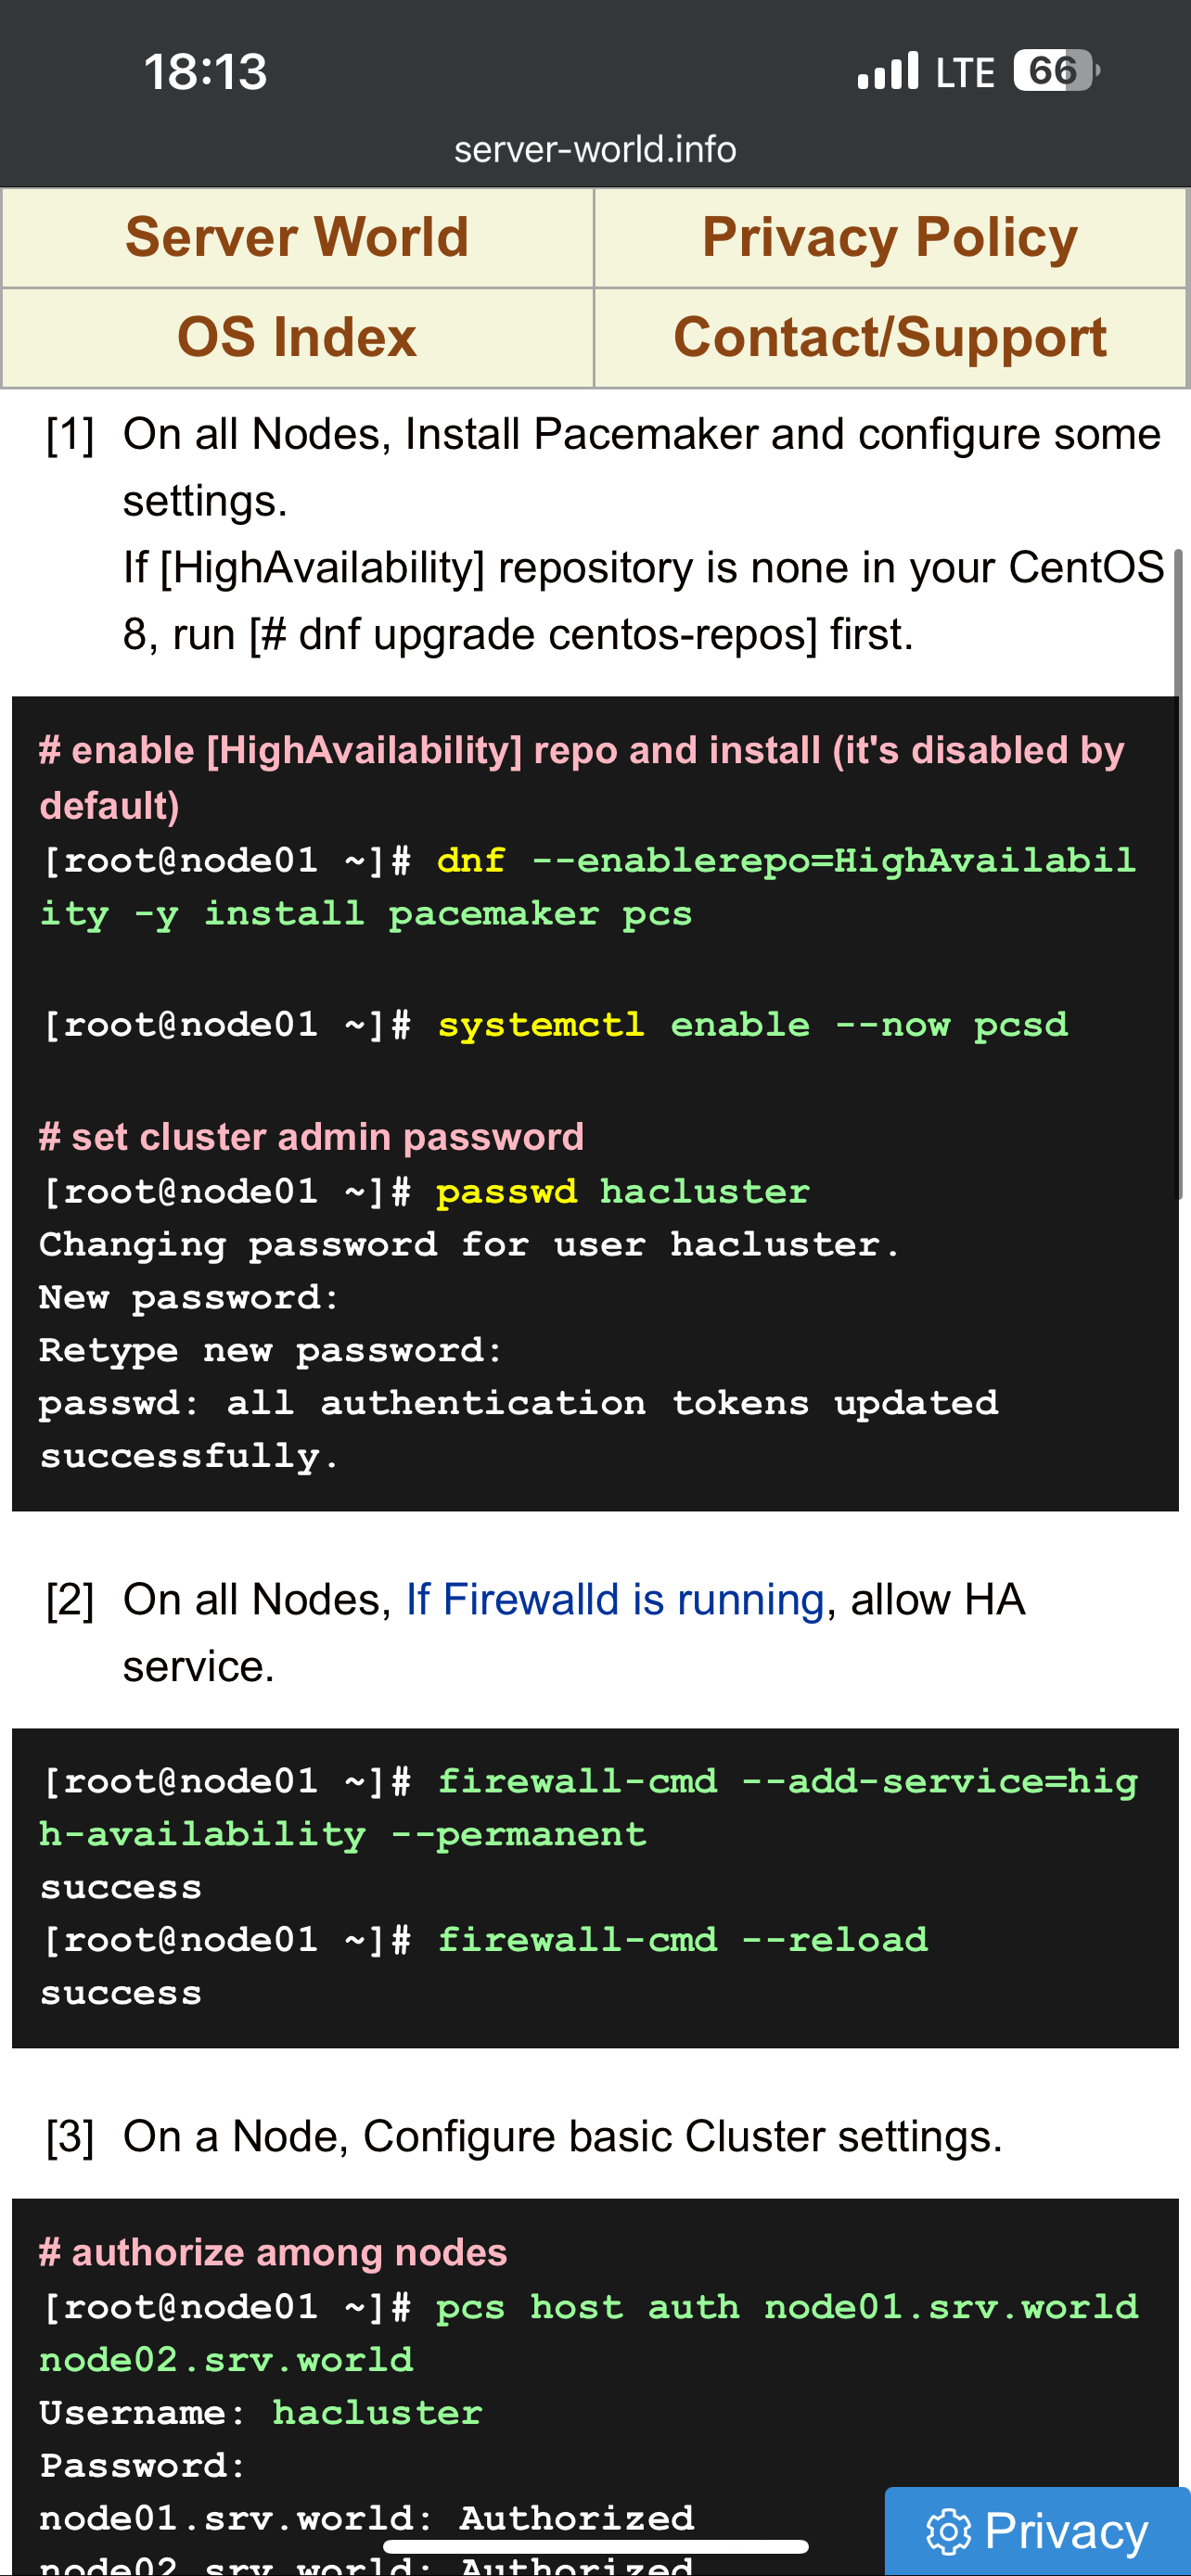
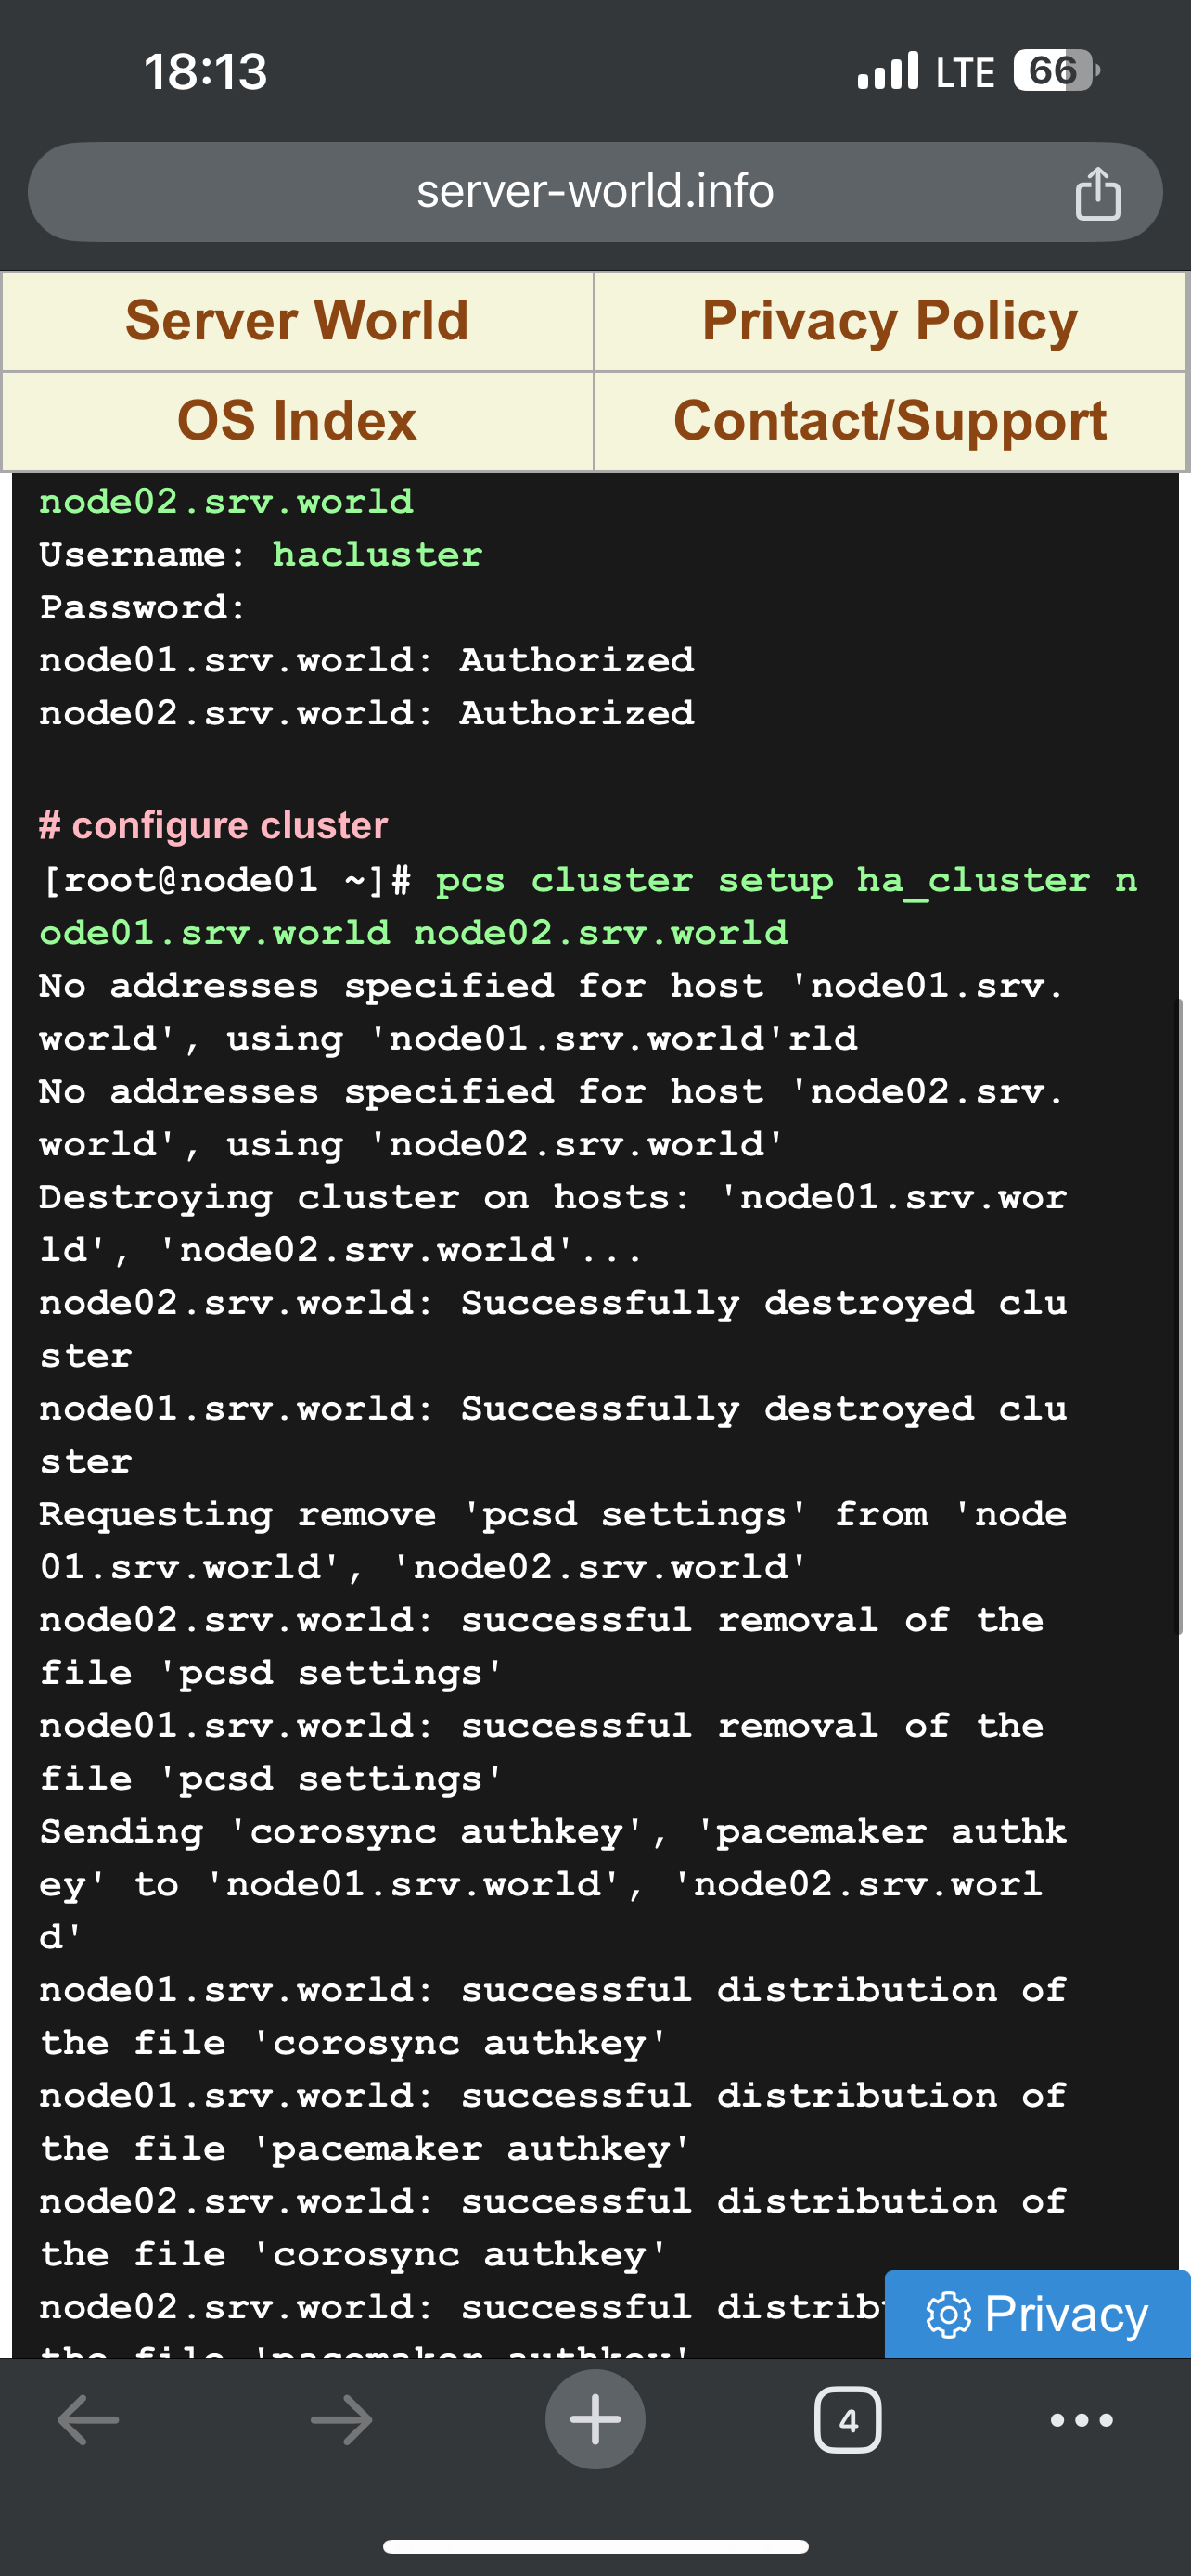
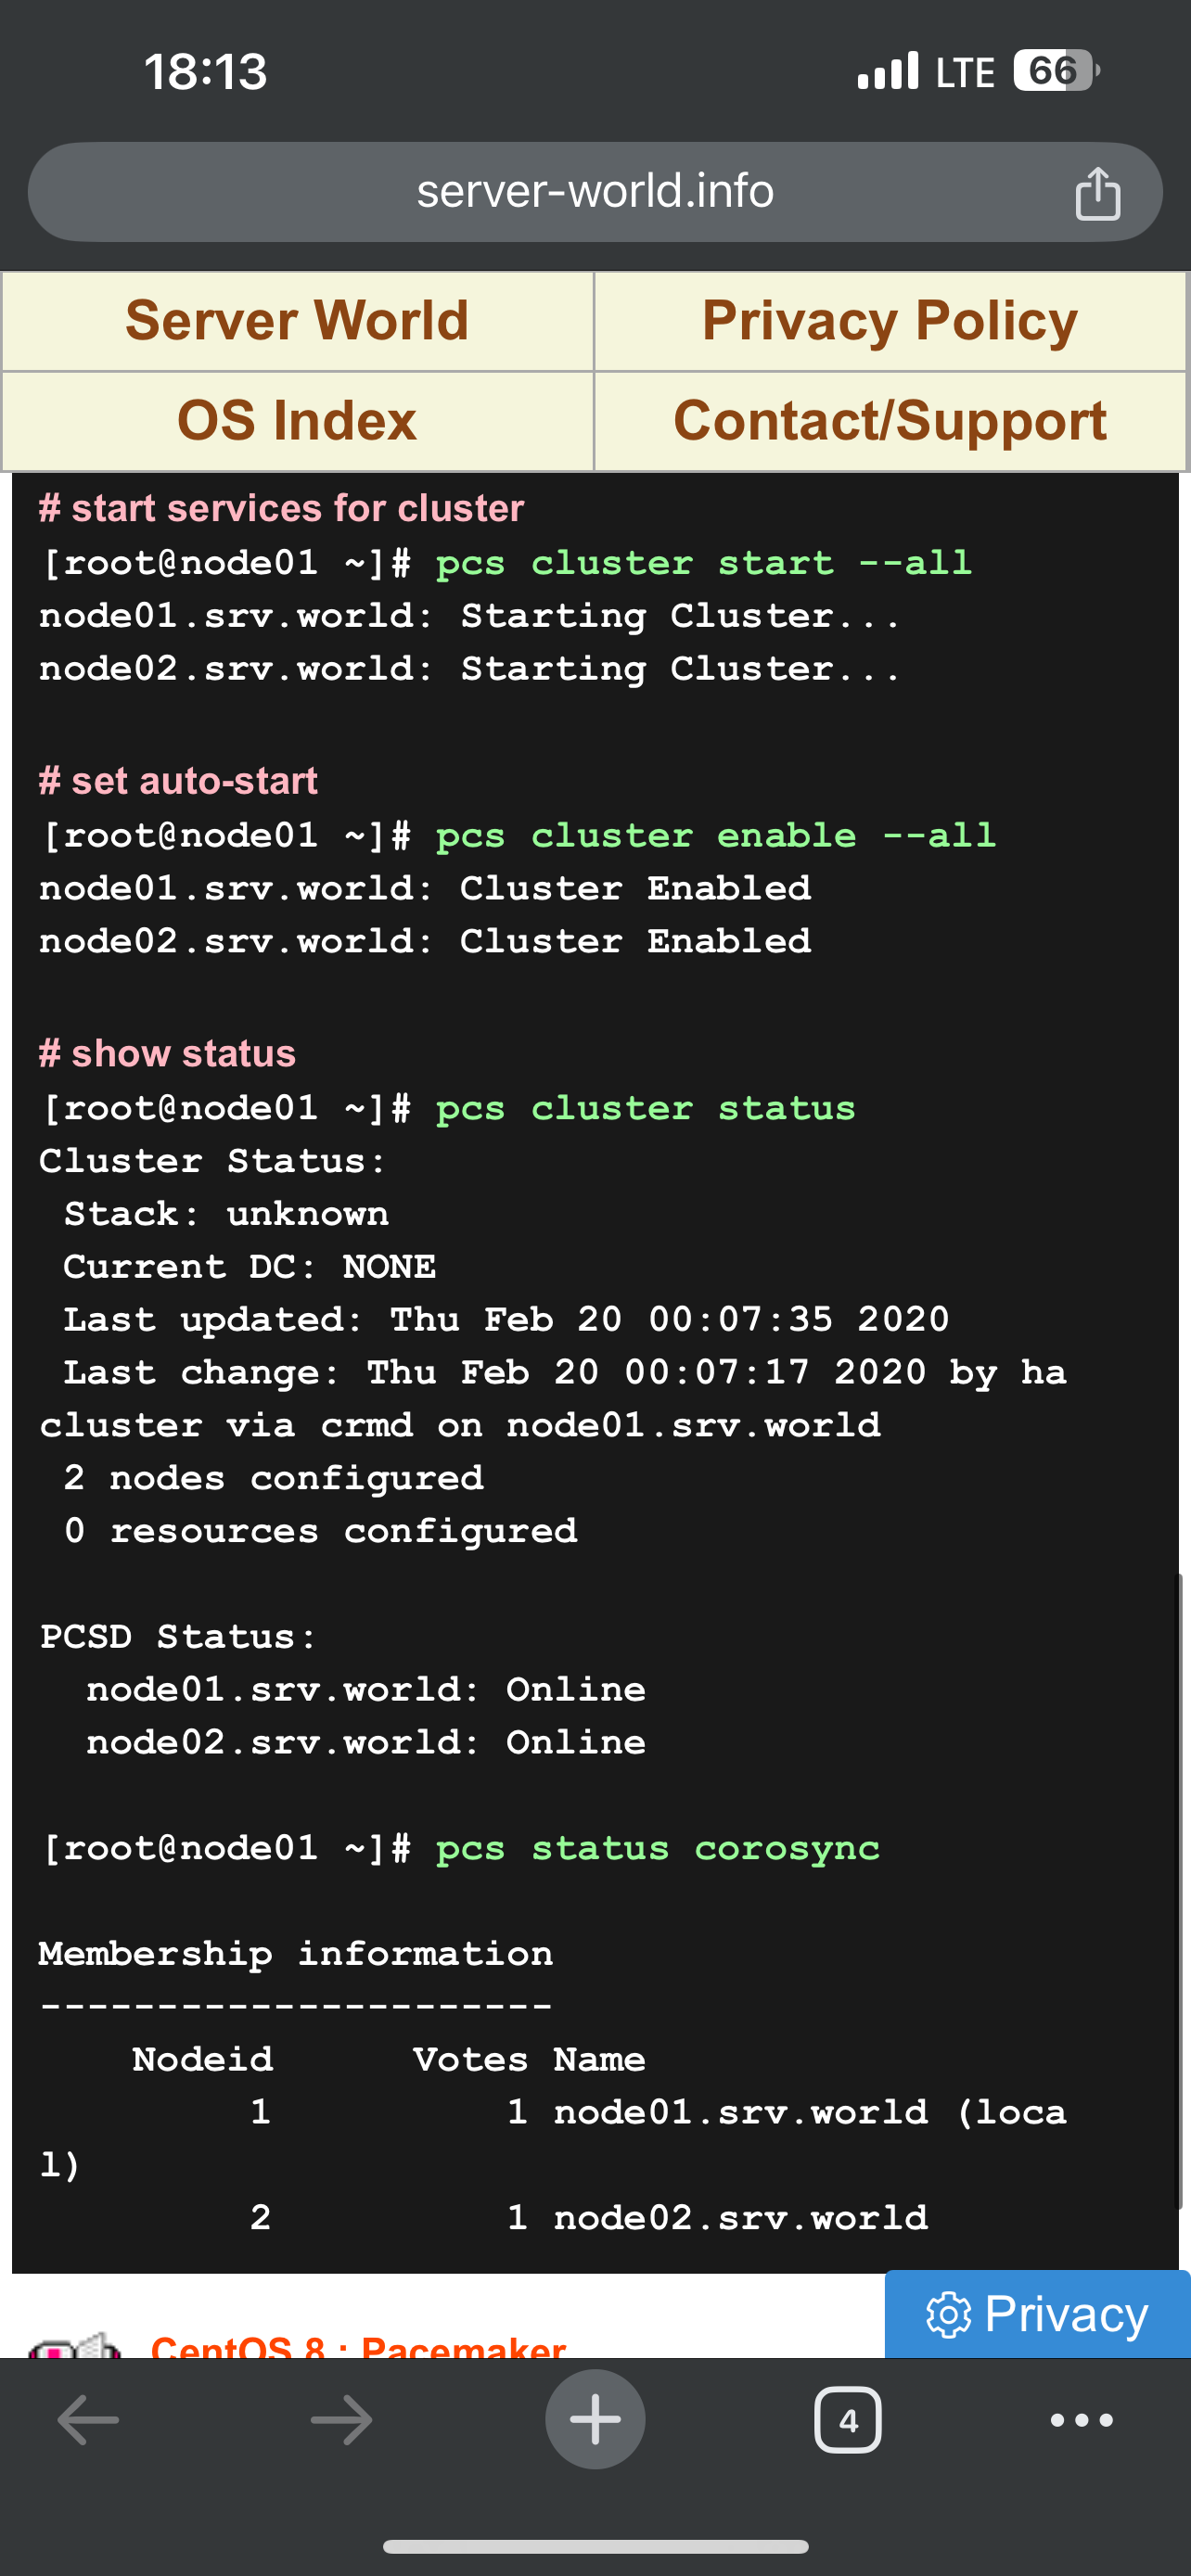
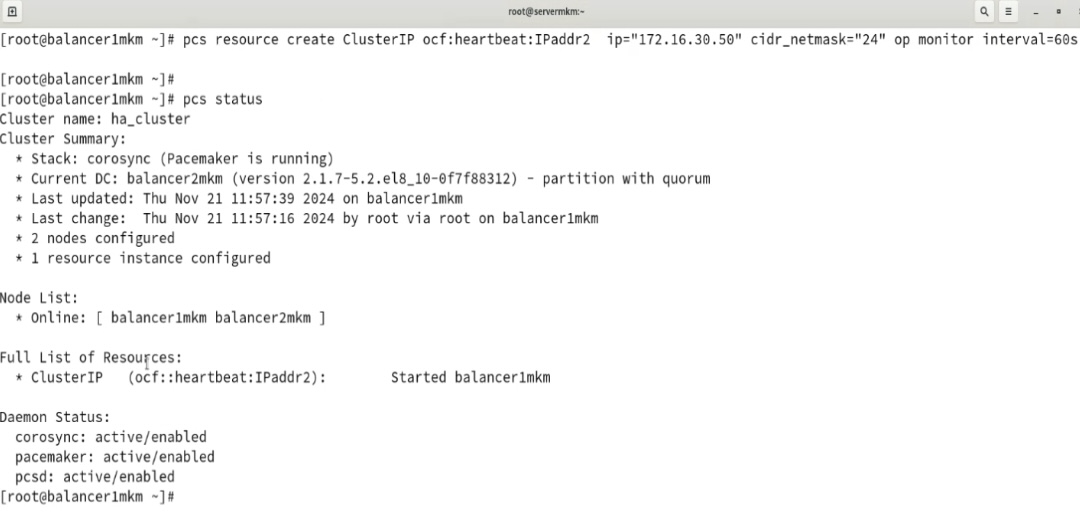
- Для pacemaker с двумя серверами нужно в конфиге pcs отключать проверку на кворум (pcs property set no-quorum-policy=ignore) и prevention по роли (когда две ноды могут постоянно друг у друга отнимать роль после восстановления связности pcs property set stonith-enable=fale). С точки зрения настройки (ниже скрины, базовая инструкция тут https://www.server-world.info/en/note?os=CentOS_8&p=pacemaker&f=1) сложного ничего нет – ставится/включается демон, меняется пароль на служебного юзара hacluster, делается связность через pcs команду между нодами через служебного пользователя, настраивается конфиг, организовывается кластер: pcs resource create ClusterIPocf:heartbeat:IPaddr2 ip=”172.16.30.50″ cidr_netmask=”24″ op monitor interval=60s
- glusterfs для общей шары/единого хранилища между web серверами – одно хранилище для файлов wordpress по /var/www/html, при этом glusterfs можно собрать в stripe (raid 0), а не только mirror (raid 1)
- mysql/mariadb с master-master репликацией, репликация через бинарный лог для запросов web серверов (через прокси т.к. самые стандартные cms не поддерживают failover sql)




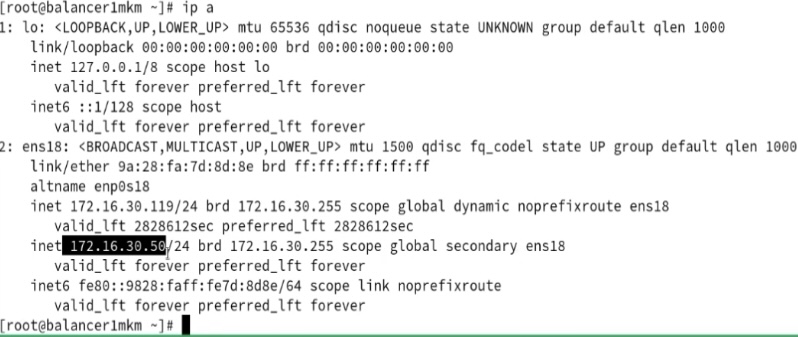
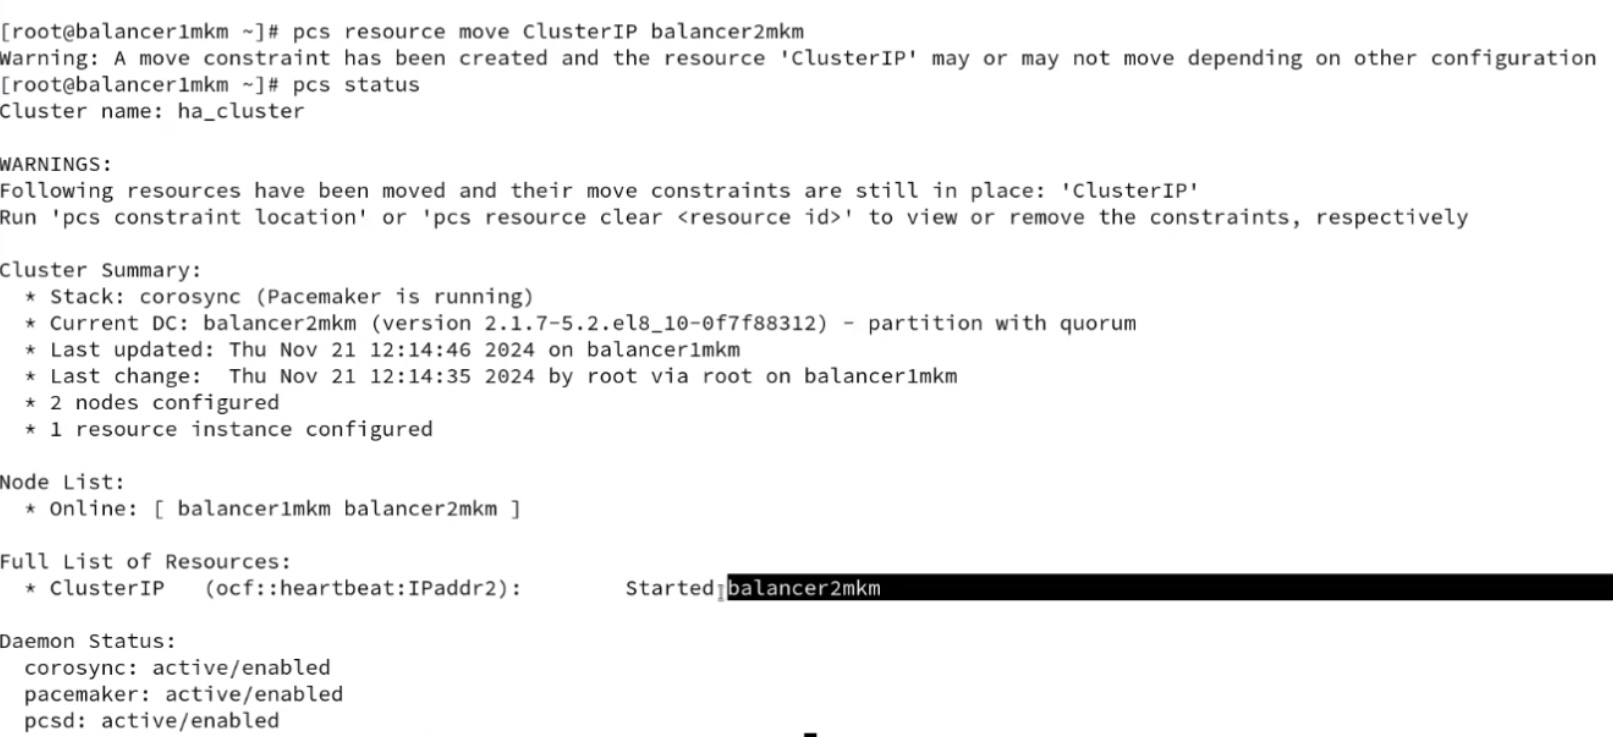
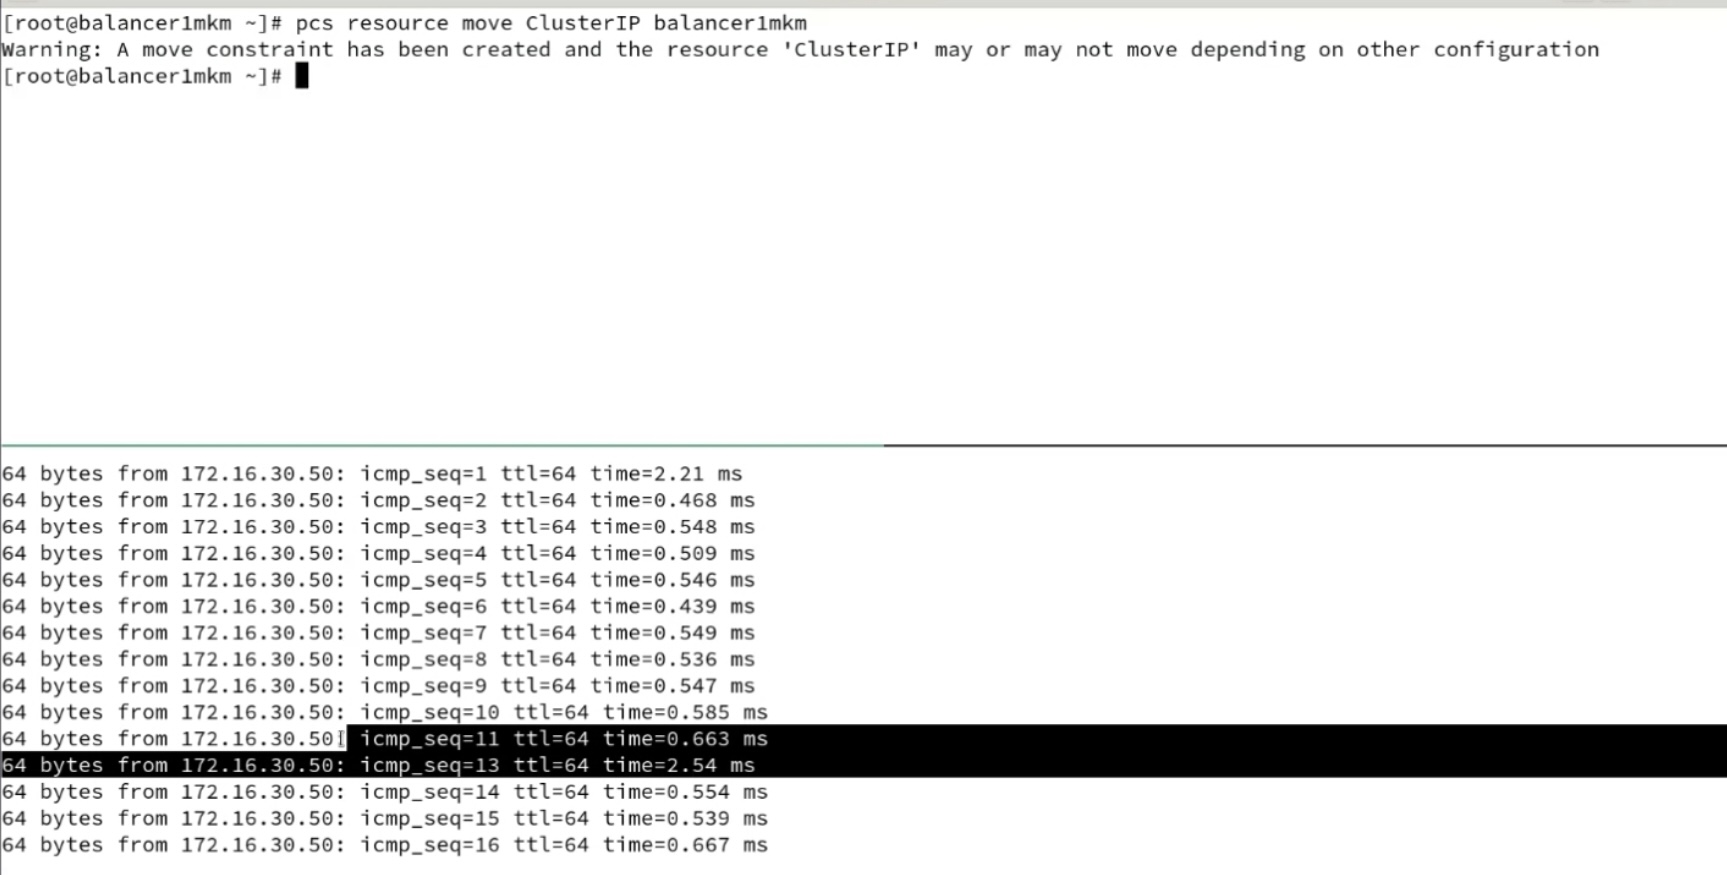
тюнинг параметров файловой системы
tune2fs allows the system administrator to adjust various tunable file system parameters ((metadata, options)) on Linux ext2, ext3, or ext4 file systems. The tune2fs command is used to change metadata and options for ext2, ext3, and ext4 filesystems. The tune2fs command can adjust various parameters such as the maximum mount count, the check interval, the reserved blocks percentage, the volume label, and the UUID. The tune2fs command can also enable or disable some filesystem features, such as the journal, the dir_index, the acl, and the user_xattr. The tune2fs command requires the device name or the UUID of the filesystem as an argument, and one or more options to specify the changes to be made. For example, to change the volume label of an ext3 filesystem on /dev/sda1 to “data”, use the following command:tune2fs -L data /dev/sda1Из статьи про FACL.
# tune2fs -l /dev/sda1
tune2fs 1.44.5 (15-Dec-2018)
Filesystem volume name: <none>
Last mounted on: /
Filesystem UUID: 48711f5b-89da-4c2c-b4f8-49c5d92945cb
Filesystem magic number: 0xEF53
Filesystem revision #: 1 (dynamic)
Filesystem features: has_journal ext_attr resize_inode dir_index filetype needs_recovery extent 64bit flex_bg sparse_super large_file huge_file dir_nlink extra_isize metadata_csum
Filesystem flags: signed_directory_hash
Default mount options: user_xattr acl
Filesystem state: clean
Errors behavior: Continue
Filesystem OS type: Linux
Inode count: 60989440
Block count: 243940096
Reserved block count: 12197004
Free blocks: 236242783
Free inodes: 60813007
First block: 0
Block size: 4096
Fragment size: 4096
Group descriptor size: 64
Reserved GDT blocks: 1024
Blocks per group: 32768
Fragments per group: 32768
Inodes per group: 8192
Inode blocks per group: 512
Flex block group size: 16
Filesystem created: Wed Mar 17 15:13:45 2021
Last mount time: Wed Dec 27 20:00:13 2023
Last write time: Wed Dec 27 20:00:11 2023
Mount count: 64
Maximum mount count: -1
Last checked: Wed Mar 17 15:13:45 2021
Check interval: 0 (<none>)
Lifetime writes: 416 GB
Reserved blocks uid: 0 (user root)
Reserved blocks gid: 0 (group root)
First inode: 11
Inode size: 256
Required extra isize: 32
Desired extra isize: 32
Journal inode: 8
Default directory hash: half_md4
Directory Hash Seed: 3c32a2d8-b166-4a58-b8b3-49cd6136c939
Journal backup: inode blocks
Checksum type: crc32c
Checksum: 0xd51c8574
File links – hard and soft links
Линкы позволяют ссылаться (pointer) на один файл в нескольких местах, но данные файла (не служебные линка) занимают место только в исходном месте. Ссылка на файл может быть непосредственнно на место хранения файла/inode (hard link) или на путь к имени файла/filename (soft link) в file system table. Недостатком hard link в сравнении с soft link, из-за самого принципа их работы, является возможность указания link только на файл (не на директорию), работа только внутри одной файловой системы. При этом они более надежны – в случае удаления/переименования файла у которого есть ссылки в виде soft link, soft линки перестают работать т.к. фактический файл удаляется при удалении/переименовании его единственного hard link (изначального указателя). При удалении/переименовании файла у которого есть ссылки в виде hard link, линки продолжают работать т.к. фактический файл не удаляется до тех пор, пока на него указывает хотя бы один hard link, даже если удален/переименован узначальный hard link. Очень часто линки используются:- для работы/переключения runlevel в systemd
- для обратной совместимости – отказались от /bin/ директории в пользу ссылки на /usr/bin/ , если бы ссылку не сделали, то пришлось бы продолжать пользоваться двумя директориями/или кучу кода пришлось бы переделывать например с /bin/bash на /usr/bin/bash .
# ls -l /bin
lrwxrwxrwx 1 root root 7 May 24 2021 /bin -> usr/bin
- для создания soft link для длинных путей к usb или dvd, к сетевым ресурсам, к каким то другим длинным путям
- в разделяемых библиотеках – например их много в /lib/ директориях, это позволяет в коде ссылаться только на одно место, которое в свою очередь ссылается на самый актуальный/стабильный код, без необходимости периеписывать код.
# ls -l /lib/x86_64-linux-gnu/
-rw-r--r-- 1 root root 19048 May 1 2019 libanl-2.28.so
-rw-r--r-- 1 root root 22108 May 1 2019 libanl.a
lrwxrwxrwx 1 root root 33 May 1 2019 libanl.so -> /lib/x86_64-linux-gnu/libanl.so.1
lrwxrwxrwx 1 root root 14 May 1 2019 libanl.so.1 -> libanl-2.28.so
lrwxrwxrwx 1 root root 20 Mar 30 2019 libapparmor.so.1 -> libapparmor.so.1.6.0
-rw-r--r-- 1 root root 80576 Mar 30 2019 libapparmor.so.1.6.0
lrwxrwxrwx 1 root root 20 Apr 19 2021 libapt-inst.so.2.0 -> libapt-inst.so.2.0.0
-rw-r--r-- 1 root root 59472 Apr 19 2021 libapt-inst.so.2.0.0
lrwxrwxrwx 1 root root 19 Apr 19 2021 libapt-pkg.so.5.0 -> libapt-pkg.so.5.0.2
-rw-r--r-- 1 root root 1920312 Apr 19 2021 libapt-pkg.so.5.0.2
# ls -l /usr/lib
lrwxrwxrwx 1 root root 18 Mar 22 2006 libevent.so.1 -> libevent-1.1a.so.1
lrwxrwxrwx 1 root root 16 Mar 19 2006 libpcap.so.0.7 -> libpcap.so.0.7.2
-rw-r--r-- 1 root root 125416 Mar 19 2006 libpcap.so.0.7.2
- Hard link – link, которые указывает на идентификатор записи в таблице методанных, не на название – файл с новым MFT/inode, который указывает на file record number другого MFT/inode (или на inode запись в Linux, в ls -l можно увидеть сколько hardlink имеет файл в столбце после прав).
Softlinks are used to point to filenames, while hardlinks point to inodes.
     mklink /H file_hlink file.txt #Windows
     ln file.txt file_hlink # Linux

# hard link видны по счетчику количества inode (по сути hard link) на один файл при выводе ls -l
# ln sw sw-hlink
# ls -l sw*
-rw-r--r-- 2 root root 2 Jul 6 08:18 sw
-rw-r--r-- 2 root root 2 Jul 6 08:18 sw-hlink
# rm sw-hlink
# ls -l sw*
-rw-r--r-- 1 root root 2 Jul 6 08:18 sw

# EXAMPLE WITH INODE ID
bash-3.2$ ln 123123 123123_hardlink
bash-3.2$ ls -li
4173801 -rw-r--r-- 2 petrredkin staff 0 Sep 1 22:56 123123
4173801 -rw-r--r-- 2 petrredkin staff 0 Sep 1 22:56 123123_hardlink

Hard links are everywhere. Every single file is a hard link! Think of it as this: a file really consists of two logically separate parts. The actual data (e.g. the contents of an MP3 file, the actual music) and a directory entry in the master file table (MFT) pointing to the data. MP3 music has no file name. That sounds silly, but it is the simple truth. In order to be able to have a name for a file of MP3 music a separate entity is needed, which is not related to the music in any way. That “entity” is your hard link.
Looking at it that way, hard links are easy to understand. Data is stored in clusters on your hard disks. The master file table stores links to the data and puts names on the links. That gives us file names. But are we limited to one MFT entry per data set (file)? No!
- Symbolic/soft/sym link (soft link) – link, который указывает на название файла или директоиии (при смене названия/удалении линк поломается) – файл с новым MFT/inode, который указывает имя другого MFT/inode.
Softlinks are used to point to filenames, while hardlinks point to inodes.
     mklink file_slink file.txt #Windows
     ln -s file.txt file_slink # Linux

# Создание нового линка (ссылки) к файлу или директории
ln -s /home/redkin_p/bin/i_help /home/redkin_p/i_help
ln -s /home/redkin_p/bin/i_updater /home/redkin_p/i_updater

# Софтлинки видны по первой букве l и непосредственного указания на путь (hard link) файла/директории
# ln -s sw sw-slink
# ls -l sw*
-rw-r--r-- 1 root root 2 Jul 6 08:18 sw
lrwxrwxrwx 1 root root 2 Jul 6 08:22 sw-slink -> sw

# EXAMPLE WITH INODE ID
bash-3.2$ ln -s 123123 123123_softlink
bash-3.2$ ls -li
4173801 -rw-r--r-- 2 petrredkin staff 0 Sep 1 22:56 123123
4173801 -rw-r--r-- 2 petrredkin staff 0 Sep 1 22:56 123123_hardlink
4173825 lrwxr-xr-x 1 petrredkin staff 6 Sep 1 22:57 123123_softlink -> 123123
While hard links and junctions have been present since Windows 2000, symbolic links were only recently added with Vista and Server 2008. They are similar in nature to junctions, but can also point to files and even to remote systems on the network, provided that the target machine runs Vista or later, too. As with junctions, changing a link’s target results in a stale link. There is no mechanism built in that notifies the source about target changes.
Проверка/восстановление/бекапы данных check/recovery/backup
- Про SMART в статье RAID
- Можно несколько дисков примонтировать к одной директории с файловыми системами типо mhddfs
- Disk rotate возможен с использованием label (см. Ниже поиском по e2label)
- Причин и симптомов сбоя носителя/ФС много
- сбои от полного отсутствия диска при загрузке в bios/в списке устройств ОС до безобидного bad sector, который не затронул ни один файл системы
- симптомы от проблемы с монтированием, до долгой загрузки/фризам системы
- (Disk, RAID) От компании datarc по восстановлению данных полезные советы
❗️А вот пользователям напоминание:⠀
Никакой RAID, и даже зеркало, не защищает от программных сбоев, вирусов, диверсий и ошибок пользователей (удалили, отформатировали и т.д.)

В очередной раз вспоминаю, что
➢RAID даже с избыточностью 50% – это еще не бэкап. Его бы не мешало резервировать
➢Избыточность деградированных массивов лучше вовремя восстанавливать штатным ребилдом на новый диск, не пренебрегая неприятными возможностями, какими бы маловероятными они ни казались.
Data corruption / Dirty file system – повреждение данных или файловая система, которая не монтируется в следствии каких либо проблем. Может быть результатом вытащенного без unmount носителя (напр. USB), внезапного отключения электричества, проблемы с системой, одновременной записи несколькими системами на диск, баги в софте и проч. Современные файловые системы (напр. NTFS) имеют механизмы минимизации вероятности ущерба, восстановления поврежденных данных, например
-
- NTFS journaling – логгирует изменения с методанными в NTFS log, создавая историю операций и позволяя понимать, в каком состоянии должна быть система, это используется при восстановлении. Подробнее о функционале в ext journaling.
- NTFS self-healing – автоматическое восстановление после минорных проблем
C:\WINDOWS\system32>fsutil repair query C:
Состояние самовосстановления C:: 0x9

Значения: 0x1 — включение общего восстановления.
0x9 — включение общего восстановления и предупреждений
о возможной потере данных.
0x10 — отключение восстановления и выполнение однократной
проверки ошибок при первом повреждении.
-
- Даже в новом и свежеотформатированном разделе на Linux можно найти директорию lost+found, в ней находятся файлы, на которых не было ссылок ни в одном каталоге, хотя их inode не были помечены как свободные. Так же в эту папку попадают файлы, если произошли какие-то проблемы с файловой системой и fsck удалось восстановить какие-то данные.
- NTFS chkdsk или Linux fsck или Linux e2fsck или Linux xfs_repair (чаще всего не получится запускать на mounted partition и хоть иногда может сработать, не рекомендуется) – утилиты по проверки разделов / восстановлению при серьезных проблемах (bad sector, disk failure, etc). Могут запускаться автоматически, когда система обнаружит повреждение (система установит бит повреждения на volume, при старте системы система прочитает бит и запустит восстановление с помощью NTFS log) или всегда при загрузке (fsck на некоторых дистрибутивах Linux). В актуальных linux OS (Debian 10) fsck запускается при загрузке системы для системных разделов не только по негативному событию (ошибки), управлять включением/отключением проверки можно через файл /etc/fstab; поэтому одним из методов решения проблемы с ФС может быть перезагрузка (в расчете на запуск проверки и автоматического восстановления). Технически fsck это wrapper, он за собой скрывает конкретную утилиту, которая справедлива для конкретной ФС (например, e2fsck для ext, xfs_repair для xfs). Но по факту fsck может не определить ФС или не иметь интеграцию с необходимой утилитой и ее нужно запускать напрямую. В целом fsck нужен на современных файловых системах с журналированием реже, чем раньше – т.к. для восстановления файлов зачастую достаточен только сброс журнала (подробнее в journaling).
# LINUX
fsck -A  # проверка всех файловых систем
fsck -a  # проверка и исправление всех файловых систем (устаревшая опция, не рекомендуется использовать)
fsck /dev/sda1  # указываем конкретный раздел
fsck -t ext4 /dev/sda1  # можно указать файловую систему, если fsck ее сам определить не может

# fsck /dev/sda1
fsck from util-linux 2.33.1
e2fsck 1.44.5 (15-Dec-2018)
/dev/sda1 is mounted.
e2fsck: Cannot continue, aborting.

# sudo fsck / dev/nvme0n2p1
fsck from util-linux 2.32.1
If you wish to check the consistency of an XFS filesystem or repair a damaged filesystem, see xfs_repair (8).

# sudo xfs_repair /dev/nvme0n2p1
Phase 1 - find and verify superblock...
Phase 2 - using internal log
- zero log...
scan filesystem freespace and inode maps...
found root inode chunk
Phase 3
- for each AG...
scan and clear agi unlinked lists...
process known inodes and perform inode discovery...
- agno = 0
agno = 1
agno = 2
agno = 3
- process newly discovered inodes...
Phase 4 -
check for duplicate blocks... setting up duplicate extent list... check for inodes claiming duplicate blocks...
agno = 0
agno = 1
agno = 2
agno = 3
Phase 5 - rebuild AG headers and trees...
- reset superblock...
Phase 6 - check inode connectivity..
- resetting contents of realtime bitmap and
- traversing filesystem ...
- traversal finished
- moving disconnected inodes to lost+found
Phase 7 - verify and correct link counts...
done
# WINDOWS
C:\WINDOWS\system32>chkdsk
Тип файловой системы: NTFS.
ПРЕДУПРЕЖДЕНИЕ! Параметр F не указан.
CHKDSK выполняется в режиме только чтения.

Этап 1. Проверка базовой структуры файловой системы...
Обработано записей файлов: 534528.
Проверка файлов завершена.
Обработано больших файловых записей: 7967.
Обработано поврежденных файловых записей: 0.

Этап 2. Проверка связей имен файлов...
Обработано записей повторного анализа: 15456.
Обработано записей индекса: 629326.
Проверка индексов завершена.
Проверено неиндексированных файлов: 0.
Восстановлено неиндексированных файлов в утерянное и найденное: 0.
Обработано записей повторного анализа: 15456.

Этап 3. Проверка дескрипторов безопасности...
Проверка дескрипторов безопасности завершена.
Обработано файлов данных: 47400.
CHKDSK проверяет журнал USN...
Обработано байт USN: 35414728.
Завершена проверка журнала USN

Windows проверила файловую систему и не обнаружила проблем.
Дальнейшие действия не требуются.
117218303 КБ всего на диске.
81843428 КБ в 236952 файлах.
93804 КБ в 47401 индексах.
0 КБ в поврежденных секторах.
658323 КБ используется системой.
65536 КБ занято под файл журнала.
34622748 КБ свободно на диске.
4096 байт в каждой единице распределения.
Всего единиц распределения на диске: 29304575.
Доступно единиц распределения на диске: 8655687.
Чистый диск -> РАБОЧАЯ ФС
BRIEF REVIEW
Для использования чистого жесткого диска Free Disk (raw capacity, LUN – подробнее в статье про RAID) нужно:
- View data structure & create backup – посмотреть текущие разделы, чтобы ничего ненароком не поломать дальше. Так же настоятельно рекомендуется сделать backup данных в с носителей, которые будут затронуты. Утилиты: lsblk, dmesg -w, lsusb, fdisk, df
- Partition – разбить его на разделы используя разную разметку (MBR/GPT). Утилиты: parted, fdisk, gdisk
- Format – накатить файловую систему на раздел/ы – отформатировать раздел под необходимую файловую систему, на одном диске может быть несколько разделов, на каждом разделе может быть своя ОС; осторожно форматирование удаляет файлы (строго говоря пересоздает file table, но файлы могут не затрагиваться). По результату форматирования создается volume (FileSystem on partition). Утилиты: mkfs* , mke2fs
- Mount – примонтировать файловую систему (вручную и в fstab для автоматического монтирования при старте системы, в Windows процесс происходит автоматически. Утилиты: mount, fstab (edit через vi).
Remember to always backup your data before modifying partitions on a live system.

Before you can start using a hard drive to store files, you'll need to partition the disk, format a filesystem, then mount the filesystem.

Instead of using a storage block as a whole, it's common practice to divide a storage block into different partitions. Partitions can be different sizes, and formatted to different filesystems. This allows you to use a single storage device for different purposes.

To automatically mount filesystems on startup, you have to add a device entry to the /etc/fstab file.
1. View data structure & BACKUP
lsblk
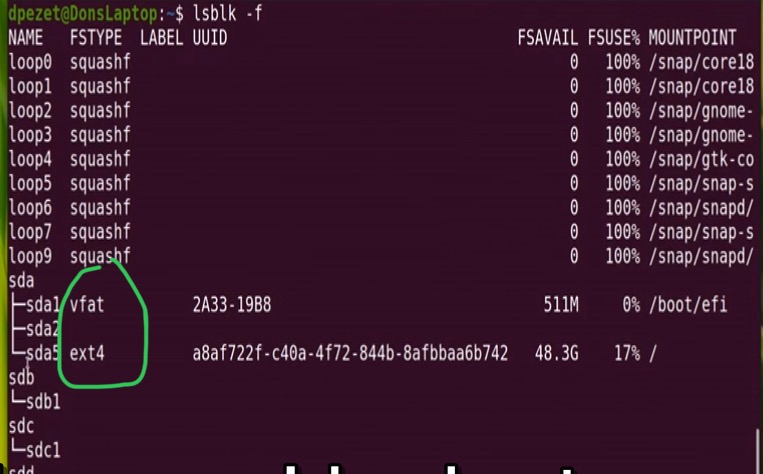
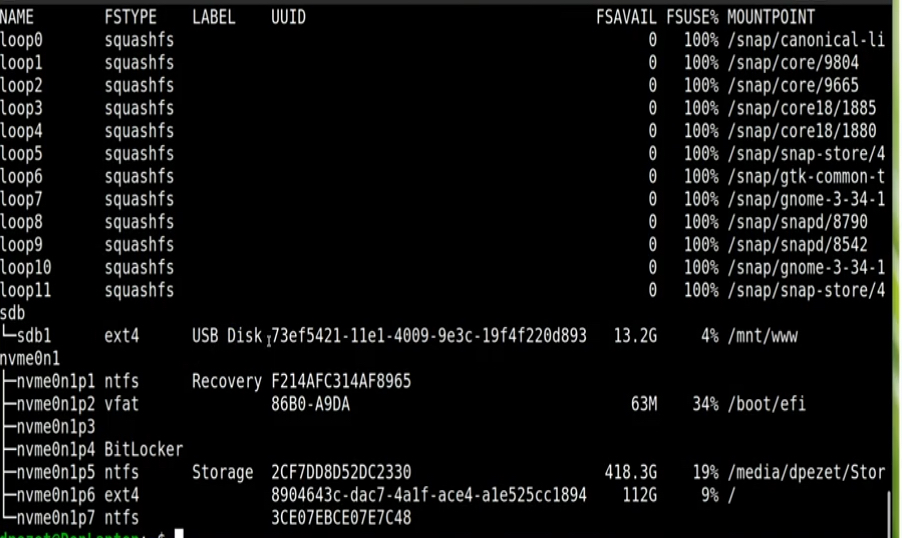
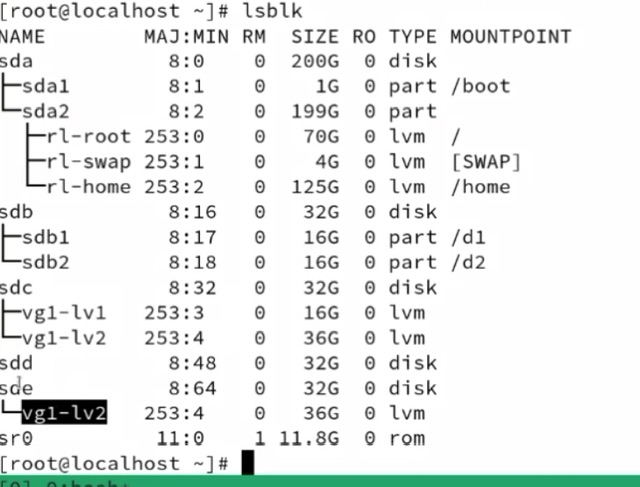
(df, lsblk) По умолчанию, в отличии от lsblk, df показывает только смонтированные разделы/диски (поэтому в lsblk они могут быть, а в df нет; они появятся при использовании df флага -a).Посмотреть текущие диски (disk), их разделы (part), размер и точку монтирования в древовидном виде (диски над разделами) можно в lsblk. С опцией lsblk -f можно так же показать файловую систему для разделов, uuid и label. Для поиска removable media типо USB так же полезно использовать dmesg -w (вставляешь флешку и видишь какое имя ей причвоилось) и lsusb.
This command gathers information about all devices attached to the system, and prints them out using a tree-like structure. The column MOUNTPOINT shows where a block device is mounted. It's from this location that files on the disk can be accessed. In this case, the first disk (sda) is mounted at the root of the Linux file system tree. This means that the files you're seeing on your system right now are from this disk.
# CENTOS
$ lsblk
NAME MAJ:MIN RM SIZE RO TYPE MOUNTPOINT
fd0 2:0 1 4K 0 disk
sda 8:0 0 200G 0 disk
├─sda1 8:1 0 1G 0 part /boot
└─sda2 8:2 0 199G 0 part
├─centos-root 253:0 0 20G 0 lvm /
├─centos-swap 253:1 0 7,9G 0 lvm [SWAP]
└─centos-home 253:2 0 171,1G 0 lvm /home
sr0 11:0 1 1024M 0 rom

~$ lsblk
NAME MAJ:MIN RM SIZE RO TYPE MOUNTPOINT
vda 253:0 0 60G 0 disk
├─vda1 253:1 0 256M 0 part /boot
└─vda2 253:2 0 59.8G 0 part /
# UBUNTU ~$ lsblk NAME MAJ:MIN RM SIZE RO TYPE MOUNTPOINT sda 8:0 0 40G 0 disk ├─sda1 8:1 0 243M 0 part /boot ├─sda2 8:2 0 1K 0 part └─sda5 8:5 0 39,8G 0 part ├─test–vg-root (dm-0) 252:0 0 37,8G 0 lvm / └─test–vg-swap_1 (dm-1) 252:1 0 2G 0 lvm [SWAP] sr0 11:0 1 1024M 0 rom
fdisk
Или через sudo fdisk -l (с fdist мы еще столкнемся ниже, когда будем создавать разделы)
fdisk displays information contained in the partition table, where information about partitions is stored.$ sudo fdisk -l Disk /dev/sdb: 10 GiB, 10737418240 bytes, 20971520 sectors Units: sectors of 1 * 512 = 512 bytes Sector size (logical/physical): 512 bytes / 4096 bytes I/O size (minimum/optimal): 4096 bytes / 4096 bytes Disklabel type: dos Disk identifier: 0x290377a6 Device Boot Start End Sectors Size Id Type /dev/sdb1 * 4096 20971519 20967424 10G 83 Linux Disk /dev/sda: 10 GiB, 10737418240 bytes, 20971520 sectors Units: sectors of 1 * 512 = 512 bytes Sector size (logical/physical): 512 bytes / 4096 bytes I/O size (minimum/optimal): 4096 bytes / 4096 bytes Disklabel type: dos Disk identifier: 0x290377a6 Device Boot Start End Sectors Size Id Type /dev/sda1 * 4096 20971519 20967424 10G 83 Linux
df
df (disk free) — утилита в UNIX и UNIX-подобных системах, показывает список всех файловых систем по именам устройств, сообщает их размер, занятое и свободное пространство и точки монтирования. Последняя колонка (Смонтировано в) показывает за какие директории отвечает данный образ.
(df, lsblk) По умолчанию, в отличии от lsblk, df показывает только смонтированные разделы/диски (поэтому в lsblk они могут быть, а в df нет; они появятся при использовании df флага -a).
Ключ –h или —human–readable отобразит размер в человеко-читабельном формате.
$ df -h
Файл.система   Размер Использовано  Дост Использовано% Cмонтировано в
/dev/sda1        7,3G         6,0G  964M           87% /
none             4,0K            0  4,0K            0% /sys/fs/cgroup
udev             233M         4,0K  233M            1% /dev
tmpfs             49M         436K   49M            1% /run
none             5,0M            0  5,0M            0% /run/lock
none             245M            0  245M            0% /run/shm
none             100M            0  100M            0% /run/user
/dev/sdb1         83G         4,2G   75G            6% /usr/data
df -T – добавляем столбец с типом файловой системы. Напр. ext4 считается неплохой FS до сих пор ((поэтому и используется по умолчанию во многих дистрибутивах Linux)), но при большом количестве файлов можно использовать что-то другое.
$ df -T
Filesystem Type 1K-blocks Used Available Use% Mounted on
udev devtmpfs 8141220 0 8141220 0% /dev
tmpfs tmpfs 1632300 43888 1588412 3% /run
/dev/sda1 ext4 959395920 9435020 901156500 2% /
tmpfs tmpfs 8161484 0 8161484 0% /dev/shm
tmpfs tmpfs 5120 0 5120 0% /run/lock
tmpfs tmpfs 8161484 0 8161484 0% /sys/fs/cgroup
tmpfs tmpfs 1632296 0 1632296 0% /run/user/0
Посмотреть volume с файловой системой, количество свободного места в системе, точку монтировки можно через df -h
The df, or disk free, command is used to find the amount of free space on an entire machine, while the du, or disk usage, command is used to find the disk usage on a specific directory.~$ df -h Filesystem Size Used Avail Use% Mounted on udev 1.8G 0 1.8G 0% /dev tmpfs 371M 6.4M 365M 2% /run /dev/sdb1 9.8G 1.1G 8.3G 12% / tmpfs 1.9G 0 1.9G 0% /dev/shm tmpfs 5.0M 0 5.0M 0% /run/lock tmpfs 1.9G 0 1.9G 0% /sys/fs/cgroup
df -i – смотрим количество Inode (used, free, %) – индексных дескриптеров файлов (метаинформация)
$ df -i
Filesystem Inodes IUsed IFree IUse% Mounted on
/dev/sdb1 8483456 8483456 0 100% /home
Пример изменения количества inode при создании файла:
# df -i
Filesystem Inodes IUsed IFree IUse% Mounted on
udev 501474 334 501140 1% /dev
tmpfs 505191 475 504716 1% /run
/dev/sda1 5185536 114562 5070974 3% /
tmpfs 505191 4 505187 1% /dev/shm
tmpfs 505191 2 505189 1% /run/lock
tmpfs 505191 17 505174 1% /sys/fs/cgroup
tmpfs 505191 10 505181 1% /run/user/0
# cat >1
# df -i
Filesystem Inodes IUsed IFree IUse% Mounted on
udev 501474 334 501140 1% /dev
tmpfs 505191 475 504716 1% /run
/dev/sda1 5185536 114563 5070973 3% /
tmpfs 505191 4 505187 1% /dev/shm
tmpfs 505191 2 505189 1% /run/lock
tmpfs 505191 17 505174 1% /sys/fs/cgroup
tmpfs 505191 10 505181 1% /run/user/0
# cat >2
# df -i
Filesystem Inodes IUsed IFree IUse% Mounted on
udev 501474 334 501140 1% /dev
tmpfs 505191 475 504716 1% /run
/dev/sda1 5185536 114564 5070972 3% /
tmpfs 505191 4 505187 1% /dev/shm
tmpfs 505191 2 505189 1% /run/lock
tmpfs 505191 17 505174 1% /sys/fs/cgroup
tmpfs 505191 10 505181 1% /run/user/0
DU
du(disk usage) — стандартная Unix программа для оценки занимаемого файлового пространства. du -h / | sort -h – ищем объемные файлы/папки во всей системе и сортируем по возрастанию.sudo du -chd 1 / – вывести статистику по утилизации диска с погружением только в одну директорию, очень полезно для поиска крупных директорий/папок
-
- (journalctl, поиск больших файлов) Файлы journal занимали 3.7G! После безопасной чистки путем указания vacuum-time 25MB.
-bash-4.2$ sudo du -chd 1 /var/log
4.0K /var/log/anaconda
72K /var/log/tuned
4.0K /var/log/chrony
33M /var/log/audit
3.7G /var/log/journal

-bash-4.2$ sudo journalctl --vacuum-time=1week
du -sh /var/www/localhost/htdocs/w/ – узнать размер папок и вложений
~$ du -sh /var/www/cacti/
1,1G/var/www/cacti/

~$ du -sh /var/www/w/
94M /var/www/w/

~$ du -sh /var/www/localhost/
708K/var/www/localhost/
du -s * | sort –n – узнать размер каждой папки и файла относительно нашей (*) и отсортировать по размеру. Ключ –s позволяет показывать только общий размер папки, не показывая размер каждого файла внутри папки. du -s * | sort -n | cut -f 2|while read a;do du -hs $a;done >1 – отображение в удобной форме для человеческого глаза (H) с выводом в мегабитах/мегабайтах. du+diff – если сервак начинает заполняться по памяти и непонятно кто память заполняет можно проанализировать размер файлов черезdu во всех папках пару раз и потом diff’ом поискать какие папки изменились.
~$ diff 2_1 2_2
236,237c236,237
< 4186296 tftpd
< 4686866 tools
---
> 4186664 tftpd
> 4687674 tools
Сортировка по размеру:
du -h | sort -h
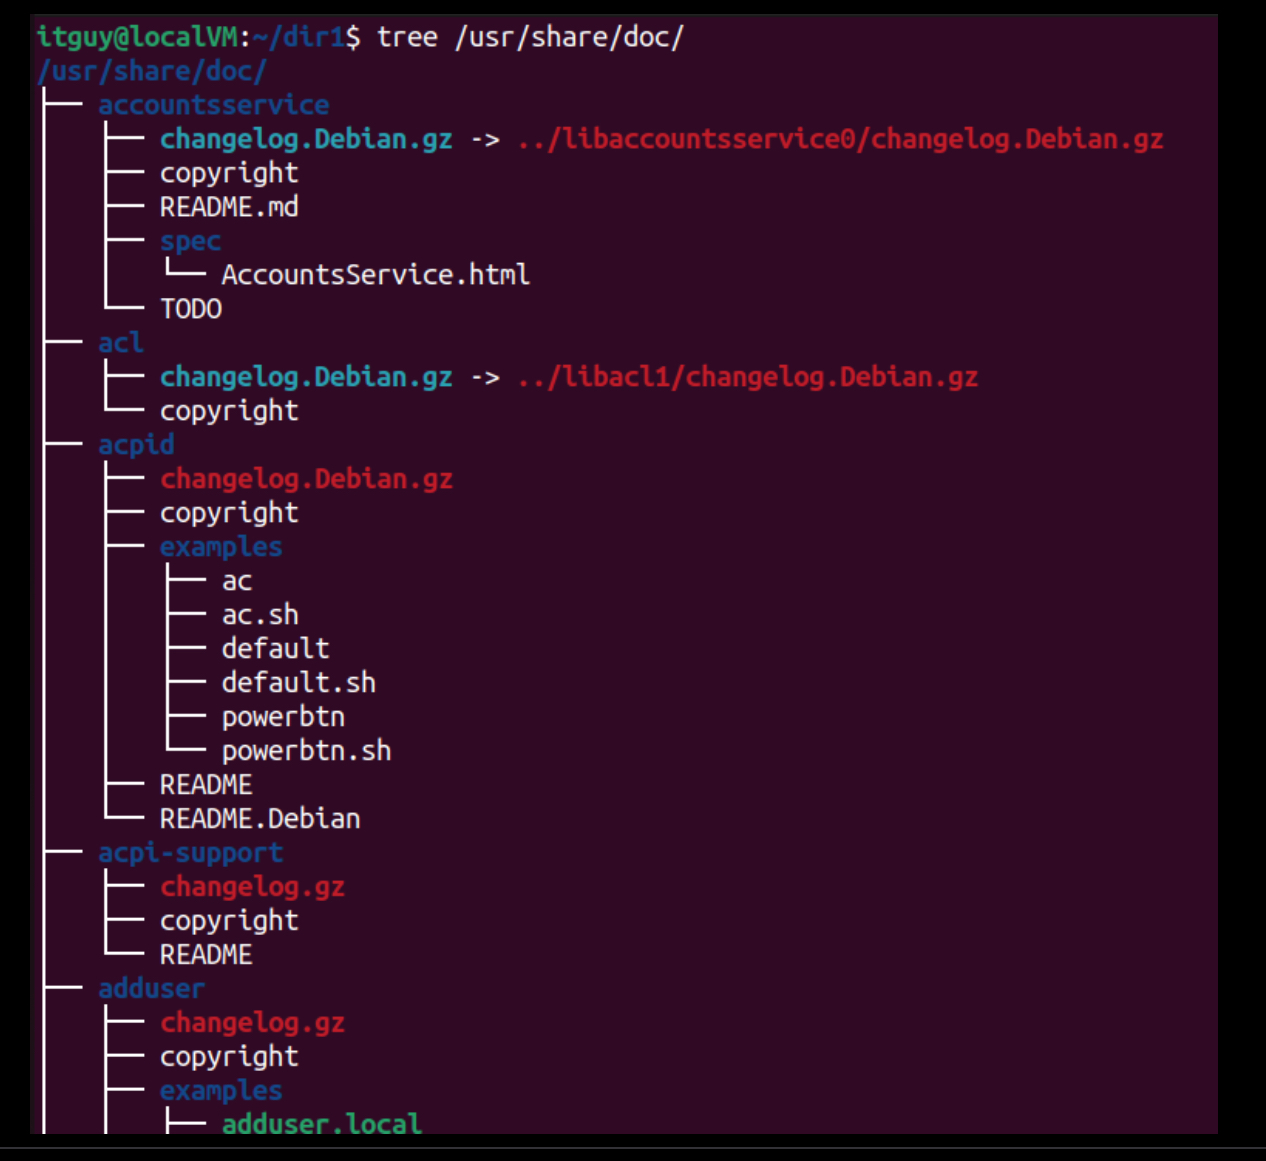
tree
tree – утилита для просмотра вложенных папок и файлов относительно текущей папки. По сути родственник du. С опциями -hs можно посмотреть размер файлов в понятном виде, с опцией -d можно посмотреть только директории.
IOTOP/IOSTAT/lSOF
- iotop – какие процессы в настоящее время создают нагрузку (чтение/запись) на диск, пример вывода при загрузке большого файла на диск, причем если загружать в /dev/null загрузки диска не будет 🙂
apt install iotopwget https://speedtest.selectel.ru/10GB iotop
TID PRIO USER DISK READ DISK WRITE SWAPIN IO> COMMAND
24043 be/4 root 0.00 B/s 0.00 B/s 0.00 % 95.10 % [kworker/u4:1+flush-8:0]
240 be/3 root 0.00 B/s 3.76 K/s 0.00 % 68.68 % [jbd2/sda1-8]
23297 be/4 root 0.00 B/s 0.00 B/s 0.00 % 0.02 % [kworker/1:1-events]
wget -O /dev/null https://speedtest.selectel.ru/10GB iostat – в расширенном выводе можно посмотреть как загружен диск в %util (до 100%) в общем для всей системы, расчет по принципу “как часто диск был занят когда он был нужен“. Внимание – в базовом выводе в первые строки зачем то добавили информацию о загрузке CPU и невнимательный может подумать, что это относится к дискам.
apt install sysstat
iostat -y 5 # с обновлением каждые 5 секунд
# iostat
Linux 4.19.0-16-amd64 (spr) 12/09/23 _x86_64_ (2 CPU)
avg-cpu: %user %nice %system %iowait %steal %idle
0.01 0.00 0.00 0.01 0.00 99.98
Device tps kB_read/s kB_wrtn/s kB_read kB_wrtn
fd0 0.00 0.00 0.00 8 0
sda 0.02 0.09 0.34 249987 902224
# iostat -x -d
Linux 4.19.0-16-amd64 (spr) 12/09/23 _x86_64_ (2 CPU)
Device r/s w/s rkB/s wkB/s rrqm/s wrqm/s %rrqm %wrqm r_await w_await aqu-sz rareq-sz wareq-sz svctm %util
fd0 0.00 0.00 0.00 0.00 0.00 0.00 0.00 0.00 65.00 0.00 0.00 4.00 0.00 66.00 0.00
sda 0.00 0.02 0.09 0.35 0.00 0.02 0.59 60.43 9.36 23.74 0.00 26.12 23.15 7.29 0.01
https://stackoverflow.com/questions/4458183/how-the-util-of-iostat-is-computed
Percentage of CPU time during which I/O requests were issued to the device (band-width utilization for the device). Device saturation occurs when this value is close to 100%.

[%util is] how much time did the storage device have outstanding work (was busy).
BACKUP
Теорию читаем тут. Используем утилиты по передаче данных scp/rsync совместно с утилитами по сжатию/архивированию или клонированию. Для клонирования дисков/данных могут быть использованы не только средства платформы виртуализации, но и софт (Clonezilla, Acronis TrueImage – часто используется админами, symantec ghost или даже утилиты системы (dd). Любое из средств создания image/backup может глючит (и регулярно так бывает, даже платный Acronis может три часа делать бекап и сделать в итоге нечитаемый образ), правильные бекапы всегда проверяют, а если не проверяют, то хотя бы делают двумя средствами создания бекапов.DD
- if – input file
- of – output file
sudo dd if=/dev/urandom of=/home/user/rand.txt bs=10M count=10
Затереть нулями весь диск:
sudo dd if=/dev/zero of=/dev/sdb bs=10M
Чтобы создать загрузочный USB-носитель с использованием Linux (альтернатива rufus, unetbootin, win32diskimager, etc):
sudo dd if=/tmp/some_OS.iso of=/dev/sdb
- The ‘if’ option specifies the input file, and the ‘of’ option specifies the output file.
- The ‘bs’ option specifies the block size, and the ‘count’ option specifies the number of blocks to copy.
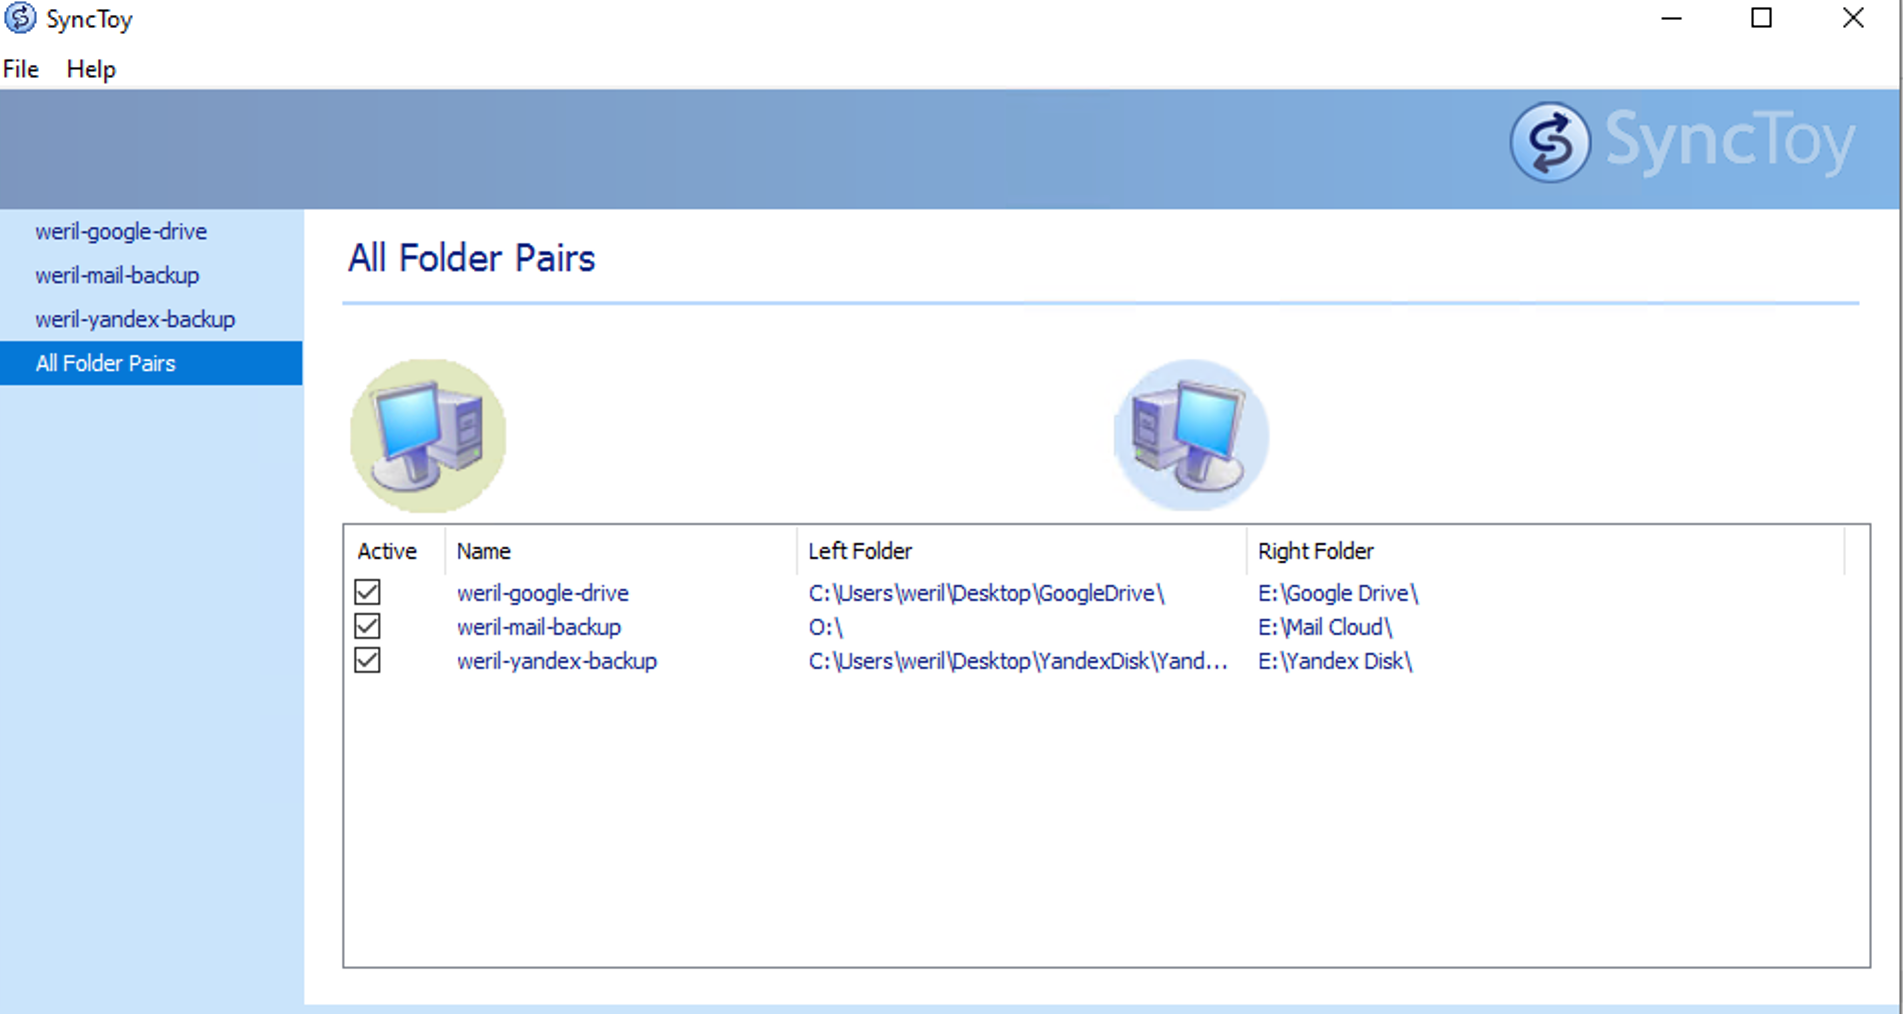
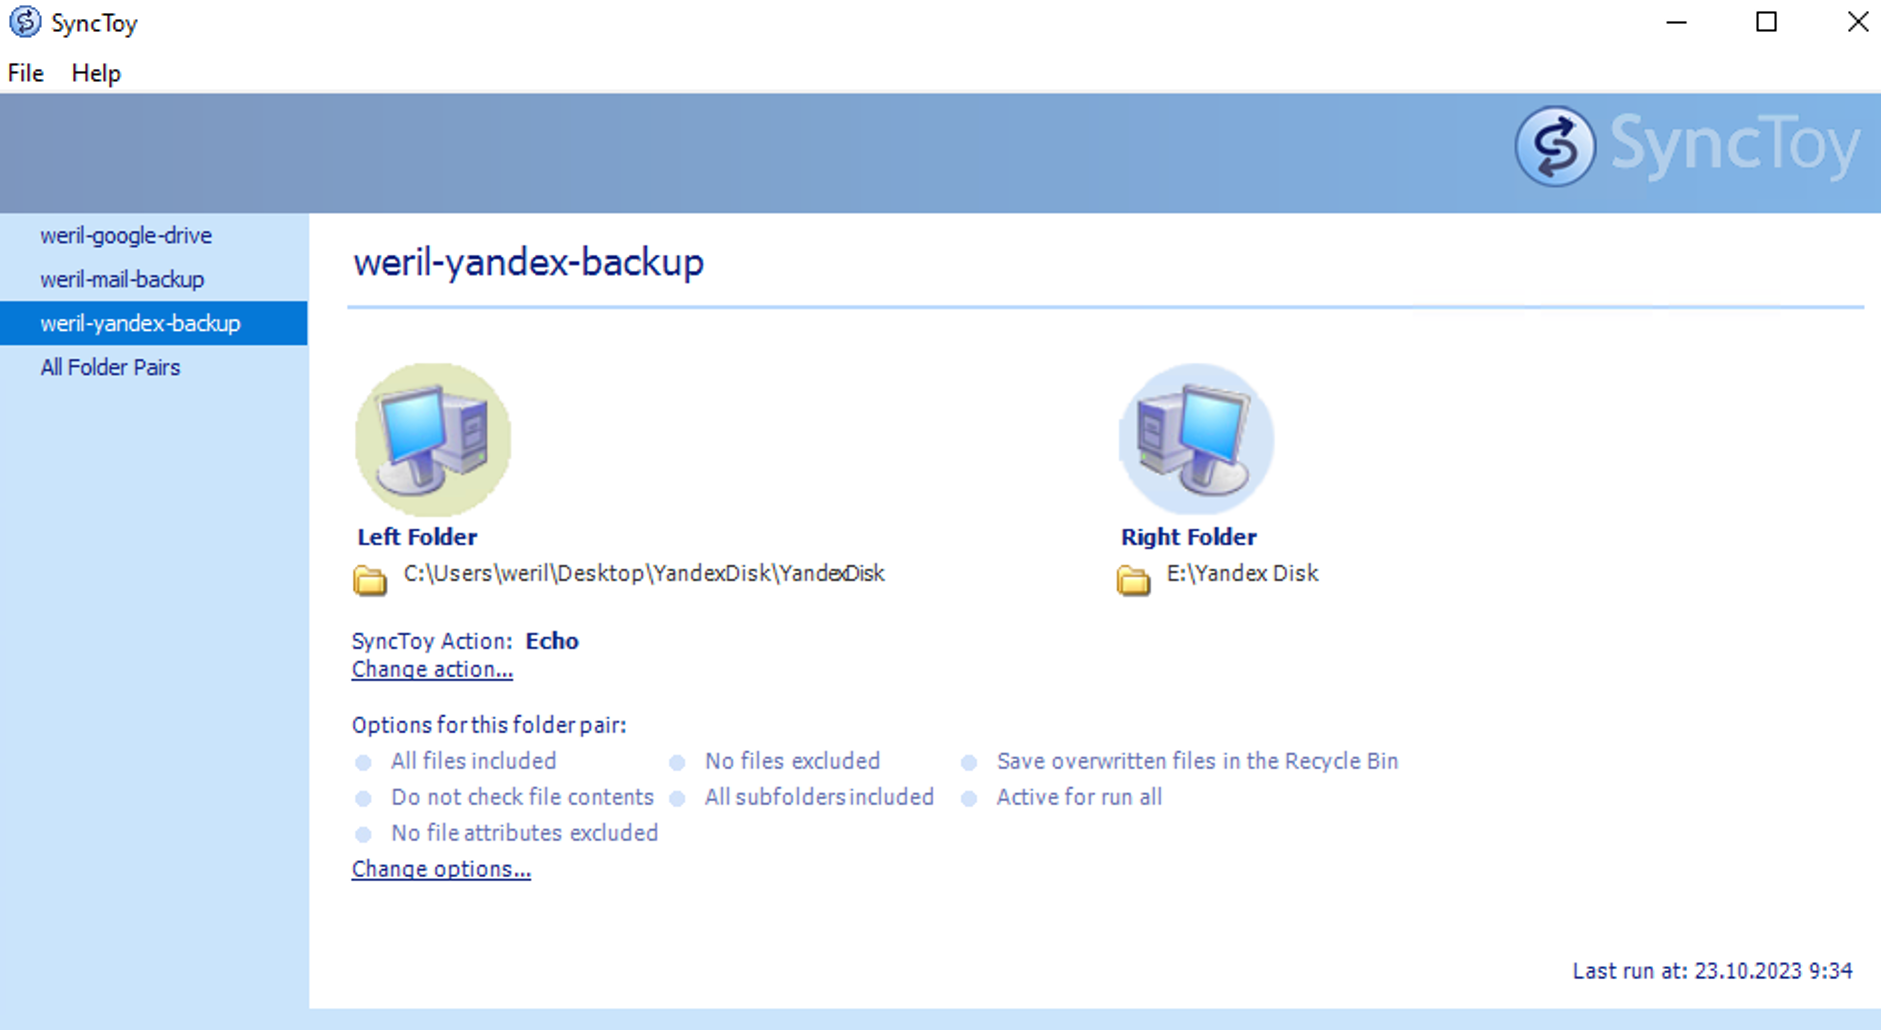
SYNCTOY
Бесплатная утилита от Microsoft для синхронизации файлов/директорий, поддерживает в том числе сетевые пути (UNC Paths). Microsoft прекратил поддержку утилиты, но на просторах интернета ее найти легко. Для работы требует установленного .NET framework version 2.0.50727, на практике проще всего поставить сразу .NET framework 3.5, который включает 2.0 и 3.0. У утилиты три режима синхронизации – двухсторонняя между source и target, односторонняя с подменой конфликтных файлов с предпочтением source (echo, я использую), односторонняя с сохранением всех конфликтов путем изменения имен файлов (инкремент).SyncToy
Users initially need to create a "folder pair" that represents the two folders ("left" and "right" folders) to be compared and synchronized. These folders can be on the local drive, on an external device such as a flash drive, or on a network share from another computer. SyncToy supports UNC paths. It provides a Browse option to find the folder or network share, or users can type it in directly.
UNC path
The Microsoft Windows UNC, short for Universal Naming Convention or Uniform Naming Convention, specifies a common syntax to describe the location of a network resource, such as a shared file, directory, or printer. The UNC syntax for Windows systems has the generic form:
\\ComputerName\SharedFolder\Resource
OSFmount
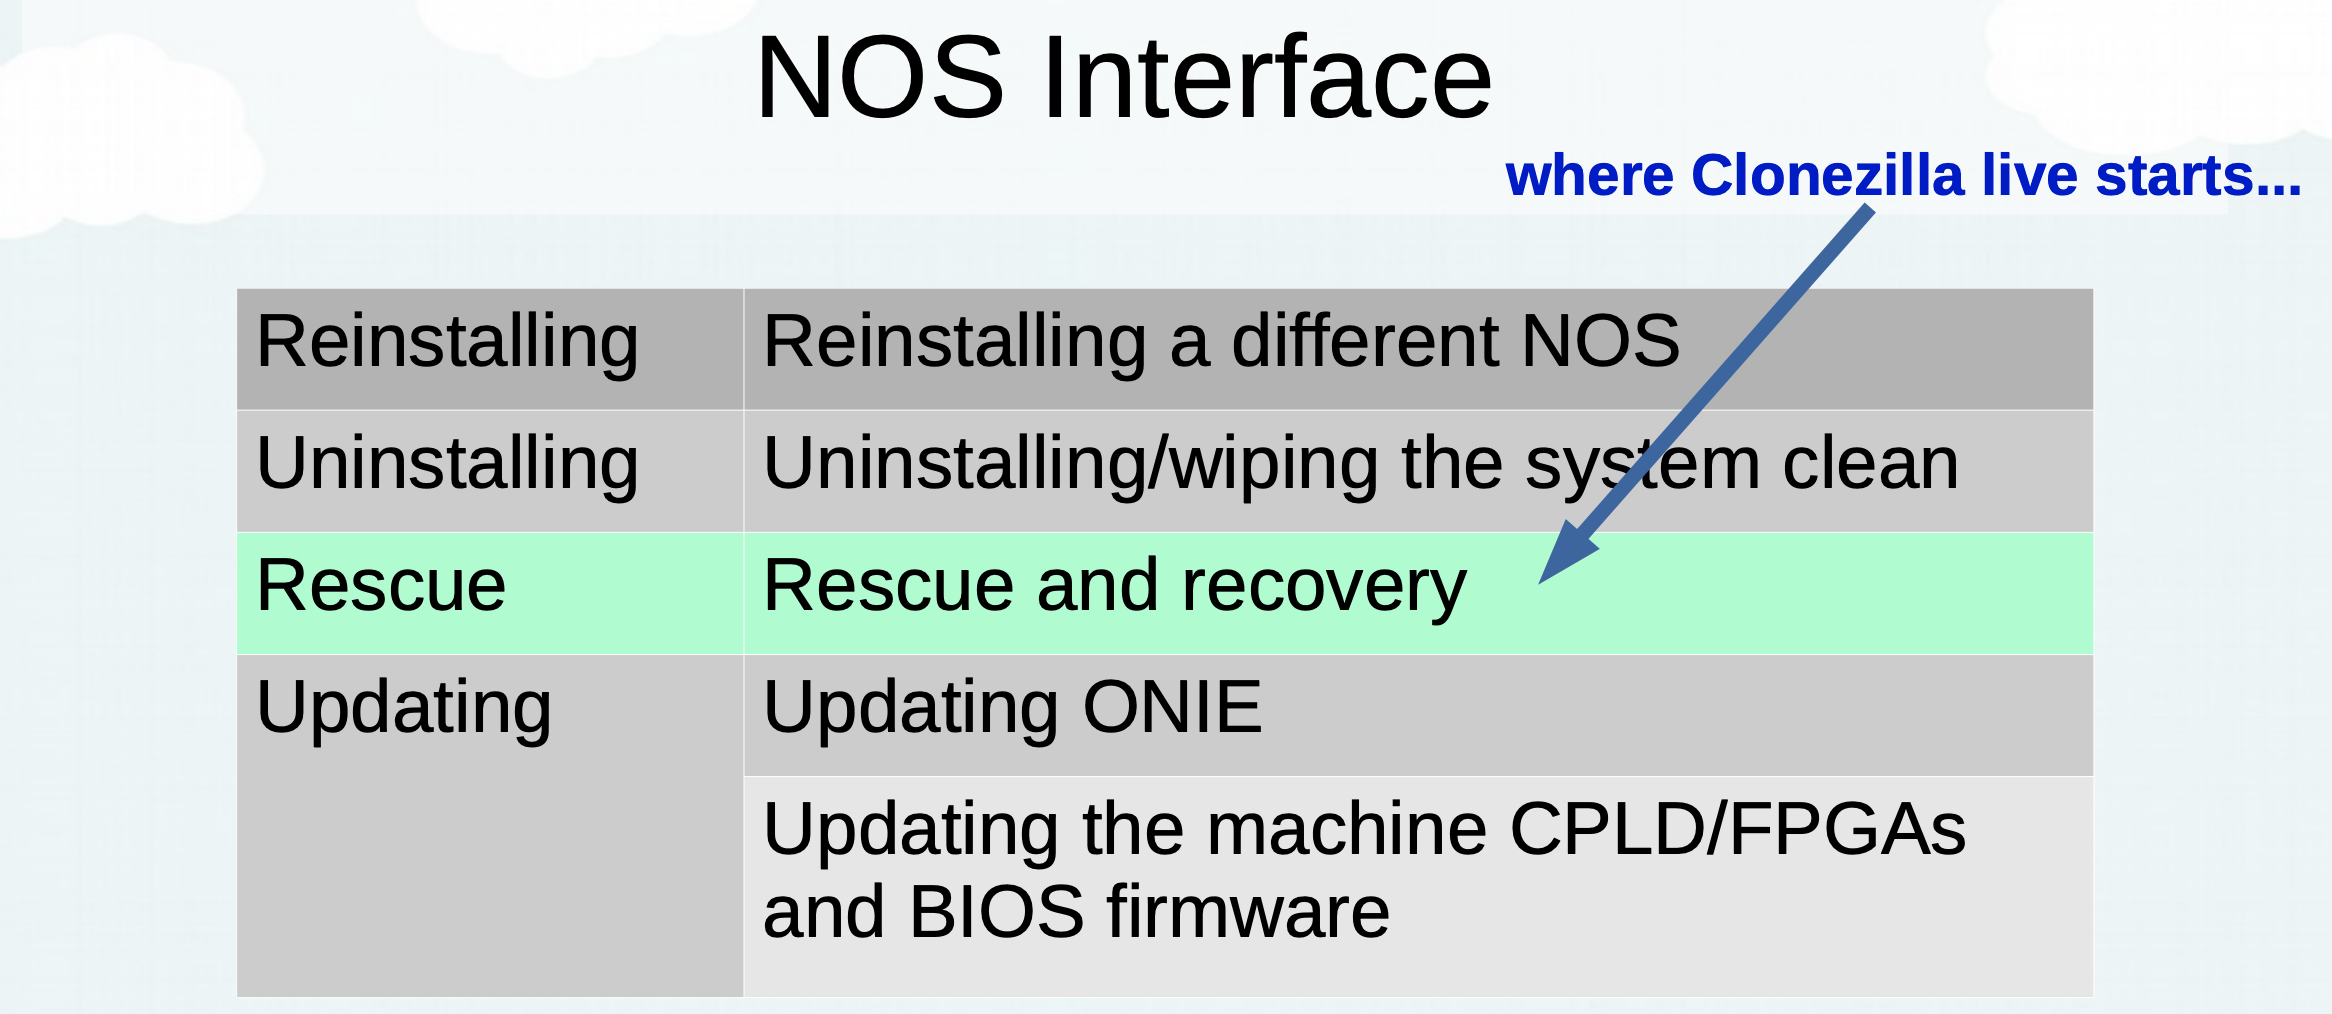
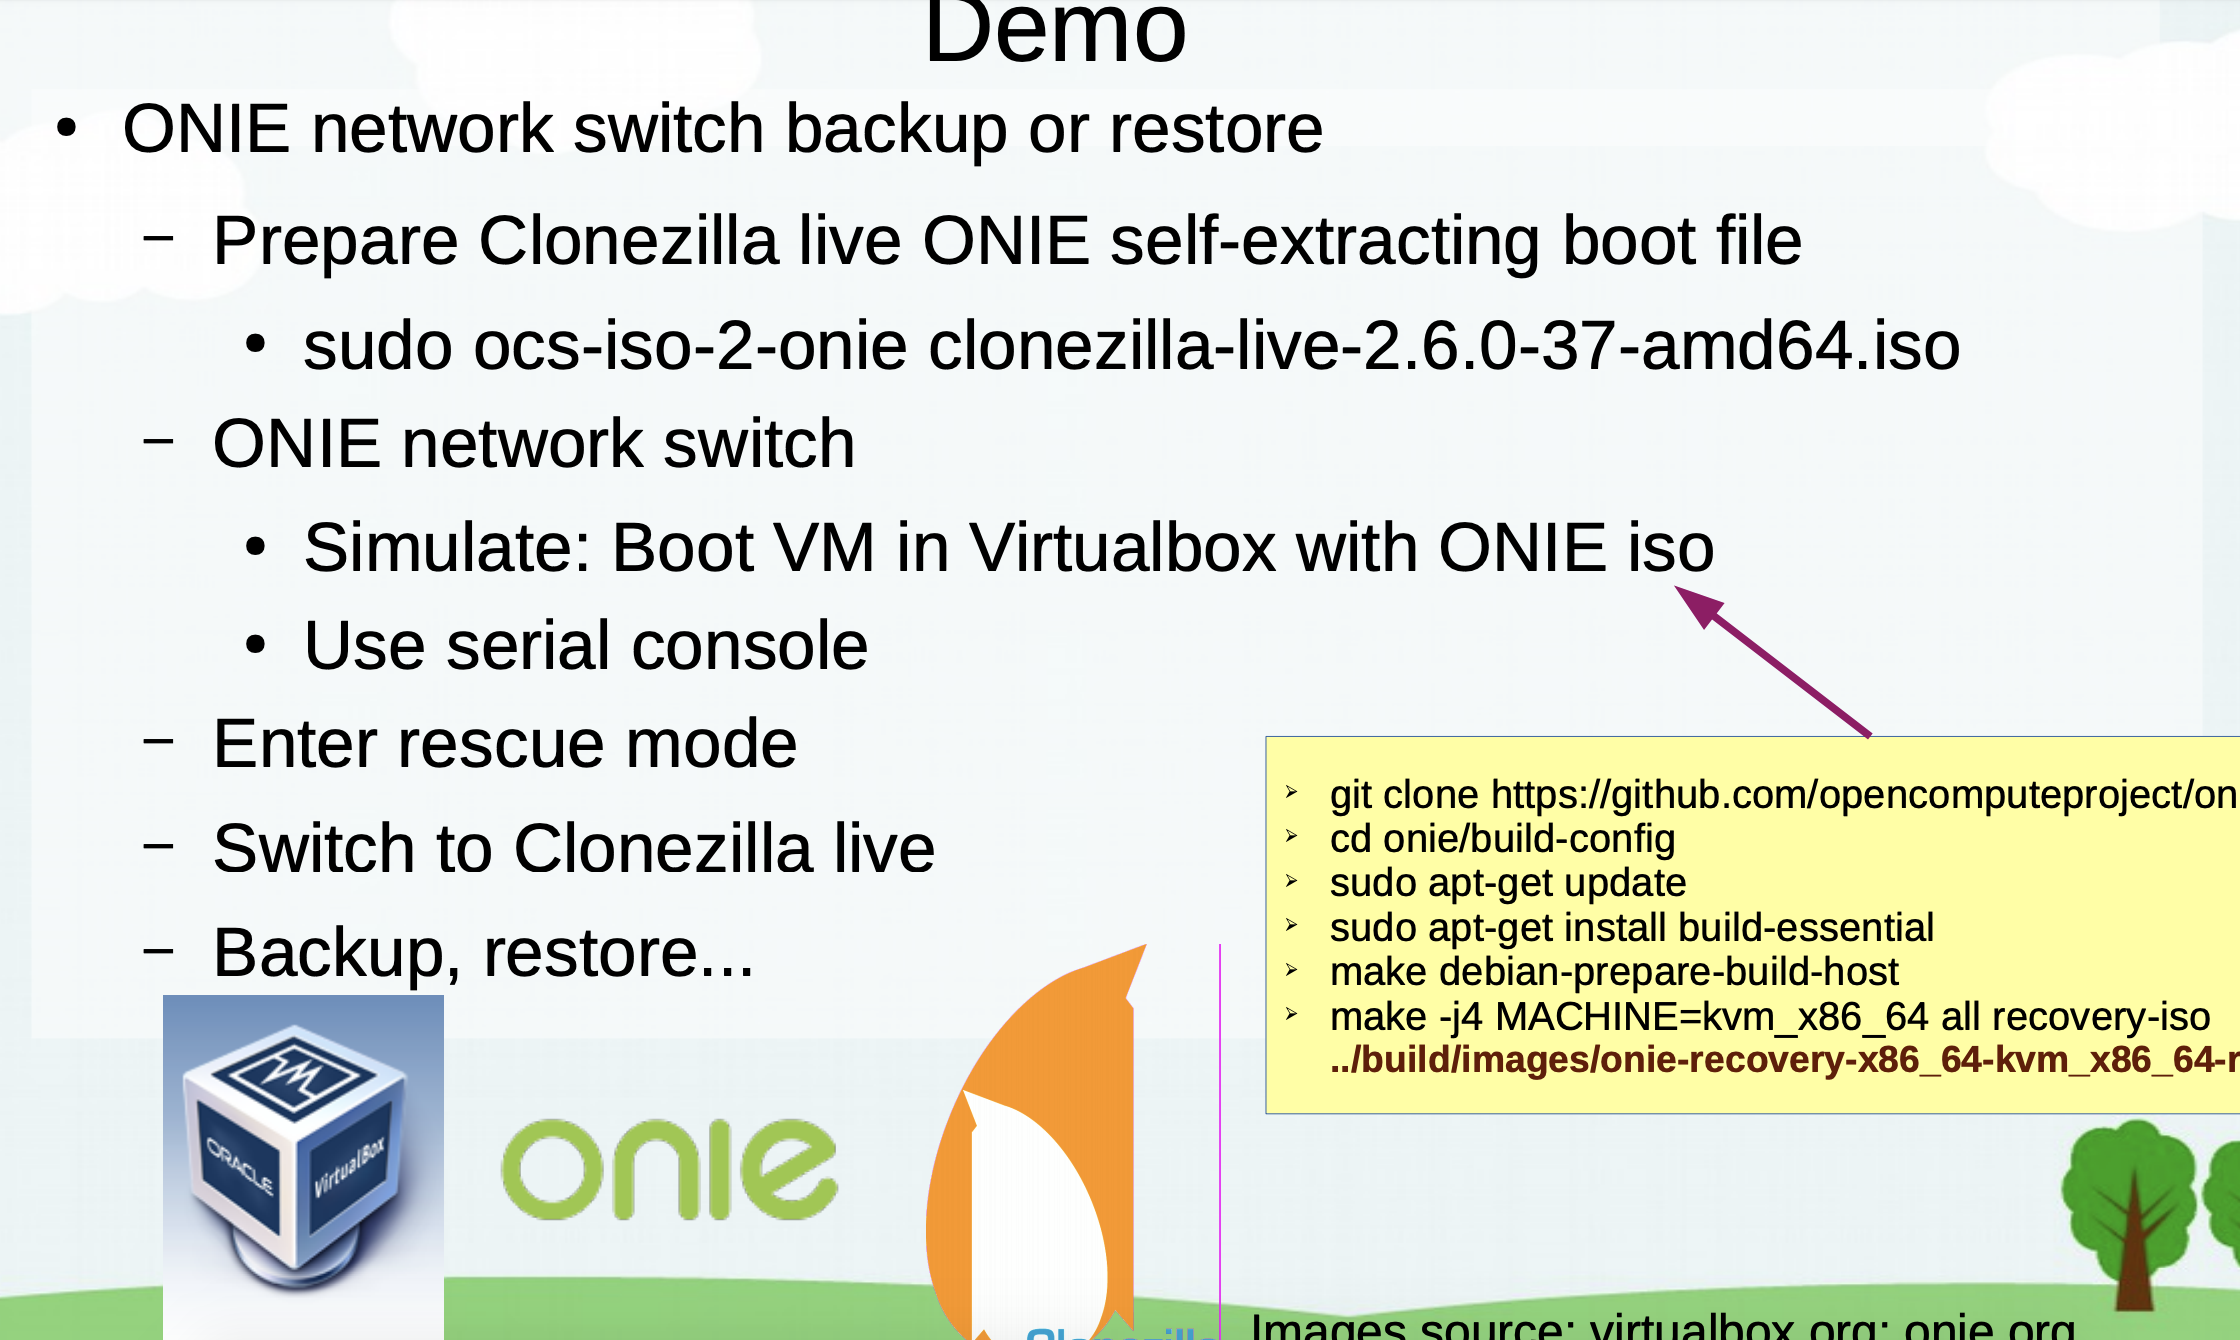
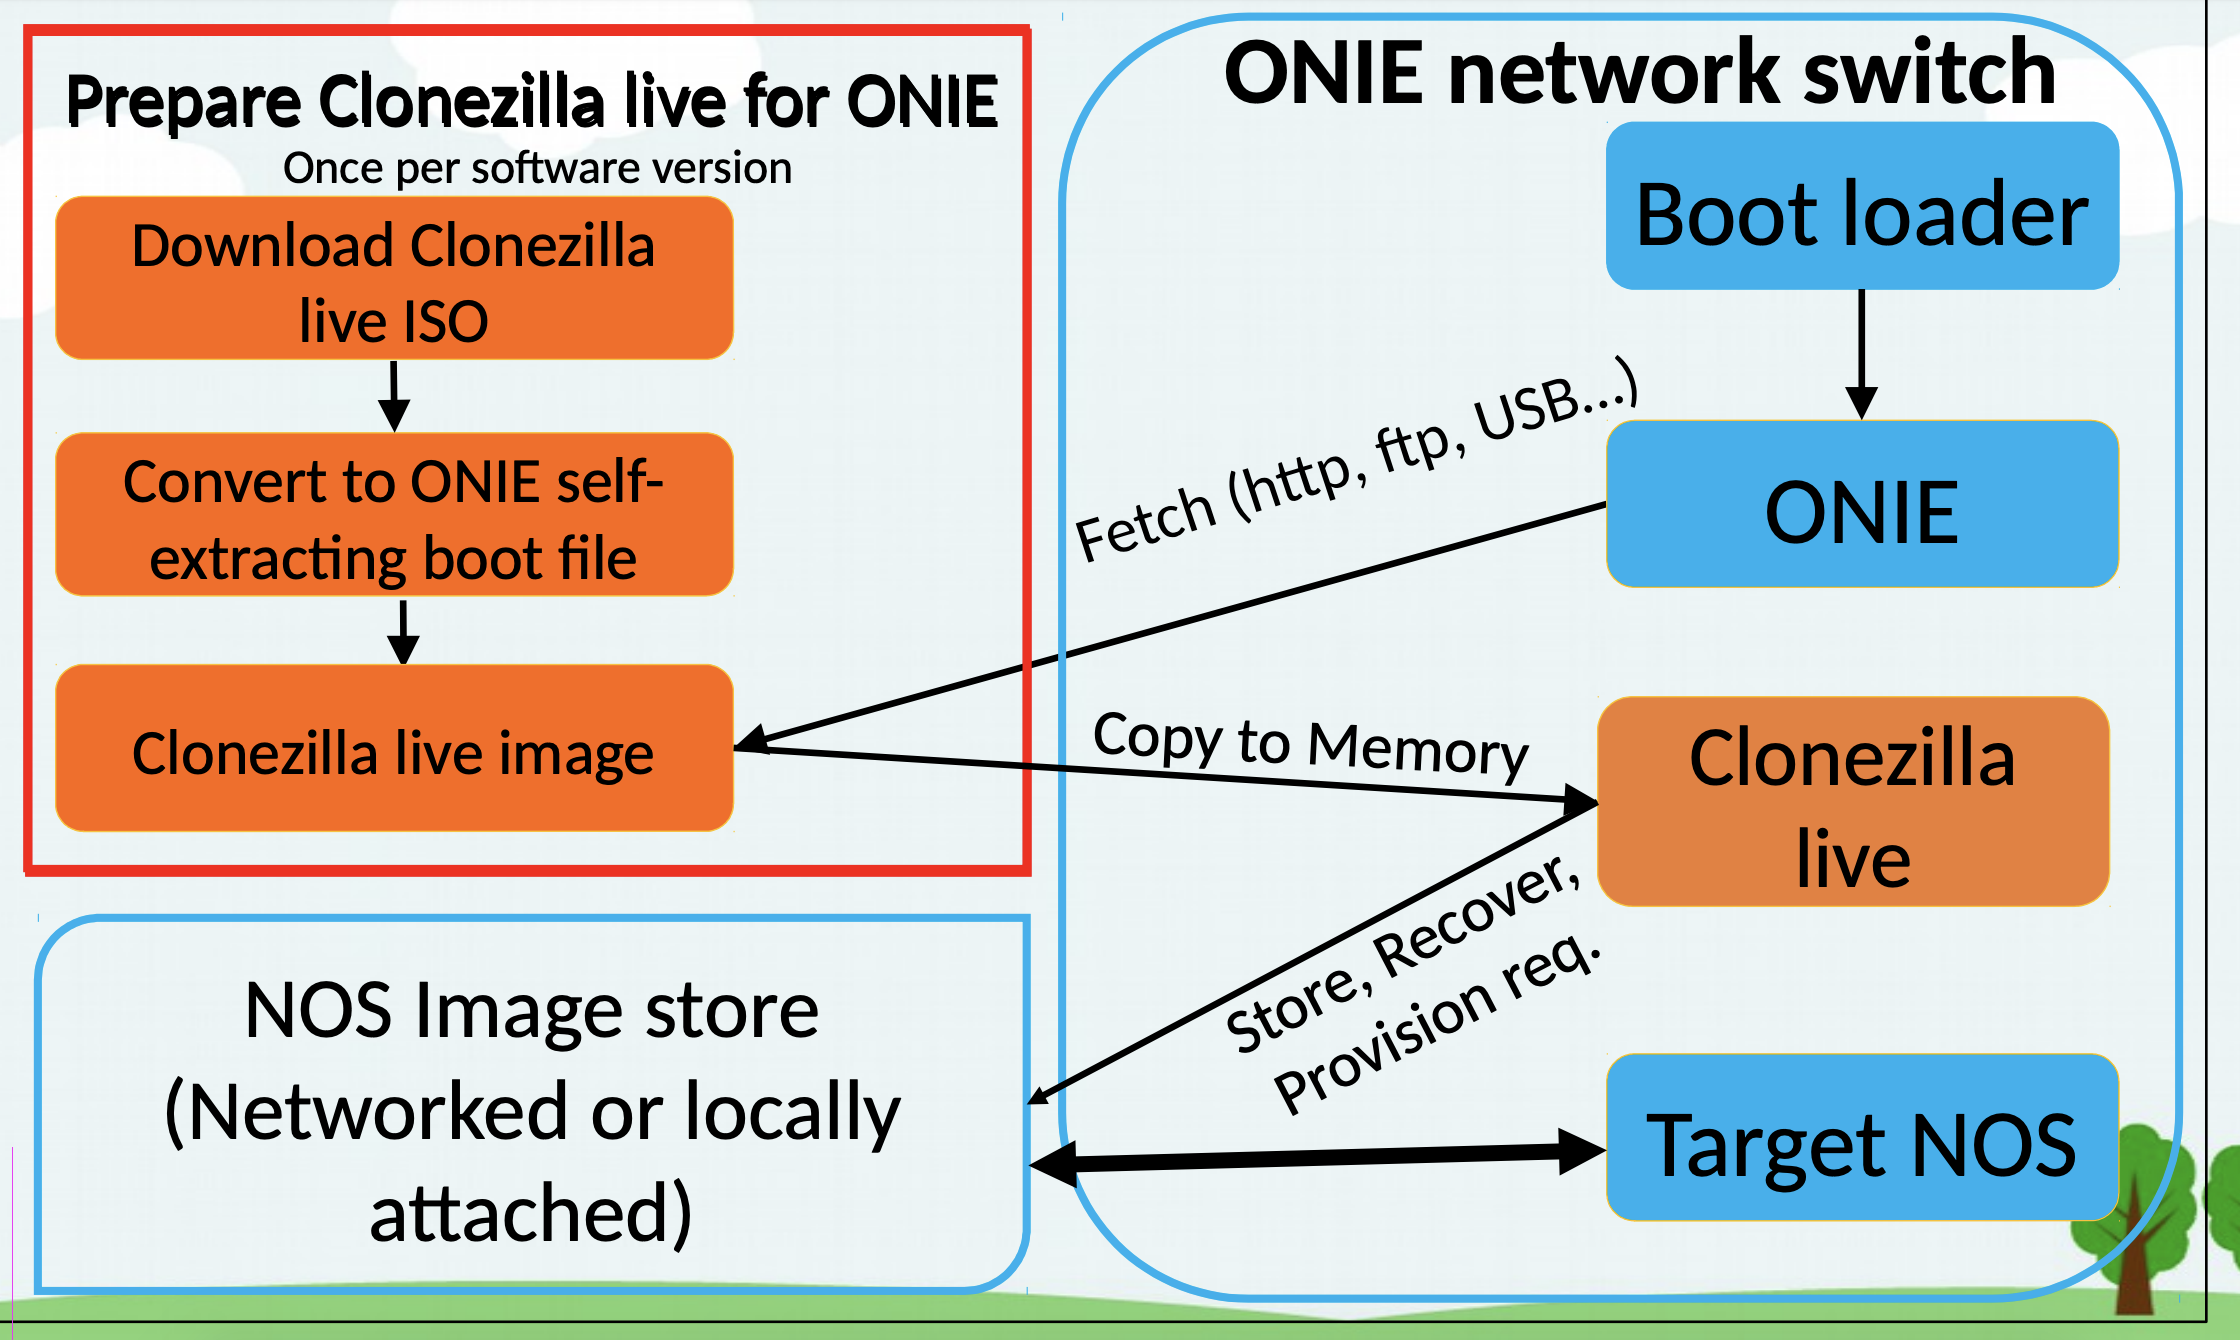
Использовал для конвертации из IMG в ISO.Clonezilla
Clonezilla позволяет и залить образы заранее созданные образы системы и создать новые образы с помощью lifeUSB. Стабильно работающая версия – clonezilla-live-2.6.1-25-amd64.iso. LifeUSB сделать можно используя UNetbootin 6.6.1.- Клон ESXi 6.7 с помощью CloneZilla с дефолтными опциями обычно заканчивается фактическим fail – получается склонировать сам гипервизор, но машины в datastore и сам datastore гипервизором не распознаются.
- Извлечение файлов из образа clonezilla без его деплоя возможно через утилиту https://github.com/fiddyschmitt/clonezilla-util?ysclid=mio25055u412566806
- В папке clonezilla с сохраненным image можно понять версию с которой он снимался открыв текcтовым редактором файл clonezilla-img.
This image was saved by Clonezilla at 2020-02-18 15:11:50 UTC.
Saved by clonezilla-live-2.6.1-25-amd64.
- Если CloneZilla зависает во время “configuring keyboard” – может помочь
- 1) перезагрузка ПАК
- 2) ctrl+c (помогало на 2.5.0-5, не помогало на 2.6.1-25) и процесс продолжится дальше.
- etcher от Balena – прекрасно работает для установки Debian 10 (и не только его), в том числе с netinstall
- rufus – debian и Windows (не netinstall – подробнее ниже, сам сталкивался в Debian 10!)
Оно не работает с нетинсталлом Debian — на этапе поиска CD диска в инсталляторе он не может его найти.
- unetbootin – ESXi (5.5, 6.7)
- ultraiso
2. Partition
THEORY
Data is stored on disk drives that are logically divided into partitions. A partition can exist on a portion of a disk, on an entire disk, or it may span multiple disks. Each partition may contain a file system, a raw data space, a swap space, or a dump space.
A file system is used to hold files and directories, a raw data space may be used for databases and other applications for faster access, a swap space is defined to supplement the physical memory on the system, and a dump space is created to store memory and kernel images after a system crash has occurred.
Linux offers several toolsets for partitioning and managing disk storage. These toolsets include the parted and gdisk utilities and the Logical Volume Manager (LVM). Additional tools, such as fdisk, sfdisk, and cfdisk, are also available for this purpose. Partitions created with a combination of most of these tools can co-exist on a single disk.
Несмотря на рост объемов памяти актуальны и сейчас. Причины использования разных разделов в рамках одной системы – это особые требования для данных в этом разделе:
-
- по backup/recovery/remove данных на этом разделе – возможность более простого переноса/восстановления пользовательских файлов при нарушении целостности системного раздела и проч
- по влиянию обновлений системы на данные в разделе (например, чтобы пользовательские данные не затрагивались при обновлении)
- по избежанию влияния переполнений данного раздела на всю систему (например, логи postgres влияют на работоспособность vSphere) – разделы предоставляют базовую защиту от отказа системы в случае заполнения (отдельный раздел под пользовательские задачи от системного)
- по безопасности (например, изоляция разделов, ограничения, включение опций noexec / nosuid) – на отдельные разделы проще накладывать какие-то ограничения (квоты)
- по производительности (например, использование специальных файловых систем и опций типа включения noatime / nodirtime)
Создание partition бывает на базе двух схем (или одно или другое т.к. обе таблицы хранятся вначале диска), схема определяет с какого может быть загрузка, максимальный размер/количество:
-
- MBR (Master Boot Record) – старый способ, но до сих пор используется (в основном используется на Windows и на VM), отказ от него постепенный, но у него плюс в максимальной совместимости/поддержки всеми девайсами (по аналогии с FAT32). Поддержка Volume до 2ТБ размером, до 4 primary разделов (если хочешь больше – от primary создаешь extended, внутри которого можешь даже еще создать logical partition). Получается три типа разделов – primary, extended, logical.
- GPT (GUID Partition Table) – новый способ. Поддержка Volume более 2ТБ размером, бесконечное количество разделов в теории, на практике в ОС чаще всего ограничено 128 (windows, centos). Обязателен для UEFI (замена BIOS). Один тип раздела – volume (по сути primary).
MBR has a few legacy traits that are being slowly faded out by GPT. MBR only allows you to have volume sizes of 2TBs or less. GPT doesn't have a limit to the amount of partitions you can make. GPT allows you to have volume sizes of 2TBs or greater.
Для создания разделов на Linux обычно используется parted, он умеет создавать разделы как MBR, так и GPT. Но так же можно использовать и fdisk (MBR, хотя современные сборки чаще всего поддерживают и GPT), gdisk (GPT).
parted understands both MBR and GPT formats.
gdisk (a.k.a. GPT fdisk) is designed to support the GPT format only and can be used instead of parted.
fdisk utility does not understand GPT and cannot address space exceeding 2TB.
FDISK
- Основные команды fdisk/gdisk – p (print), n (new), d (delete), w (write).
When the fdisk command is used without options, it provides a menu-driven environment for creating and deleting partitions.
sudo fdisk /dev/sdb # переходим в интерактивный режим с выбранным носителем (выбираем носитель, не раздел, если даже на диске уже есть разделы!)# ПРОСМОТР РАЗДЕЛОВ
Command (m for help): p
Disk /dev/sda: 10 GiB, 10737418240 bytes, 20971520 sectors
Units: sectors of 1 * 512 = 512 bytes
Sector size (logical/physical): 512 bytes / 4096 bytes
I/O size (minimum/optimal): 4096 bytes / 4096 bytes
Disklabel type: dos
Disk identifier: 0x290377a6

# УДАЛЕНИЕ РАЗДЕЛОВ
Command (m for help): d
Partition number (1,2, default 2):
Partition 2 has been deleted.
Command (m for help): d
Selected partition 1
Partition 1 has been deleted.

# СОЗДАНИЕ РАЗДЕЛОВ
Command (m for help): n # тут может ругнуться, значит сначала нужно удалить старый раздел: since all the space on the disk is currently allocated, you'll need to first free up space by deleting the default partition.
Partition type
p primary (0 primary, 0 extended, 4 free)
e extended (container for logical partitions)
Select (default p): p
Partition number (1-4, default 1): 1 # Since it's a primary partition, it can only be labelled from 1-4. It's good practice to assign partition numbers sequentially; problems can sometimes arise with certain programs if partitions aren't ordered sequentially.
First sector (2048-20967423, default 2048):
Last sector, +sectors or +size{K,M,G,T,P} (2048-20967423, default 20967423): 2097200 # ((1. по умолчанию указывается последний свободный сектор от текущего первого, если нужно разделить диск на несколько секторов - указываем другое число. 2. по умолчанию предлагается работать с секторами, но современные утилиты обычно позволяют тут указать  обьем в виде +<n>M/G/T)) Provide the last sector of the new partition, up to where you want to allocate. The difference between the first and last sectors makes up the total size of the partition. Disk sector represents units used to measure the size on disks. Each sector stores a fixed amount of data. In lots of hard disks, for example, a sector stores 512 bytes. To create the first 1GB partition, enter 2097200 (divide the original partition by 10). Two important things happen here: the partition size is set to 1GB, and the partition type is set to "Linux".
Command (m for help): n
Partition type
p primary (1 primary, 0 extended, 3 free)
e extended (container for logical partitions)
Select (default p): p
Partition number (2-4, default 2): 2 # select partition number 2 to issue partition numbers in sequence.
First sector (2097201-20967423, default 2099200): # select the default partition starting sector, which is the next sector from the last partition you allocated.
Last sector, +sectors or +size{K,M,G,T,P} (2099200-20967423, default 20967423): # select the default last sector, which will be the last sector of the remaining disk space.
Created a new partition 2 of type ‘Linux’ and of size 9 GiB.
Created a new partition 1 of type ‘Linux’ and of size 1023 MiB.
Command (m for help): p
Disk /dev/sda: 10 GiB, 10737418240 bytes, 20971520 sectors
Units: sectors of 1 * 512 = 512 bytes
Sector size (logical/physical): 512 bytes / 4096 bytes
I/O size (minimum/optimal): 4096 bytes / 4096 bytes
Disklabel type: dos
Disk identifier: 0x290377a6
Device Boot Start End Sectors Size Id Type
/dev/sda1 2048 2097200 2095153 1023M 83 Linux
/dev/sda2 2099200 20971519 18872320 9G 83 Linux
# ИЗМЕНЕНИЕ ТИПА РАЗДЕЛОВ
Command (m for help): t
Partition number (1,2, default 2): 1
Partition type (type L to list all types): L # тут можно посмотреть все возможные типы разделов с их ID
Partition type (type L to list all types): 82 # выбираем ID
Changed type of partition ‘Linux’ to ‘Linux swap / Solaris’.
Command (m for help): p
Disk /dev/sda: 10 GiB, 10737418240 bytes, 20971520 sectors
Units: sectors of 1 * 512 = 512 bytes
Sector size (logical/physical): 512 bytes / 4096 bytes
I/O size (minimum/optimal): 4096 bytes / 4096 bytes
Disklabel type: dos
Disk identifier: 0x290377a6
Device Boot Start End Sectors Size Id Type
/dev/sda1 2048 2097200 2095153 1023M 82 Linux swap / Solaris
/dev/sda2 2099200 20971519 18872320 9G 83 Linux
# ПРИМЕНЕНИЕ КОНФИГУРАЦИИ
Up to this point, you’ve just been editing the partition table in memory. You can use the q command here to quit fdisk without committing changes to the disk. You can also update your partitions by using the d and n commands to remove and add new partitions.
Command (m for help): w # If you’re satisfied with the changes you’ve made so far, you can commit them to the disk by using the w command.
The partition table has been altered.
Calling ioctl() to re-read partition table.
Syncing disks.
GDISK
- Основные команды fdisk/gdisk – p (print), n (new), d (delete), w (write).
The gdisk utility is used to carve up disks using GPT format. This text-based, menu-driven program allows us to view, add, verify, modify, and delete partitions among other tasks. gdisk can be used to create up to 128 partitions on a single GPT disk on systems with UEFI firmware.
[root@localhost ~]# gdisk /dev/vdc
GPT fdisk (gdisk) version 0.8.6
Partition table scan:
  MBR: not present
  BSD: not present
  APM: not present
  GPT: not present
Creating new GPT entries.
Command (? for help): ?
b       back up GPT data to a file
c       change a partition's name
d       delete a partition
i       show detailed information on a partition
l       list known partition types
n       add a new partition
o       create a new empty GUID partition table (GPT) ((Labels the disk to use GPT scheme.))
p       print the partition table
q       quit without saving changes
r       recovery and transformation options (experts only)
s       sort partitions
t       change a partition's type code
v       verify disk
w       write table to disk and exit
x       extra functionality (experts only)
?       print this menu
В случае запуска на MBR диск.
[root@localhost ~]# gdisk /dev/vdb
GPT fdisk (gdisk) version 0.8.6
Partition table scan:
  MBR: MBR only
  BSD: not present
  APM: not present
  GPT: not present
***************************************************************
Found invalid GPT and valid MBR; converting MBR to GPT format.
THIS OPERATION IS POTENTIALLY DESTRUCTIVE! Exit by typing 'q' if
you don't want to convert your MBR partitions to GPT format!
***************************************************************
Command (? for help):
Create a GPT Partition Table and a Partition Using gdisk
Execute the gdisk command on /dev/vdc
[root@localhost ~]#  gdisk /dev/vdc
GPT fdisk (gdisk) version 0.8.6
Partition table scan:
  MBR: not present
  BSD: not present
  APM: not present
  GPT: not present
Creating new GPT entries.
Command (? for help):
Assign GPT as the partition table to the disk using the o subcommand. Enter y for confirmation to proceed. view the disk label. The output shows the assigned GUID states that the partition table can hold up to 128 partition entries.
Command (? for help): o
This option deletes all partitions and creates a new protective MBR.
Proceed? (Y/N): y
Command (? for help): p
Disk /dev/vdc: 4194304 sectors, 2.0 GiB
Logical sector size: 512 bytes
Disk identifier (GUID): 72FEE5EE-C06F-4A6E-9F91-CEB534429A90
Partition table holds up to 128 entries
First usable sector is 34, last usable sector is 4194270
Partitions will be aligned on 2048-sector boundaries
Total free space is 4194237 sectors (2.0 GiB)
Number  Start (sector)    End (sector)  Size       Code  Name
Create a 200MB partition using the n subcommand. Use all the defaults except for the size specification. Verify the new partition with p. Первые секторы заняты MBR table, поэтому предлагается в качестве раздела использовать default = 2048. Последние секторы можно указать желаемым размером в виде +-size{KMGTP} (+200M), не указывая непосредственный сектор.
Command (? for help): n
Partition number (1-128, default 1):
First sector (34-4194270, default = 2048) or {+-}size{KMGTP}:
Last sector (2048-4194270, default = 4194270) or {+-}size{KMGTP}: +200M
Current type is 'Linux filesystem'
Hex code or GUID (L to show codes, Enter = 8300):
Changed type of partition to 'Linux filesystem'
Command (? for help): p
Disk /dev/vdc: 4194304 sectors, 2.0 GiB
Logical sector size: 512 bytes
Disk identifier (GUID): 72FEE5EE-C06F-4A6E-9F91-CEB534429A90
Partition table holds up to 128 entries
First usable sector is 34, last usable sector is 4194270
Partitions will be aligned on 2048-sector boundaries
Total free space is 3784637 sectors (1.8 GiB)
Number  Start (sector)    End (sector)  Size       Code  Name
   1            2048          411647   200.0 MiB   8300  Linux filesystem
Run the w subcommand to write the partition information to the partition table. Enter y to confirm.
Command (? for help): w
Final checks complete. About to write GPT data. THIS WILL OVERWRITE EXISTING
PARTITIONS!!
Do you want to proceed? (Y/N): y
OK; writing new GUID partition table (GPT) to /dev/vdc.
The operation has completed successfully.
[root@localhost ~]#
Confirm the partition information by running either of the following at the command prompt. You may need to run the partprobe command after exiting the gdisk utility to inform the kernel of changes in the partition table if the disk previously had partitions. This is not required for new unpartitioned disks.
[root@localhost ~]# gdisk -l /dev/vdc
GPT fdisk (gdisk) version 0.8.6
Partition table scan:
  MBR: protective
  BSD: not present
  APM: not present
  GPT: present
Found valid GPT with protective MBR; using GPT.
Disk /dev/vdc: 4194304 sectors, 2.0 GiB
Logical sector size: 512 bytes
Disk identifier (GUID): 72FEE5EE-C06F-4A6E-9F91-CEB534429A90
Partition table holds up to 128 entries
First usable sector is 34, last usable sector is 4194270
Partitions will be aligned on 2048-sector boundaries
Total free space is 3784637 sectors (1.8 GiB)
Number  Start (sector)    End (sector)  Size       Code  Name
   1            2048          411647   200.0 MiB   8300  Linux filesystem

[root@localhost ~]# grep vdc /proc/partitions
 252       32    2097152 vdc
 252       33     204800 vdc1
Create three 50MB partitions on /dev/vdc using the gdisk utility and set appropriate flags to use them as a file system, a swap space, and an LVM partition, respectively.
[root@localhost ~]# gdisk /dev/sdd

Command (? for help): o
This option deletes all partitions and creates a new protective MBR.
Proceed? (Y/N): y

Command (? for help): p
Disk /dev/sdd: 1035302 sectors, 505.5 MiB
Logical sector size: 512 bytes
Disk identifier (GUID): C5AC991A-323D-42A6-8369-12A6906DAD05
Partition table holds up to 128 entries
First usable sector is 34, last usable sector is 1035268
Partitions will be aligned on 2048-sector boundaries
Total free space is 1035235 sectors (505.5 MiB)
Number Start (sector) End (sector) Size Code Name

Command (? for help): n
Partition number (1-128, default 1):
First sector (34-1035268, default = 2048) or {+-}size{KMGTP}:
Last sector (2048-1035268, default = 1035268) or {+-}size{KMGTP}: +50M
Current type is 'Linux filesystem'
Hex code or GUID (L to show codes, Enter = 8300):
Changed type of partition to 'Linux filesystem'

Command (? for help): n
Partition number (2-128, default 2):
First sector (34-1035268, default = 104448) or {+-}size{KMGTP}:
Last sector (104448-1035268, default = 1035268) or {+-}size{KMGTP}: +50M
Current type is 'Linux filesystem'
Hex code or GUID (L to show codes, Enter = 8300):
Changed type of partition to 'Linux filesystem'

Command (? for help): n
Partition number (3-128, default 3):
First sector (34-1035268, default = 206848) or {+-}size{KMGTP}:
Last sector (206848-1035268, default = 1035268) or {+-}size{KMGTP}: +50M
Current type is 'Linux filesystem'
Hex code or GUID (L to show codes, Enter = 8300):
Changed type of partition to 'Linux filesystem'

Command (? for help): p
Disk /dev/sdd: 1035302 sectors, 505.5 MiB
Logical sector size: 512 bytes
Disk identifier (GUID): 99C5539C-A978-42C8-8BF9-D959C6402B37
Partition table holds up to 128 entries
First usable sector is 34, last usable sector is 1035268
Partitions will be aligned on 2048-sector boundaries
Total free space is 728035 sectors (355.5 MiB)

Number Start (sector) End (sector) Size Code Name
  1 2048 104447 50.0 MiB 8300 Linux filesystem
  2 104448 206847 50.0 MiB 8300 Linux filesystem
  3 206848 309247 50.0 MiB 8300 Linux filesystem

Command (? for help): t
Partition number (1-3): 2
Current type is 'Linux filesystem'
Hex code or GUID (L to show codes, Enter = 8300): L
0700 Microsoft basic data 0c01 Microsoft reserved 2700 Windows RE
4200 Windows LDM data 4201 Windows LDM metadata 7501 IBM GPFS
7f00 ChromeOS kernel 7f01 ChromeOS root 7f02 ChromeOS reserved
8200 Linux swap 8300 Linux filesystem 8301 Linux reserved
8e00 Linux LVM a500 FreeBSD disklabel a501 FreeBSD boot
a502 FreeBSD swap a503 FreeBSD UFS a504 FreeBSD ZFS
a505 FreeBSD Vinum/RAID a580 Midnight BSD data a581 Midnight BSD boot
a582 Midnight BSD swap a583 Midnight BSD UFS a584 Midnight BSD ZFS
a585 Midnight BSD Vinum a800 Apple UFS a901 NetBSD swap
a902 NetBSD FFS a903 NetBSD LFS a904 NetBSD concatenated
a905 NetBSD encrypted a906 NetBSD RAID ab00 Apple boot
af00 Apple HFS/HFS+ af01 Apple RAID af02 Apple RAID offline
af03 Apple label af04 AppleTV recovery af05 Apple Core Storage
be00 Solaris boot bf00 Solaris root bf01 Solaris /usr & Mac Z
bf02 Solaris swap bf03 Solaris backup bf04 Solaris /var
bf05 Solaris /home bf06 Solaris alternate se bf07 Solaris Reserved 1
bf08 Solaris Reserved 2 bf09 Solaris Reserved 3 bf0a Solaris Reserved 4
bf0b Solaris Reserved 5 c001 HP-UX data c002 HP-UX service
ed00 Sony system partitio ef00 EFI System ef01 MBR partition scheme
ef02 BIOS boot partition fb00 VMWare VMFS fb01 VMWare reserved
fc00 VMWare kcore crash p fd00 Linux RAID
Hex code or GUID (L to show codes, Enter = 8300): 8200
Changed type of partition to 'Linux swap'

Command (? for help): p
Disk /dev/sdd: 1035302 sectors, 505.5 MiB
Logical sector size: 512 bytes
Disk identifier (GUID): 99C5539C-A978-42C8-8BF9-D959C6402B37
Partition table holds up to 128 entries
First usable sector is 34, last usable sector is 1035268
Partitions will be aligned on 2048-sector boundaries
Total free space is 728035 sectors (355.5 MiB)

Number Start (sector) End (sector) Size Code Name
  1 2048 104447 50.0 MiB 8300 Linux filesystem
  2 104448 206847 50.0 MiB 8200 Linux swap
  3 206848 309247 50.0 MiB 8300 Linux filesystem

Command (? for help): t
Partition number (1-3): 3
Current type is 'Linux filesystem'
Hex code or GUID (L to show codes, Enter = 8300): 8e00
Changed type of partition to 'Linux LVM'

Command (? for help): p
Disk /dev/sdd: 1035302 sectors, 505.5 MiB
Logical sector size: 512 bytes
Disk identifier (GUID): 99C5539C-A978-42C8-8BF9-D959C6402B37
Partition table holds up to 128 entries
First usable sector is 34, last usable sector is 1035268
Partitions will be aligned on 2048-sector boundaries
Total free space is 728035 sectors (355.5 MiB)

Number Start (sector) End (sector) Size Code Name
  1 2048 104447 50.0 MiB 8300 Linux filesystem
  2 104448 206847 50.0 MiB 8200 Linux swap
  3 206848 309247 50.0 MiB 8E00 Linux LVM

Command (? for help): w

Final checks complete. About to write GPT data. THIS WILL OVERWRITE EXISTING
PARTITIONS!!

Do you want to proceed? (Y/N): y
OK; writing new GUID partition table (GPT) to /dev/sdd.
The operation has completed successfully.
Delete a GPT Partition Using gdisk
Execute the gdisk command on the /dev/vdc disk
gdisk /dev/vdc
View the current partition table using the p subcommand:
Command (? for help): p
Execute the d subcommand and specify the partition number to delete, verify and quit with save:
Command (? for help): d1
Using 1
Command (? for help): p
Command (? for help): w
Confirm the partition information:
[root@localhost ~]# gdisk -l /dev/vdc
[root@localhost ~]# grep vdc /proc/partitions
Далее смотрим Create an MBR Partition Table and a Partition Using parted
(G)PARTED
- gparted – GUI для parted.gparted live image использовал для сжатия раздела (resizepart), с которым не мог справится Resize-VHD (сжал gparted раздел 32GB до менее 4GB). После ужатия gparted уже использовал Resize-VHD для сжатия непосредственно виртуального диска.
The parted tool is used to carve up disks on RHEL systems. This text-based, menu-driven program allows us to view, add, check, modify, copy, resize, and delete partitions. parted understands and supports both MBR and GPT schemes. It can be used to create up to 128 partitions on a single GPT disk.
- Parted, как и fdisk/gdisk, можно использовать в интерактивном режиме (как например irb в ruby) или в командной режиме (находясь в shell вызываем parted покомандно), но в отличии от fdisk/gdisk, parted сразу применяет настройки в интерактивном режиме.
- Но несмотря на богатых функционал (форматирование, resize, изменение уже созданных разделов). Основная задача parted – создание разделов на диске и для форматирования и для resize есть другие утилиты, специализированные для файловой системы – ext/xfs/etc и в целом по практике лучше использовать именно специализированные версии.
- Недостатком parted является то, что он по умолчанию в системах зачастую отсутствует, так же он может устанавливаться с ворохом gui зависимостей при установке по итогу устанавливая gparted, помимо консольной версии; поэтому алгоритм автора курса – если нет parted уже установленного, то использовать fdisk/gdisk (LPIC-2 course), потому что в целом репартиция это разовые действия.
- Достоинство что он поддерживает MBR/GPT и другие форматы (Apple, BSD, etc) partition table, более интуитивен за счет нового более user-friendly подхода по настройке.
- Список возможных команд/опций в интерактивном режиме выводится по help, указав на входе help команду можно получить по ней справку.
-
Утилита, естественно, требует sudo.
- Примененик конфигурации происходит при выходе из утилиты.
command mode
parted -l # смотрим какие диски подключены
~$ sudo parted -l
Model: VMware Virtual disk (scsi)
Disk /dev/sda: 42,9GB
Sector size (logical/physical): 512B/512B
Partition Table: msdos
interactive mode
sudo parted /dev/sdb # переходим в интерактивный режим с выбранным носителем (выбираем носитель, не раздел, если даже на диске уже есть разделы!), причем можно при запуске не выбирать носитель, а выбрать потом по команде select
p/print # смотрим всю информацию, можно отфильтровать по print devices
rm 1 # удалить первый раздел на выбранном носителе
-
$ parted
WARNING: You are not superuser. Watch out for permissions.
/dev/mapper/control: open failed: Permission denied
Failure to communicate with kernel device-mapper driver.
Incompatible libdevmapper (unknown version) and kernel driver (unknown version).
Error: No device found
Retry/Cancel?
# sudo parted
…
…
…
(parted) help
align-check TYPE N check partition N for TYPE(min|opt) alignment
help [COMMAND] print general help, or help on COMMAND
mklabel,mktable LABEL-TYPE create a new disklabel (partition table)
mkpart PART-TYPE [FS-TYPE] START END make a partition
name NUMBER NAME name partition NUMBER as NAME
print [devices|free|list,all|NUMBER] display the partition table, available devices, free space, all found partitions, or a particular partition
quit exit program
rescue START END rescue a lost partition near START and END
resizepart NUMBER END resize partition NUMBER
rm NUMBER delete partition NUMBER
select DEVICE choose the device to edit
disk_set FLAG STATE change the FLAG on selected device
disk_toggle [FLAG] toggle the state of FLAG on selected device
set NUMBER FLAG STATE change the FLAG on partition NUMBER
toggle [NUMBER [FLAG]] toggle the state of FLAG on partition NUMBER
unit UNIT set the default unit to UNIT
version display the version number and copyright information of GNU Parted

(parted) print devices
/dev/sda (85.9GB)
(parted) help mklabel
mklabel,mktable LABEL-TYPE create a new disklabel (partition table)
LABEL-TYPE is one of: atari, aix, amiga, bsd, dvh, gpt, mac, msdos, pc98, sun, loop
Create an MBR Partition Table and a Partition Using parted
Execute the parted command on /dev/vdb, view the current partition information:
# parted /dev/vdb
GNU Parted 3.1
Using /dev/vdb
Welcome to GNU Parted! Type 'help' to view a list of commands.
(parted) print
Error: /dev/vdb: unrecognised disk label
Model: Virtio Block Device (virtblk)
Disk /dev/vdb: 2147MB
Sector size (logical/physical): 512B/512B
Partition Table: unknown
Disk Flags:
1) mklabel сначала создаем разметку диска (label type/partition table) – GPT, MBR, MSDOS или другой (можно передавать команде переменные как ниже, но проще/удобнее просто ввести команду и попасть в интерактивный режим/wizard) Assign disk label ((type)) “msdos” to the disk with mklabel. This must be done on a new disk. To use the GPT partition table type, run “mklabel gpt” instead.
(parted) mklabel msdos
(parted) print
Model: Virtio Block Device (virtblk)
Disk /dev/vdb: 2147MB
Sector size (logical/physical): 512B/512B
Partition Table: msdos
Disk Flags:
Number  Start  End  Size  Type  File system  Flags
2) mkpart далее создаем непосредственно разделы – выбираем файловую систему для раздела, указываем стартовой объем и конечный в мегабайтах, так же можно указать имя раздела (можно передавать команде переменные как ниже, но проще/удобнее просто ввести команду и попасть в интерактивный режим/wizard) Create a 1GB primary partition starting at 1MB using mkpart.
(parted) mkpart primary 1 1g
(parted) mkpart primary ext4 1Mib 4Gib # еще пример
(parted) print
Model: Virtio Block Device (virtblk)
Disk /dev/vdb: 2147MB
Sector size (logical/physical): 512B/512B
Partition Table: msdos
Disk Flags:
Number  Start   End     Size   Type     File system  Flags
1      1049kB  1000MB  999MB  primary
Confirm the partition information. You may need to run the partprobe command after exiting the parted utility to inform the kernel of changes in the partition table if the disk previously had partitions. This is not required for new unpartitioned disks.
# parted /dev/vdb print
Model: Virtio Block Device (virtblk)
Disk /dev/vdb: 2147MB
Sector size (logical/physical): 512B/512B
Partition Table: msdos
Disk Flags:
Number  Start   End     Size   Type     File system  Flags
1      1049kB  1000MB  999MB  primary

# grep vdb /proc/partitions
252       16    2097152 vdb
252       17     975872 vdb1
3. Format (для parted необязательно)
mkfs
Для форматирования созданных разделов можно использовать mkfs , mke2fs утилиту/утилиты. Для создания swap используется отдельная утилита mkswap, подробнее по работе со swap в отдельной статье. Быстрое форматирование обычно реализуется за счет обнуления filetable, без удаления фактических данных.
sudo mkfs -t ext4 /dev/sdb1 # форматируем раздел номер 1 носителя sdb файловой системой ext4

sudo mkfs.etx4 /dev/sdb1  # аналог

# ls /usr/sbin/mkfs*
/usr/sbin/mkfs /usr/sbin/mkfs.ext2 /usr/sbin/mkfs.minix
/usr/sbin/mkfs.bfs /usr/sbin/mkfs.ext3
/usr/sbin/mkfs.cramfs /usr/sbin/mkfs.ext4
4. mount
mount, FSTAB – монтируем созданный раздел вручную mount или при загрузках fstab (file system table)
- Cd/dvd rom
- обычно монтируются с именем /dev/sr0 (проверить можно через blkid) и несколькими alias, по которым так же можно обращаться к устройству (/dev/cdrom , /dev/dvdrom , /dev/dvd)
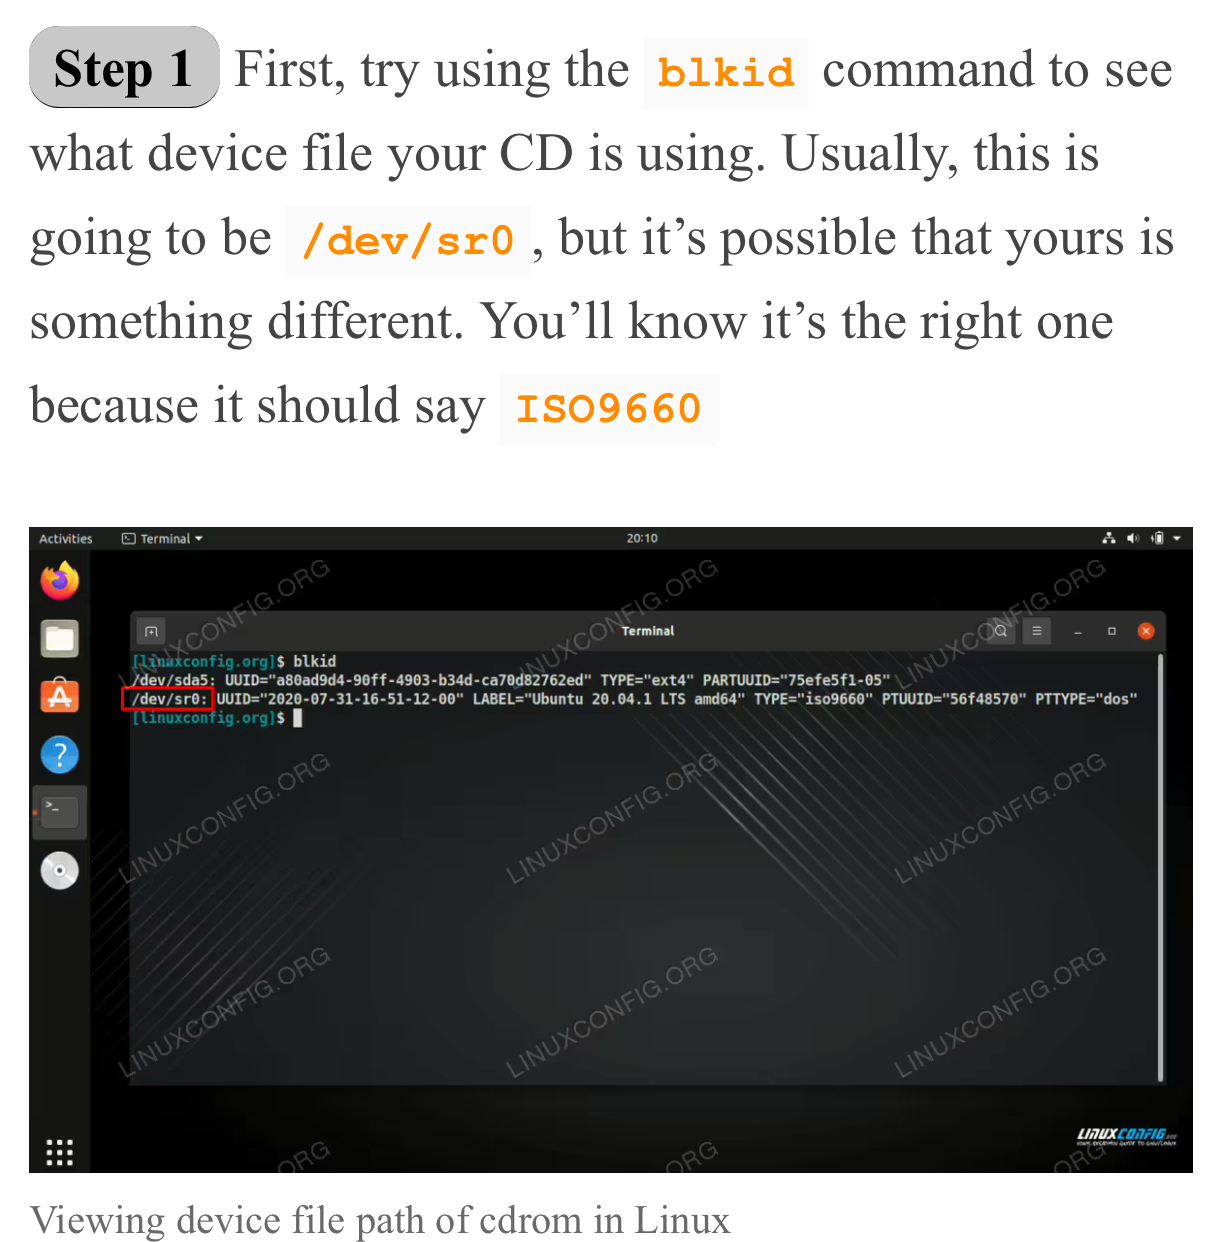
- mount при монтировании обычно автоматически определяет используемую ФС, но иногда нужно указать через -t
- mount -t iso9660 /dev/cdrom /mnt/cdrom
- вытаскиваем диск через eject
- монтирование возможно по разным идентификаторам раздела (все три есть в выводе lsblk -f) – именно раздела т.к. каждый раздел рассматривается как независимый носитель с точки зрения хранилища в Linux
- имя раздела (нежелательно т.к. может поменяться)
- UUID (предпочтительно т.к. меньше вероятность изменения) (UUID=)
- Label name – именная метка диска (не путать с label type) в файловой системе, прикольно использовать в сценариях инкрементального ротируещегося бекапа, когда несколько носителей имеют один label и монтируются по одному пути – это позволяет утилитам бекапа не изменяя конфигурацию всегда писать в одно место, как будто они работают с одним носителем, они лишь бекапят новые данные на диск, а пользователь по итогу на разных дисках, которые свапит, имеет разные данные и старые диски ротируются новыми (грубо говоря logrotate на дисках). Пример назначения label (LABEL=)
- в ext: sudo e2label /dev/sda2 backup
- в xfs: sudo xfs_admin -L backup /dev/sda2
Для монтирования разделов используем команду mount. Перед модификацией диска его нужно размантировать через umount, после операций – смонтировать обратно. В целом возможно разбить диск, на котором работает ОС, но потребуется ребут после операции.
Mounting and unmounting mean making devices available or unavailable on a Linux file system. This is accomplished by the commands mount and umount. Before modifying a disk, you should first unmount it from the system, using the umount command. When modifications on the disk are done, you should mount it back onto the system. You can still partition the disk even when the operating system is running from it, but a reboot will be required in order for the partition changes you make to take place.Монтирование mount, монтируется раздел устройства в директории (точке монтирования)
sudo mount /dev/sdb1 /my_usb/ # раздел номер 1 носителя sdb монтируем в папку my_usb
sudo mount /dev/sda2 /home/my_drive # раздел номер 2 носителя sda монтируем в папку my_usb
Размонтирование umount
-
- при размонтировании мы можем размонтировать как точку монтирования/mount point (будет размонтирована конкретная точка монтирования), так и все устройство (будут размонтированы все точки монтирования)
- umount /mnt/usb
- umount /dev/sdc
- если вытащить носитель во время записи есть риск потерять данные, поэтому лучше использовать umount чтобы не потерять данные, но в целом если носитель отформатирован файловой системой с журналированием (ext4, xfs, ntfs) потеряются только изменения.
- при размонтировании мы можем размонтировать как точку монтирования/mount point (будет размонтирована конкретная точка монтирования), так и все устройство (будут размонтированы все точки монтирования)
# UMOUNT
lsof | grep /root/1/
kill <pid
kill -9 <pid>
umount /dev/sdc
umount -f /dev/sdc
umount -l /dev/sdc
Помещение информации о носителе (диск/флешка) в файл fstab позволяет автоматически монтировать носитель при включении.
Алгоритм:
1) Узнаем UUID устройства sudo blkid
sudo blkid

[root@localhost ~]# blkid /dev/sdb1
/dev/sdb1: UUID="848ed844-dd07-4689-8e25-3da2f814b1d4" BLOCK_SIZE="512" TYPE="xfs" PARTLABEL="Linux filesystem" PARTUUID="264ca626-8ce6-44d3-abb2-82fe076a2a9b"
2) Редактируем файл vi /etc/fstab – добавляем
-
-
- информацию о устройстве (uuid/device/label), лучше использовать uuid т.к. устройство может изменить имя при изменении подключения устройства на шине
- точки монтирования (/),
- файловой системе (ext4), но возможно и указание auto для автоматического обнаружения
- опциям (options) по ее монтированию, напр. ro (-o ro) или noexec (-o noexec). Помимо описанных ниже существуют специфичные для файловой системы опции, при их указании нужно быть аккуратным т.к. при переходе на другую ФС они приведут к неработоспособности (ОС не будет загружать ФС с неизвестныси для нее параметрами).
- defaults – загружаться с опциями по монтимованию ОС по умолчанию, чаще всего за этим скрыто использование следующих опций: rw, suid, dev, exec, auto, nouser, async. К defaults можно добавлять другие опции, например: defaults, nofail.
- auto/noauto – автоматически монтировать раздел при загрузке системы (auto, по умолчанию) или нет
- ro/rw – примонтировать только для чтения или для чтения и записи, по умолчанию rw, но можно когда важно сохранить целостность данных на носителе примонтировать ro
- sync/async – синхронная/асинхронная запись на диск – при синхронной записи ожидается 100% запись на диск до перехода к следующей операции записи (плюс в гарантии записи), при асинхронной записи ожидания успеха нет (плюс в скорости)
- errors=remount-ro (default debian for system disk) – приведет к тому, что при обнаружении ошибок файловая система будет монтироваться как RO
- nofail – не прерывать загрузку даже при ошибках (например, 1) поменялся тип ФС раздела из-за изменения на шине, а монтирование не по UUID 2) устройство или точка моноирования вообще не найдено – напр. отказ HDD, точка монтирования не создана)
- nofail allows the boot sequence to continue even if the drive fails to mount.
- usrquota/grpquota – возможность включения пользовательских/групповых квот на разделе, обычно по умолчанию включено в операционных системах
- exec/noexec – возможность запуска бинарных файлов на диске, по умолчанию разрешено (exec). noexec базово защищает от запуска вредоносов (базовая защита т.к. их по факту все равно можно запустить указав интерпретатор).
- suid – разрешить операции с suid и sgid битами. В основном используются, чтобы позволить пользователям выполнять бинарные файлы со временно приобретёнными привилегиями для выполнения определённой задачи.
- nosuid – запрещает операции с suid и sgid битами.
- noatime / nodirtime – подробнее выше
- dump bit – в актуальных системах не используется, но раньше разделы с таким битом бекапились – т.е. утилита смотрела на каких дисках/разделах стоит бит и бекапила только их
- pass bit – указывает на необходимость проверки файловой системы на проверку ошибок fsck, подробнее про fsck отдельно выше. По опциям fstab: 0 – не проверять при загрузке, 1 – обязательна проверка файловой системы перед загрузкой (по умолчанию на системных дисках), 2 – проверка перед загрузкой не обязательна/может быть после загрузки/можно пропустить.
-
vi /etc/fstab

~# cat /etc/fstab
# /etc/fstab: static file system information.
#
# Use 'blkid' to print the universally unique identifier for a
# device; this may be used with UUID= as a more robust way to name devices
# that works even if disks are added and removed. See fstab(5).
#
# <file system> <mount point> <type> <options> <dump> <pass>
# / was on /dev/sdb1 during installation
UUID=48711f5b-89da-4c2c-b4f8-49c5d92945cb / ext4 errors=remount-ro 0 1
# swap was on /dev/sdb5 during installation
UUID=e7717451-7951-4f3e-94d5-40bd83943003 none swap sw 0 0
3) После модификации fstab файла рекомендуется до перезагрузки ( фактическое использование fstab файла) проверить, что fstab файл корректен:
-
- mount -A – монтируем все что прописано в fstab и имеет опцию auto
- The command mount -a mounts all filesystems that are listed in the file /etc/fstab and have the option auto set. The option auto means that the filesystem can be mounted automatically by the mount -a command or at boot time. The option noauto means that the filesystem can only be mounted explicitly by the mount command with the device or mount point specified
- или mount <mount point> – если mount не указать раздел, а указать точку монтирования, утилита попытается найти раздел в файле fstab
- mount -A – монтируем все что прописано в fstab и имеет опцию auto
Mount так же позволяет посмотреть все разделы/диски в системе и их форматирование (по сути за mount в этом случае cat /proc/mounts , но вывод достаточно плохо читаемый в сравнении с альтернативами (lsblk/fdisk/gdisk/parted).
# mount
sysfs on /sys type sysfs (rw,nosuid,nodev,noexec,relatime)
proc on /proc type proc (rw,nosuid,nodev,noexec,relatime)
udev on /dev type devtmpfs (rw,nosuid,relatime,size=2005896k,nr_inodes=501474,mode=755)
devpts on /dev/pts type devpts (rw,nosuid,noexec,relatime,gid=5,mode=620,ptmxmode=000)
tmpfs on /run type tmpfs (rw,nosuid,noexec,relatime,size=404156k,mode=755)
/dev/sda1 on / type ext4 (rw,relatime,errors=remount-ro)
securityfs on /sys/kernel/security type securityfs (rw,nosuid,nodev,noexec,relatime)
tmpfs on /dev/shm type tmpfs (rw,nosuid,nodev)
tmpfs on /run/lock type tmpfs (rw,nosuid,nodev,noexec,relatime,size=5120k)
tmpfs on /sys/fs/cgroup type tmpfs (ro,nosuid,nodev,noexec,mode=755)
cgroup2 on /sys/fs/cgroup/unified type cgroup2 (rw,nosuid,nodev,noexec,relatime,nsdelegate)
cgroup on /sys/fs/cgroup/systemd type cgroup (rw,nosuid,nodev,noexec,relatime,xattr,name=systemd)
pstore on /sys/fs/pstore type pstore (rw,nosuid,nodev,noexec,relatime)
bpf on /sys/fs/bpf type bpf (rw,nosuid,nodev,noexec,relatime,mode=700)
cgroup on /sys/fs/cgroup/cpu,cpuacct type cgroup (rw,nosuid,nodev,noexec,relatime,cpu,cpuacct)
cgroup on /sys/fs/cgroup/perf_event type cgroup (rw,nosuid,nodev,noexec,relatime,perf_event)
cgroup on /sys/fs/cgroup/net_cls,net_prio type cgroup (rw,nosuid,nodev,noexec,relatime,net_cls,net_prio)
cgroup on /sys/fs/cgroup/rdma type cgroup (rw,nosuid,nodev,noexec,relatime,rdma)
cgroup on /sys/fs/cgroup/cpuset type cgroup (rw,nosuid,nodev,noexec,relatime,cpuset)
cgroup on /sys/fs/cgroup/memory type cgroup (rw,nosuid,nodev,noexec,relatime,memory)
cgroup on /sys/fs/cgroup/pids type cgroup (rw,nosuid,nodev,noexec,relatime,pids)
cgroup on /sys/fs/cgroup/blkio type cgroup (rw,nosuid,nodev,noexec,relatime,blkio)
cgroup on /sys/fs/cgroup/freezer type cgroup (rw,nosuid,nodev,noexec,relatime,freezer)
cgroup on /sys/fs/cgroup/devices type cgroup (rw,nosuid,nodev,noexec,relatime,devices)
systemd-1 on /proc/sys/fs/binfmt_misc type autofs (rw,relatime,fd=37,pgrp=1,timeout=0,minproto=5,maxproto=5,direct,pipe_ino=10477)
debugfs on /sys/kernel/debug type debugfs (rw,relatime)
hugetlbfs on /dev/hugepages type hugetlbfs (rw,relatime,pagesize=2M)
mqueue on /dev/mqueue type mqueue (rw,relatime)
tmpfs on /run/user/0 type tmpfs (rw,nosuid,nodev,relatime,size=404152k,mode=700)
FLOCK
Запуск только одного instance программы возможен с использованием lock файлов и таких утилит как flock, lockfile.
По умолчанию второй instance app при запуске обоих instance с одним flock ожидает снятия блокировки первым (активным) instance.
By default, if the lock cannot be immediately acquired, flock waits until the lock is available.
Но это можно легко поменять:
# Ждем 10 секунд
flock --wait 10 /var/lock/test.lock python3 /root/weril/test.py
# Не ждем вообще flock –nonblock /var/lock/test.lock python3 /root/weril/test.py # И в первом и во втором случае получаем Error code 1 (т.е. не 0 -> ошибка) echo $?
Просмотр файлов
ls – list files-a - all files (включая скрытые) -l - long listing (показать таблицу с правами-размером-датами) -h - human readable (конвертация в MB/GB/etc)
FIND – ПОиск файлов
Поиск файла во всей системе (на всех носителях) по названию в файловой системе. Опция поиска словом указывается с одним тире, что достаточно нестандартно для Linux/UNIX (обычно с одним тире только буква, а при слове используется двойное тире, в случае одинарного и слова оно может быть разбито на отдельные опции -n -a -m -e). По умолчанию find рекурсивный и делает поиск на максимальную глубину директорий от исходной но это можно изменить используя опцию -maxdepth.sudo find / -name "downloads.txt" 2>/dev/null sudo find / -name "*.pdf" 2>/dev/null sudo find / -maxdepth 1 -name "*.pdf" 2>/dev/null # только текущая =1, не =0
По размеру.
find / -size 20c/20k/20M/20G  # ровно размером 20 байт/килобайт/мегабайт/гигабайт
find / -size -20c/20k/20M/20G # меньше размера 20 байт/килобайт/мегабайт/гигабайт
find / -size +20c/20k/20M/20G # больше размера 20 байт/килобайт/мегабайт/гигабайт
По разрешениям. Например найти все свои файлы/файлы группы по имени или id, например, для поиска всего что принадлежит пользователю перед удалением. Либо
найти файлы, у которых есть разрешение всем на исполнение + всем на изменение (ИБ аудит – такие файлы злоумышленник может использовать для самостоятельного запуска или заставить кого то запустить их).
find / -user redkin_p
find / -group redkin_p
find / -uid 1001
find / -gid 1001
find / -perm /u=,g=,o=
find / -perm /g=w,o=w  # все файлы у которых есть для группы/остальных права на write
find / -perm /g=+w,o=+w  # можно использовать при поиске +/- по аналогии с размером файлов (r min, w middle, x max)

You can search for all files in the system with setuid special bit defined using the find command:
~ find /usr/bin -perm -4000
/usr/bin/chage
/usr/bin/gpasswd
/usr/bin/newgrp
/usr/bin/chfn
/usr/bin/chsh

You can search for all files in the system with setgid special bit defined using the find command
~ find / -perm -2000 2>/dev/null
/run/log/journal
/usr/bin/wall
/usr/bin/write
/usr/bin/ssh-agent

You can search for all files in the system with sticky bit defined using the find command:
# find / –type d –perm –1000
/dev/mqueue
/dev/shm
/tmp
/tmp/.X11-unix
/tmp/.ICE-unix
Есть так же поиск по вхождению в регулярное выражение (-e).
find может не работать если не заключать искомый pattern со спец. символами в кавычки. Происходит это тогда, когда в локальной папке присутствуют искомые файлы. Причем сам find об этом пишет в подсказке к ошибке – possible unquoted pattern after predicate.
serv# find /home/user/test -name webs*
find: paths must precede expression: `webs.txt'
find: possible unquoted pattern after predicate `-name'?
find -not -newermt '-120 seconds' -delete
while true; do date; echo "delete files older 120 seconds"; find -not -newermt '-120 seconds' -delete; sleep 120; done
Find умеет работать с выражениями OR (-o), AND (-a): найти файлы с тремя различными именами в рамках одного поиска.
find / -name 'xxx' -o name 'yyy' -o name 'zzz'
Удаление файлов
rm – простое удаление файлов. При удалении по маске можно столкнуться с ошибкой Argument list too long, которая говорит о том, что файлов слишком много. В таком случае или удаляем все или удаляем скриптом (while xxx). rmdir – удаление директорий shred – позволяет удалять файл и осуществлять перезапись в пространство памяти, которое занимал файл, тем самым значительно усложняя его восстановление.shred -uv /etc/apt/trusted.gpg.d/microsoft.gpg
tmpwatch – позволяет удалять файлы, к котором не обращались определенное время. Обычно используется для чистки temp директорий.
tmpwatch - removes files which haven't been accessed for a period of time/usr/sbin/tmpwatch –ctime 30d /temp/script_temp
Ошибки
У меня такое было когда удалил для виртуалки диск. Нужно нажать S и разобраться с файлом /etc/fstab – удалить левый диск или поменять там UUID диска (если просто примантировать новый диск в ту же папку это не поможет, нужно обновлять UUID).
"Дисковод /usr/data не существует. Ожидайте или нажмите S, чтобы пропустить подключение или М для выполнения самостоятельного восстановления"
LVM – Logical Volume Manager
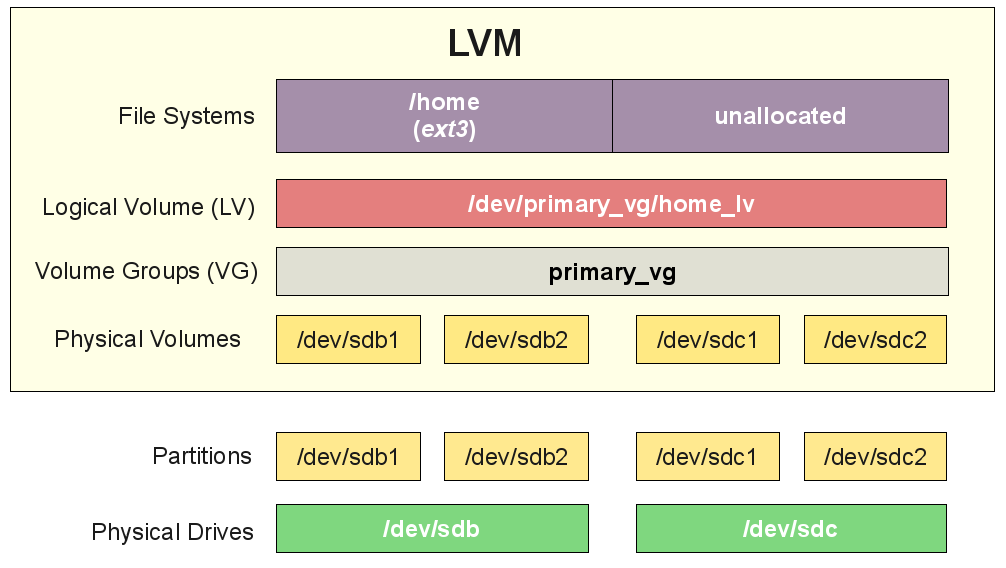
- LVM (Logical Volume Manager) — подсистема операционных систем Linux, позволяющая использовать разные области физического жёсткого диска или разных жёстких дисков как один логический том. Зачастую в современных ОС «устанавливается» при установке ОС по умолчанию (к примерк, Rocky Linux).
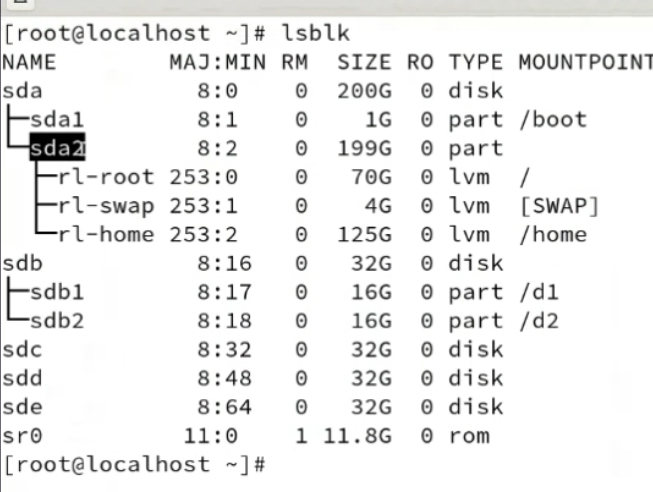 У LVM есть ряд преимуществ/функций за счет использования абстракции от физических дисков:
- больше одного диска можно сделать размер Тома (logical volume)
- динамическое изменение размера Тома (logical volume) – возможность resizing volume group как в сторону увеличения (enlarge – lvextend), так и в сторону уменьшения (shrink – lvreduce)
- возможность плановой замены физических дисков/разделов (HDD/SSD) без прерывания сервиса через вынос возможно проблемных дисков из LVM (так можно заменить все диски без простоя) – см. ниже “LVM: Pvmove Меняем потенциально сбойный диск”
- mirroring – зеркалирование Тома (logical volume) для отказоустойчивости – без RAID можно сохранять одни данные на нескольких носителей, причем с точки зрения настройки ты включаешь зеркалирование, а LVM обеспечивает его – т.е. дублирует данные на другой физический носитель/носители относительно текущего носителя данных
- snapshot – хранит разницу между состоянием текущим и будущим (т.е. будущие файлы/изменения добавляются в snapshot), по умолчанию не хранит ничего.
- Можно просто откатить состояние volume на snapshot, см. нижеLVM: восстановление всего из snapshot
- но можно примонтировать snapshot и восстановить отдельные файлы из него см. ниже “LVM: восстановление файла из snapshot”.
- (Резервное копирование, LVM) Если говорить в целом про snapshot:
- snapshot =! Backup как минимум потому, что
- он обычно хранит только diff от данных от текущего состояния системы и того состояния, которое было при снятии snapshot
- snapshot хранятся на тех же носителях, что и основная система
- snapshot на storage/СХД (EMC/IBM) устройствах
- snapshot используются на всю катушку – есть банки которые все бекапы делают только на них -> напр, каждые 15мин делается snapshot всей базы и их хранятся сотник штук
- разработчики таких устройств поддерживают использование snapshot, но полноценные backup это не snapshot, рекомендуется использовать snapshot + backup
- удобно и правильно комбинировать snapshot и backup – snapshot получаешь консисентное состояние в один момент времени всех элементов системы (к примеру файлов сайта и файлов БД), а backup-ом это состояние уже сохраняешь, при этом нужно учитывать, что иногда при снятии snapshot есть некоторое «подмораживание системы на запись» на некоторое время
- snapshot =! Backup как минимум потому, что
- thin provisioning (аналогия VM)
- можно сделать cache pool из выделенных носителей для logical volume – например на базе SSD пула cache SSD loop (можно как ro, так и rw cache – по умолчанию), который будет работать «перед» медленной корзиной HDD, в итоге может значимо ускорится работа с данными. Для write будет ускорена любая операция, например бекапы – сначала бекап данные будут попадать на ssd, а уже далее распространяться на медленные HDD (препод LPIC-2). При этом если этот cache упадет, то данные потеряются, поэтому его лучше резервировать (RAID, LVM mirror).
- Краткая инструкция работы с LVM
- У полных команд LVM есть короткие аналоги и достаточно хорошие (лаконичные по выводу) аналоги pvs, lvs, vgs
- Термины
-
- Physical Volume – раздел или диск (можно добавлять диск без создания разделов на нем, это даже рекомендуется если диск планируется использовать только под lvm) с инициализированным LVM
- Physical Extent – минимальное адресуемое пространство в Volume Group. Physical Volume состоит из Physical Extent.
-
Volume Group – собрание всех физических томов в одну группу
-
Logical Volume – логический раздел на Volume Group, их может быть несколько или может быть один
-
Logical Extent – минимальное адресуемое пространство в Logical Volume. Logical Volume состоит из Logical Extent. Logical Extent это по сути Physical Extent, которые отданы под Logical Volume.
-
- Physical Volume – раздел или диск (можно добавлять диск без создания разделов на нем, это даже рекомендуется если диск планируется использовать только под lvm) с инициализированным LVM

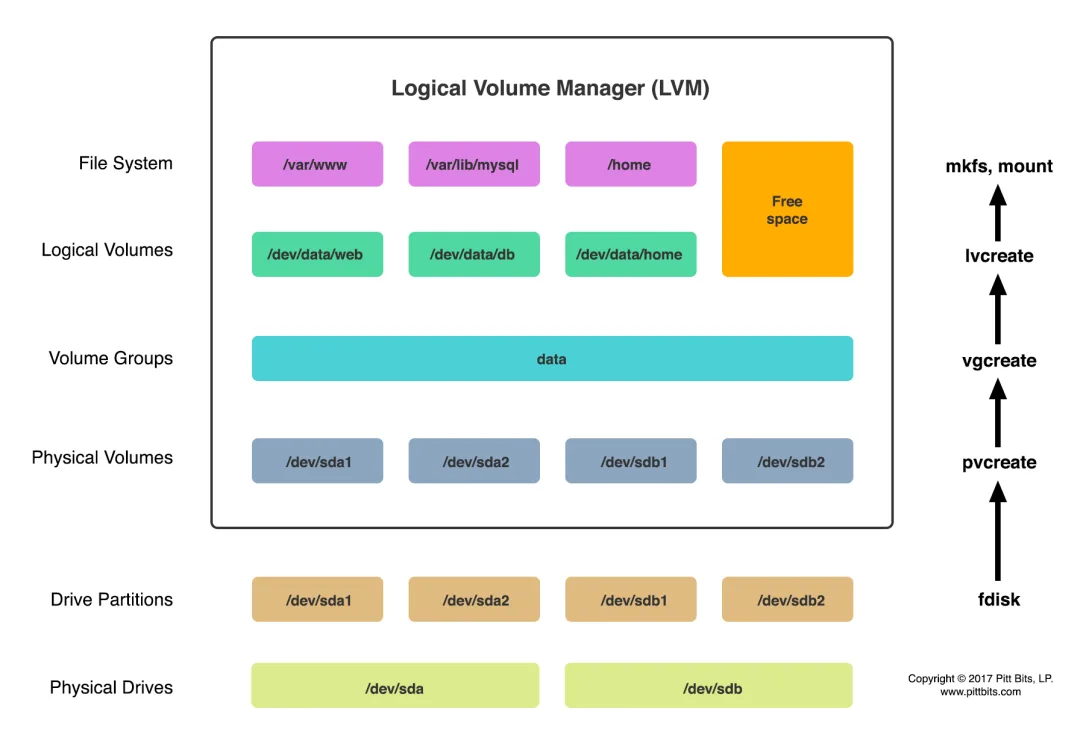
The LVM solution is widely used for managing disk storage. It provides an abstraction layer between the physical storage and the file system, enabling the file system to be resized, to span across multiple physical disks, use random disk space, etc. LVM allows us to accumulate spaces taken from one or several partitions or disks (called physical volumes) to form a logical container (called volume group), which is then divided into logical partitions (called logical volumes). Primary benefits that LVM offers include, in addition to the three advantages mentioned above, the resizing of volume groups and logical volumes, online data migration between logical volumes and physical volumes, user-defined naming for volume groups and logical volumes, mirroring and striping across multiple physical disks, and snapshotting of logical volumes. RHEL7 includes version 2 of LVM called LVM2, which is the default when we use the LVM technique to carve up storage devices.
As noted above, the LVM structure is made up of three key objects called physical volume, volume group, and logical volume. These objects are further carved up in physical extents (PEs) and logical extents (LEs). The LVM components are explained in the following sub-sections.

Physical Volume
A physical volume (PV) is created when a block storage device such as a partition or an entire disk is brought under LVM control after going through the initialization process. This process constructs LVM data structures on the device, including a label on the second sector and metadata information shortly thereafter. The label includes a UUID, device size, and pointers to the locations of data and metadata areas. Given the criticality of metadata, LVM stores a copy of it at the end of the physical volume as well. The rest of the device space is available for use.
Currently, there is one physical volume on server1, which was created during the installation. Run the pvs command to view it:

[root@localhost ~]# pvs -v
   Using physical volume(s) on command line.
    Found same device /dev/sda2 with same pvid ojnq6jpjmC6Klw5W90X6TgFFTp71ic2o
  PV         VG     Fmt  Attr PSize PFree  DevSize PV UUID
  /dev/sda2  centos lvm2 a--  7.51g 40.00m   7.51g ojnq6j-pjmC-6Klw-5W90-X6Tg-FFTp-71ic2o

The output confirms the presence of one physical volume /dev/vda2 of size 7.51GB in centos volume group. Additional information displays the metadata format (Fmt) used, status of the physical volume under the Attr column (a for allocatable), and the amount of free space available on the physical volume. Run this command again with the –v option and it will show you UUID of the PV.
Volume Group
A volume group (VG) is created when at least one physical volume is added to it. The space from all physical volumes in a volume group is aggregated to form one large pool of storage, which is then used to build one or more logical volumes. The physical volumes added to a volume group may be of varying sizes. LVM writes metadata information for the volume group on each physical volume that is added to it. The volume group metadata contains its name, a unique ID, date and time of creation, how it was created, the extent size used, a list of included physical volumes and their attributes, a list of logical volumes, a mapping of physical and logical extents, etc. A volume group can have any name assigned to it at the time of its creation. For example, it may be called vg01, vgora, or vgweb so as to identify the type of information it is constructed to store. The metadata includes volume group information, and a copy of it is maintained at two locations on each physical volume within the volume group.
Currently, there is one volume group on server1, which was created during the installation. Run the vgs command to view it:

[root@localhost ~]#  vgs -v
    Using volume group(s) on command line.
  VG     Attr   Ext   #PV #LV #SN VSize VFree  VG UUID                                VProfile
  centos wz--n- 4.00m   1   2   0 7.51g 40.00m qrJWqt-wf2W-Oqs0-5BO5-LMF3-lIX5-J7t00L

The output confirms the existence of one volume group called centos on the system containing one physical volume. Additional information displays the number of logical volumes (LV) and snapshots (SN) in the volume group, status of the volume group under the Attr column (w for writeable, z for resizable, and n for normal), size of the volume group, and the amount of free space available in the volume group. Run this command again with the –v option and it will show you UUID of the VG.
Physical Extent ((минимальный блок данных, если умножить минимальный используемый размер блока на количество блоков - можно узнать объем physical volumeq (в ))
A physical volume is divided into several smaller logical pieces when it is added to a volume group. These logical pieces are known as physical extents (PEs). An extent is the smallest allocatable unit of space in LVM. At the time we create a volume group, we can either define the size of the PE or leave it to the default size of 4MB. This means a 20GB disk would contain approximately 5,000 PEs. Any physical volumes added to this volume group thereafter will use the same PE size. The following command displays the physical extent size used in the centos volume group:

[root@localhost ~]# vgdisplay [vg1]
  --- Volume group ---
  VG Name               centos
  System ID
  Format                lvm2
  Metadata Areas        1
  Metadata Sequence No  3
  VG Access             read/write
  VG Status             resizable
  MAX LV                0
  Cur LV                2
  Open LV               2
  Max PV                0
  Cur PV                1
  Act PV                1
  VG Size               7.51 GiB
  PE Size               4.00 MiB
  Total PE              1922
  Alloc PE / Size       1912 / 7.47 GiB
  Free  PE / Size       10 / 40.00 MiB
  VG UUID               qrJWqt-wf2W-Oqs0-5BO5-LMF3-lIX5-J7t00L

[root@localhost ~]# vgdisplay centos | grep "PE Size"
  PE Size               4.00 MiB
Logical Volume
A volume group consists of a pool of storage taken from one or more physical volumes. This volume group space is divided into one or more logical partitions called logical volumes (LVs). A logical volume can be expanded or shrunk, and can use space taken from one or several physical volumes inside the volume group. The default naming convention for logical volumes is lvol0, lvol1, lvol2, and so on; however, we may assign any name that we wish. For example, a logical volume may be called system, undo, or oraarch so as to identify the type of information that it is constructed to store. Currently, there are two logical volumes on server1 that were created during the installation. Run the lvs command to view them. Run this command again with the –v option and it will show you more details.

[root@localhost ~]# lvs -v
    Using logical volume(s) on command line.
  LV   VG     #Seg Attr       LSize   Maj Min KMaj KMin Pool Origin Data%  Meta%  Move Cpy%Sync Log Convert LV UUID                                LProfile
  root centos    1 -wi-ao----   6.67g  -1  -1  253    0                                                     blfW3X-gTcc-0H0N-aENO-Lmnu-oowi-ZYYGpb
  swap centos    1 -wi-ao---- 820.00m  -1  -1  253    1                                                     7DtVXi-QVeV-gGzY-ry6y-gWYc-EUDY-dZeYpQ

The output indicates the presence of two logical volumes root and swap in vg00 volume group. Additional information displays the status of the logical volumes under the Attr column (w for writeable, i for inherited allocation policy, a for active, and o for open) and their sizes.
Logical Extent
A logical volume is made up of extents called logical extents (LEs). Logical extents point to physical extents, and they may be random or contiguous. The larger a logical volume is, the more LEs it will have. Logical extents are a set of physical extents allocated to the logical volume.
The PE and LE sizes are usually kept the same within a volume group; however, a logical extent can be smaller or larger than a physical extent. The default LE size is 4MB, which corresponds to the default PE size. The following command displays the information about the root logical volume in the root volume group. The output does not indicate the LE size; however, we can convert the LV size in MBs and then divide the result by the Current LE count to get the LE size (which comes to 4MB in the following example).

[root@localhost ~]# lvdisplay /dev/centos/root
  --- Logical volume ---
  LV Path                /dev/centos/root
  LV Name                root
  VG Name                centos
  LV UUID                blfW3X-gTcc-0H0N-aENO-Lmnu-oowi-ZYYGpb
  LV Write Access        read/write
  LV Creation host, time localhost.localdomain, 2016-07-27 16:45:48 +0300
  LV Status              available
  # open                 1
  LV Size                6.67 GiB
  Current LE             1707
  Segments               1
  Allocation             inherit
  Read ahead sectors     auto
  - currently set to     8192
  Block device           253:0
Thin Provisioning
Thin provisioning technology allows for the economical allocation and utilization of storage space. With thin provisioning support in LVM, we can create a thin pool of storage space and assign logical volumes larger space than what the pool actually has available. Applications begin consuming the actual space when data writing occurs. We set a threshold (80%, for instance) on the actual consumption of the physical storage in the thin pool, and monitor it. As soon as the actual usage reaches the preset threshold, we expand the thin pool dynamically by adding more physical storage to it. The logical volumes will automatically begin taking advantage of the new space right away. Thin provisioning technique saves us from spending more money upfront.

Managing Storage with Logical Volume
Manager Managing storage with LVM involves several administrative tasks, such as creating a physical volume, creating and displaying a volume group, creating and displaying a logical volume, extending a volume group, extending a logical volume, reducing a logical volume, renaming a logical volume, removing a logical volume, reducing a volume group, removing a volume group, and uninitializing a physical volume. All of these tasks are covered in this chapter.
LVM Commands
Physical Volume Commands
pvck Checks the integrity of a physical volume.
pvcreate Initializes a disk or partition for LVM use.
pvdisplay Displays details of a physical volume.
pvresize Resizes a physical volume.
pvmove Moves data from one physical volume to another.
pvremove Uninitializes a physical volume.
pvs Lists physical volumes.
pvscan Scans the entire system and lists all physical volumes found.
Volume Group Commands
vgck Checks the integrity of a volume group.
vgcreate Creates a volume group.
vgdisplay Displays the details of a volume group.
vgextend Adds a physical volume to a volume group.
vgreduce Removes a physical volume from a volume group.
vgrename Renames a volume group.
vgremove Removes a volume group.
vgs Lists volume groups.
vgscan Scans the entire system and lists all volume groups found, and rebuilds the cache.
Logical Volume Commands
lvcreate Creates a logical volume.
lvdisplay Displays the details of a logical volume.
lvextend Extends the size of a logical volume.
lvreduce Reduces the size of a logical volume.
lvremove Removes a logical volume.
lvrename Renames a logical volume.
Lvresize Resizes a logical volume. With the –r option, this command calls the resize2fs command and resizes the underlying file system as well.
lvs Lists logical volumes.
lvscan Scans the entire system and lists all logical volumes found
Miscellaneous LVM Commands
lvm Interactive LVM management tool.
lvmdiskscan Scans for existing LVM disks and partitions, and those that can be initialized for use in LVM. Execute the lvmdiskscan command to identify the disks and partitions:

[root@localhost ~]# lvmdiskscan
 /dev/centos/root [       6.67 GiB]
 /dev/sda1        [     500.00 MiB]
 /dev/centos/swap [     820.00 MiB]
 /dev/sda2        [       7.51 GiB] LVM physical volume
2 disks
1 partition
0 LVM physical volume whole disks
1 LVM physical volume

The above output shows six disks/partitions of which vda’s are used for the operating system, and the rest are empty.
Create a Physical Volume and a Volume Group
Если добавляешь сразу все диски на них не должно быть разделов (удаляешь через parted -> print + rm <number>) и они должны быть размечены (выставляешь через parted -> mklabel msdos)

created
СОЗДАЕМ РАЗДЕЛ
Create vdc1 of size 200MB using parted and confirm:

[root@localhost ~]# parted /dev/sdb mklabel msdos
Information: You may need to update /etc/fstab.

[root@localhost ~]# parted /dev/sdb mkpart primary 1 201m
Information: You may need to update /etc/fstab.

[root@localhost ~]# parted /dev/sdb print
Model: ATA VBOX HARDDISK (scsi)
Disk /dev/sdb: 1178MB
Sector size (logical/physical): 512B/512B
Partition Table: msdos
Disk Flags:
Number  Start   End    Size   Type     File system  Flags
1      1049kB  201MB  200MB  primary

Инициализируем в LVM раздел 1 тома sdb (sdb1) и весь том sdc (в целом pvcreate не обязательна команда т.к. неинициализированный диск будет инициализирован и добавлен в volume group если его указать при vgcreate):
[root@localhost ~]# pvcreate -v /dev/sdb1 /dev/sdc
    Found same device /dev/sda2 with same pvid ojnq6jpjmC6Klw5W90X6TgFFTp71ic2o
    Set up physical volume for "/dev/sdb1" with 391168 available sectors
    Zeroing start of device /dev/sdb1
    Writing physical volume data to disk "/dev/sdb1"
  Physical volume "/dev/sdb1" successfully created
    Found same device /dev/sda2 with same pvid ojnq6jpjmC6Klw5W90X6TgFFTp71ic2o
    Found existing signature on /dev/sdc at offset 510: LABEL="(null)" UUID="(null)" TYPE="dos" USAGE="partition table"
WARNING: dos signature detected on /dev/sdc at offset 510. Wipe it? [y/n]: y
  Wiping dos signature on /dev/sdc.
    Set up physical volume for "/dev/sdc" with 2300672 available sectors
    Zeroing start of device /dev/sdc
    Writing physical volume data to disk "/dev/sdc"
 Physical volume "/dev/sdc" successfully created

Create centos1 volume group using the vgcreate command and add раздел 1 тома sdb (sdb1) и весь том sdc to it. Use the –s option to specify the PE size in MBs. Once a disk or a partition is initialized and added to a volume group, both are treated identically. LVM does not differentiate between the two.

[root@localhost ~]# vgcreate centos1 /dev/sdb1 /dev/sdc
    Found same device /dev/sda2 with same pvid ojnq6jpjmC6Klw5W90X6TgFFTp71ic2o
    Adding physical volume '/dev/sdb1' to volume group 'centos1'
    Found same device /dev/sda2 with same pvid ojnq6jpjmC6Klw5W90X6TgFFTp71ic2o
    Adding physical volume '/dev/sdc' to volume group 'centos1'
    Archiving volume group "centos1" metadata (seqno 0).
    Creating volume group backup "/etc/lvm/backup/centos1" (seqno 1).
  Volume group "centos1" successfully created

[root@localhost ~]# vgcreate -s 32M centos1 /dev/sdb /dev/sdc -v
  Found same device /dev/sda2 with same pvid ojnq6jpjmC6Klw5W90X6TgFFTp71ic2o
  Found same device /dev/sda2 with same pvid ojnq6jpjmC6Klw5W90X6TgFFTp71ic2o
  Found existing signature on /dev/sdb at offset 510: LABEL="(null)" UUID="(null)" TYPE="dos" USAGE="partition table"
WARNING: dos signature detected on /dev/sdb at offset 510. Wipe it? [y/n]: y
  Wiping dos signature on /dev/sdb.
  Set up physical volume for "/dev/sdb" with 2300672 available sectors
  Adding physical volume '/dev/sdb' to volume group 'centos1'
Found same device /dev/sda2 with same pvid ojnq6jpjmC6Klw5W90X6TgFFTp71ic2o
  Found same device /dev/sda2 with same pvid ojnq6jpjmC6Klw5W90X6TgFFTp71ic2o
  Found existing signature on /dev/sdc at offset 510: LABEL="(null)" UUID="(null)" TYPE="dos" USAGE="partition table"
WARNING: dos signature detected on /dev/sdc at offset 510. Wipe it? [y/n]: y
  Wiping dos signature on /dev/sdc.
  Set up physical volume for "/dev/sdc" with 2300672 available sectors
  Adding physical volume '/dev/sdc' to volume group 'centos1'
 Archiving volume group "centos1" metadata (seqno 0).
  Zeroing start of device /dev/sdb
  Writing physical volume data to disk "/dev/sdb"
  Physical volume "/dev/sdb" successfully created
  Zeroing start of device /dev/sdc
  Writing physical volume data to disk "/dev/sdc"
  Physical volume "/dev/sdc" successfully created
  Creating volume group backup "/etc/lvm/backup/centos1" (seqno 1).
 Volume group "centos1" successfully

CHECK
Display basic information for vg01 using the vgs and vgscan commands:

[root@localhost ~]# vgs centos1
  VG      #PV #LV #SN Attr   VSize VFree
  centos1   2   0   0 wz--n- 1.27g 1.27g

[root@localhost ~]# vgscan
 Reading all physical volumes.  This may take a while...
  Found volume group "centos" using metadata type lvm2
  Found volume group "centos1" using metadata type lvm2

We can also display the details for the volume group with the vgdisplay command. With the –v switch, this command also shows the physical volumes in it. The vgdisplay command shows that there are two physical volumes in centos1 volume group, with 70 PEs in the first physical volume and 11 in the second, totaling 81. The PE size is 16MB and total usable space is about 1.27GB.

[root@localhost ~]# vgdisplay -v centos1
 Using volume group(s) on command line.
 --- Volume group ---
  VG Name               centos1
  System ID
  Format                lvm2
  Metadata Areas        2
  Metadata Sequence No  1
  VG Access             read/write
  VG Status             resizable
  MAX LV                0
  Cur LV                0
  Open LV               0
  Max PV                0
  Cur PV                2
  Act PV                2
  VG Size               1.27 GiB
  PE Size               16.00 MiB
  Total PE              81
  Alloc PE / Size       0 / 0
  Free  PE / Size       81 / 1.27 GiB
  VG UUID               JwOT6S-Vvqu-EaSF-Vn0e-Snrm-1bf4-J4hSi2
  --- Physical volumes ---
  PV Name               /dev/sdb1
  PV UUID               urNQ0F-pSlY-CZZa-49Ct-rHQi-U80Y-2pKdbh
PV Status             allocatable
  Total PE / Free PE    11 / 11
  PV Name               /dev/sdc
  PV UUID               HaEpMj-UmlI-XpDM-RgDH-bXjb-maLk-vMxKoG
  PV Status             allocatable
  Total PE / Free PE    70 / 70
Display basic information for vdb using the pvs and pvscan commands:[root@localhost ~]# pvs  PV         VG      Fmt  Attr PSize   PFree
  /dev/sda2  centos  lvm2 a--    7.51g  40.00m
  /dev/sdb1  centos1 lvm2 a--  176.00m 176.00m
  /dev/sdc   centos1 lvm2 a--    1.09g   1.09g

[root@localhost ~]# pvscan
  PV /dev/sdb1   VG centos1   lvm2 [176.00 MiB / 176.00 MiB free]
  PV /dev/sdc    VG centos1   lvm2 [1.09 GiB / 1.09 GiB free]
  PV /dev/sda2   VG centos    lvm2 [7.51 GiB / 40.00 MiB free]
  Total: 3 [8.77 GiB] / in use: 3 [8.77 GiB] / in no VG: 0 [0   ]
We can also display the details for the physical volumes with the pvdisplay command:
[root@localhost ~]#  pvdisplay [/dev/sdb1 /dev/sdc]
  --- Physical volume ---
  PV Name               /dev/sdb1
  VG Name               centos1
  PV Size               191.00 MiB / not usable 15.00 MiB
  Allocatable           yes
  PE Size               16.00 MiB
  Total PE              11
  Free PE               11
  Allocated PE          0
  PV UUID               urNQ0F-pSlY-CZZa-49Ct-rHQi-U80Y-2pKdbh
  --- Physical volume ---
  PV Name               /dev/sdc
  VG Name               centos1
  PV Size               1.10 GiB / not usable 3.38 Mi
  Allocatable           yes
  PE Size               16.00 MiB
  Total PE              70
  Free PE               70
  Allocated PE          0
  PV UUID               HaEpMj-UmlI-XpDM-RgDH-bXjb-maLk-vMxKoG
Create a Logical Volume (((после создания им можно уже пользоваться как полноценным разделом - форматировать mkfs под файловую систему mkfs.xfs /dev/mapper/vg1-lv1 (рекомендуется) или mkfs.xfs /dev/vg1/lv1 (менее рекомендуется), монтировать, прописывать в fstab и проч ; размер указывается в MB, но можно указать в GB - 32G)))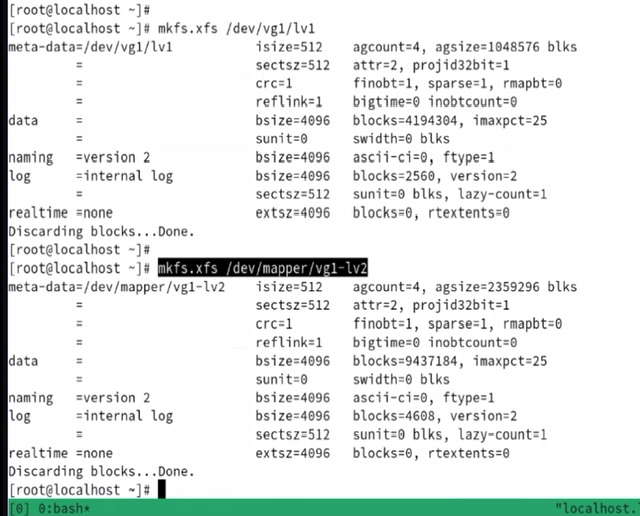
Create test of size 1GB using the lvcreate command. Use the –L option to specify the size and –n for the custom name. [root@localhost ~]# lvcreate -L 1000 -n test centos1 Rounding up size to full physical extent 1008.00 MiB Logical volume "test" created. Create lvol0 of size 250MB using the lvcreate command. Use the –L option to specify the logical volume size. You may want to use the –v, –vv, or –vvv option with the command for verbosity. [root@localhost ~]# lvcreate -L 250 centos1 -v Finding volume group "centos1" Rounding up size to full physical extent 256.00 MiB Archiving volume group "centos1" metadata (seqno 1). Creating logical volume lvol0 Creating volume group backup "/etc/lvm/backup/centos1" (seqno 2). Activating logical volume "lvol0". activation/volume_list configuration setting not defined: Checking only host tags for centos1/lvol0 Creating centos1-lvol0 Loading centos1-lvol0 table (253:2) Resuming centos1-lvol0 (253:2) Wiping known signatures on logical volume "centos1/lvol0" Initializing 4.00 KiB of logical volume "centos1/lvol0" with value 0. Logical volume "lvol0" created. The size may be specified in KBs (kilobytes), MBs (megabytes), GBs (gigabytes), TBs (terabytes), PBs (petabytes), EBs (exabytes), bytes, sectors, or a count of LEs; however, MB is the default if no unit is specified. The minimum size of a logical volume is the size of a PE set at the time of volume group creation, and it is always in multiples of the PE size. For instance, logical volumes that we can create in vg01 with the PE size set at 16MB will be 16MB, 32MB, 48MB, 64MB, and so on; it cannot be any other size. Therefore, care must be taken when setting the PE size and creating logical volumes to avoid wasting space. Display basic information for the two logical volumes using the lvs and lvscan commands: [root@localhost ~]# lvs LV VG Attr LSize Pool Origin Data% Meta% Move Log Cpy%Sync Convert root centos -wi-ao---- 6.67g swap centos -wi-ao---- 820.00m lvol0 centos1 -wi-a----- 256.00m test centos1 -wi-a----- 1008.00m [root@localhost ~]# lvscan ACTIVE '/dev/centos/swap' [820.00 MiB] inherit ACTIVE '/dev/centos/root' [6.67 GiB] inherit ACTIVE '/dev/centos1/lvol0' [256.00 MiB] inherit ACTIVE '/dev/centos1/test' [1008.00 MiB] inherit Execute the vgdisplay command on centos1 with the –v option to get details for the entire volume group including the logical volumes and the physical volumes it holds. You can also run the lvdisplay command on /dev/ centos1 /lvol0 and /dev/ centos1 /test to obtain the details for the two logical volumes. If you want to understand where the vgdisplay command gets volume group information from, go to the /etc/lvm/backup directory and view the contents of the desired volume group file. [root@localhost ~]# lvdisplay centos1 --- Logical volume --- LV Path /dev/centos1/lvol0 LV Name lvol0 VG Name centos1 LV UUID qg4Oz5-eo7Y-k8zf-6FFd-m4t0-JwNS-CQs4gG LV Write Access read/write LV Creation host, time localhost.localdomain, 2016-10-31 17:00:28 +0300 LV Status available # open 0 LV Size 256.00 MiB Current LE 16 Segments 1 Allocation inherit Read ahead sectors auto - currently set to 8192 Block device 253:2 --- Logical volume --- LV Path /dev/centos1/test LV Name test VG Name centos1 LV UUID VWAaZO-XDnt-UlHH-MD0D-F4ty-6roE-qRK62v LV Write Access read/write LV Creation host, time localhost.localdomain, 2016-10-31 17:03:08 +0300 LV Status available # open 0 LV Size 1008.00 MiB Current LE 63 Segments 2 Allocation inherit Read ahead sectors auto - currently set to 8192 Block device 253:3 Пример просмотра альтернативными командами, в случае с lsblk видим использование нескольких physical volume в logical volume т.к. объема одного pv недостаточно для lv.

Добавляем физический диск в vg/lv: Extend a Volume Group and a Logical Volume
Prepare /dev/sdd for use in LVM using the pvcreate command:

[root@localhost ~]# pvcreate /dev/sdd -v
    Found same device /dev/sda2 with same pvid ojnq6jpjmC6Klw5W90X6TgFFTp71ic2o
    Found same device /dev/sdb1 with same pvid urNQ0FpSlYCZZa49CtrHQiU80Y2pKdbh
    Found same device /dev/sdc with same pvid HaEpMjUmlIXpDMRgDHbXjbmaLkvMxKoG
    Set up physical volume for "/dev/sdd" with 1035302 available sectors
    Zeroing start of device /dev/sdd
    Writing physical volume data to disk "/dev/sdd"
  Physical volume "/dev/sdd" successfully created
Add /dev/sdd to centos1 using the vgextend command:

[root@localhost ~]# vgs centos1
  VG      #PV #LV #SN Attr   VSize VFree
  centos1   2   2   0 wz--n- 1.27g 32.00m

[root@localhost ~]# vgextend centos1 /dev/sdd -v
    Using volume group(s) on command line.
    Found same device /dev/sdb1 with same pvid urNQ0FpSlYCZZa49CtrHQiU80Y2pKdbh
    Found same device /dev/sdc with same pvid HaEpMjUmlIXpDMRgDHbXjbmaLkvMxKoG
    Found same device /dev/sda2 with same pvid ojnq6jpjmC6Klw5W90X6TgFFTp71ic2o
    Found same device /dev/sdb1 with same pvid urNQ0FpSlYCZZa49CtrHQiU80Y2pKdbh
    Found same device /dev/sdc with same pvid HaEpMjUmlIXpDMRgDHbXjbmaLkvMxKoG
    Adding physical volume '/dev/sdd' to volume group 'centos1'
    Volume group "centos1" will be extended by 1 new physical volumes
    Creating volume group backup "/etc/lvm/backup/centos1" (seqno 4).
  Volume group "centos1" successfully extended


View basic information of centos1. The output reflects the addition of a third physical volume to vg01. The total capacity for the volume group has now increased to 1.75GB, with 528MB free.
[root@localhost ~]# vgs centos1
  VG      #PV #LV #SN Attr   VSize VFree
  centos1   3   2   0 wz--n- 1.75g 528.00m

Execute the lvextend command on lvol0 and specify either the absolute desired size for the logical volume or the additional amount you wish to add to it (добавляем 128MB к существующим 256):
[root@localhost ~]# lvextend -L 384m /dev/centos1/lvol0
[root@localhost ~]# lvextend -L +128m /dev/centos1/lvol0
  Size of logical volume centos1/lvol0 changed from 256.00 MiB (16 extents) to 384.00 MiB (24 extents).
  Logical volume lvol0 successfully resized.

Execute the lvresize command on test and specify either the absolute desired size for the logical volume or the additional amount you wish to add to it (добавляем 300MB к существующим 1000, не забываем после увеличение размера logical volume увеличить размер файловой таблицы, например с использованием xfs_growfs /dev/mapper/vg1-lv1):
[root@localhost ~]# lvresize -L 1280m /dev/centos1/test
[root@localhost ~]# lvresize -L +300m /dev/centos1/test
  Rounding size to boundary between physical extents: 304.00 MiB
  Size of logical volume centos1/test changed from 1008.00 MiB (63 extents) to 1.28 GiB (82 extents).
  Logical volume test successfully resized.

Issue vgdisplay on centos1 with the –v switch for the updated details. The output shows a lot of information about the volume group and the logical and physical volumes it contains. It reflects the updates made in this exercise. In fact, each time a volume group or a logical volume in it is resized, the vgdisplay command output reflects those updates. The above output shows three physical volumes with the combined allocatable space grown to 1.75GB. The number of PEs have increased to 112, with 106 allocated to logical volumes and 6 unused. The unused PEs amounts to 96MB of free space in the pool. The two Logical Volume sections display the updated information for the logical volumes. And at the very bottom, all three physical volumes are listed with their device names and total and available PEs in each.
[root@localhost ~]# vgdisplay -v centos1
    Using volume group(s) on command line.
  --- Volume group ---
  VG Name               centos1
  System ID
  Format                lvm2
  Metadata Areas        3
  Metadata Sequence No  6
  VG Access             read/write
  VG Status             resizable
  MAX LV                0
  Cur LV                2
  Open LV               0
  Max PV                0
  Cur PV                3
  Act PV                3
  VG Size               1.75 GiB
  PE Size               16.00 MiB
  Total PE              112
  Alloc PE / Size       106 / 1.66 GiB
  Free  PE / Size       6 / 96.00 MiB
  VG UUID               JwOT6S-Vvqu-EaSF-Vn0e-Snrm-1bf4-J4hSi2

  --- Logical volume ---
  LV Path                /dev/centos1/lvol0
  LV Name                lvol0
  VG Name                centos1
  LV UUID                qg4Oz5-eo7Y-k8zf-6FFd-m4t0-JwNS-CQs4gG
  LV Write Access        read/write
  LV Creation host, time localhost.localdomain, 2016-10-31 17:00:28 +0300
  LV Status              available
  # open                 0
  LV Size                384.00 MiB
  Current LE             24
  Segments               2
  Allocation             inherit
  Read ahead sectors     auto
  - currently set to     8192
  Block device           253:2

  --- Logical volume ---
  LV Path                /dev/centos1/test
  LV Name                test
  VG Name                centos1
  LV UUID                VWAaZO-XDnt-UlHH-MD0D-F4ty-6roE-qRK62v
  LV Write Access        read/write
  LV Creation host, time localhost.localdomain, 2016-10-31 17:03:08 +0300
  LV Status              available

  # open                 0
  LV Size                1.28 GiB
  Current LE             82
  Segments               3
  Allocation             inherit
  Read ahead sectors     auto
  - currently set to     8192
  Block device           253:3


  --- Physical volumes ---
  PV Name               /dev/sdb1
  PV UUID               urNQ0F-pSlY-CZZa-49Ct-rHQi-U80Y-2pKdbh
  PV Status             allocatable
  Total PE / Free PE    11 / 0
  PV Name               /dev/sdc
  PV UUID               HaEpMj-UmlI-XpDM-RgDH-bXjb-maLk-vMxKoG
  PV Status             allocatable
  Total PE / Free PE    70 / 0
  PV Name               /dev/sdd
  PV UUID               y61FYs-B7dk-VX43-hGtn-xbYf-5m3l-q3PvXb
  PV Status             allocatable
  Total PE / Free PE    31 / 6
Rename, Reduce, and Remove a Logical Volume Remember to proceed with caution whenever you perform reduce and remove operations. There is risk involved when you reduce the size of a logical volume. You may end up losing data that is located on the logical extents being removed. To be on the safe side, perform a backup of the data in the logical volume before proceeding with size reduction. Rename lvol0 to lvolnew using the lvrename command and confirm with lvs: [root@localhost ~]# lvrename centos1 lvol0 lvolnew Renamed "lvol0" to "lvolnew" in volume group "centos1" [root@localhost ~]# lvs | grep lvol lvolnew centos1 -wi-a----- 384.00m Reduce the size of lvol0 logical volume to 100MB with the lvreduce command. Specify either the absolute desired size for the logical volume or the amount that you wish to subtract from it. Answer “Do you really want to reduce lvolnew?” in the affirmative. [root@localhost ~]# lvreduce 288m /dev/centos1/lvolnew [root@localhost ~]# lvreduce -L -100m /dev/centos1/lvolnew Rounding size to boundary between physical extents: 96.00 MiB WARNING: Reducing active logical volume to 288.00 MiB THIS MAY DESTROY YOUR DATA (filesystem etc.) Do you really want to reduce lvolnew? [y/n]: y Size of logical volume centos1/lvolnew changed from 384.00 MiB (24 extents) to 288.00 MiB (18 extents). Logical volume lvolnew successfully resized. Reduce the size of lvolnew logical volume to 50MB with the lvresize command. Specify either the absolute desired size for the logical volume or the amount that you wish to subtract from it. Answer “Do you really want to reduce lvolnew?” in the affirmative.[root@localhost ~]# lvresize -L 240m /dev/centos1/lvolnew [root@localhost ~]# lvresize -L -50m /dev/centos1/lvolnew Rounding size to boundary between physical extents: 48.00 MiB WARNING: Reducing active logical volume to 240.00 MiB THIS MAY DESTROY YOUR DATA (filesystem etc.) Do you really want to reduce lvolnew? [y/n]: y Size of logical volume centos1/lvolnew changed from 288.00 MiB (18 extents) to 240.00 MiB (15 extents). Logical volume lvolnew successfully resized. Remove lvolnew and test logical volumes with the lvremove command. Use the –f option to suppress the “Do you really want to remove active logical volume <lvol_name>” message. Removing a logical volume is a destructive task. You need to ensure that you perform a backup of any data in the target logical volume prior to deleting it. You will need to unmount the file system or disable swap in the logical volume. [root@localhost ~]# lvremove -f /dev/centos1/lvolnew Logical volume "lvolnew" successfully removed [root@localhost ~]# lvremove -f /dev/centos1/test Logical volume "test" successfully removed Execute the vgdisplay command and grep for “Cur LV” to see the number of logical volumes currently available in centos1. It should show 0, as you have removed both logical volumes. [root@localhost ~]# vgdisplay centos1 | grep 'Cur LV' Cur LV 0
Reduce and Remove a Volume Group
Remember to proceed with caution whenever you perform reduce and remove operations.

Remove sdb1 and sdc physical volumes from centos1 by issuing the vgreduce command:
[root@localhost ~]# vgreduce centos1 /dev/sdb1 /dev/sdc
  Removed "/dev/sdb1" from volume group "centos1"
  Removed "/dev/sdc" from volume group "centos1"

Remove the volume group using the vgremove command. This will also remove the last physical volume from it. You can also use the –f option with the vgremove command to force the volume group removal even if it contains any number of logical and physical volumes.
[root@localhost ~]# vgremove centos1
  Volume group "centos1" successfully removed
Uninitialize a Physical Volume
Issue the pvremove command on sdb, sdc, and sdd physical volumes to uninitialize them by deleting the LVM structural information from them. The disks and the partition are now back to their raw state and can be repurposed or removed from server.
[root@localhost ~]# pvremove /dev/sdb1 /dev/sdc /dev/sdd
  Labels on physical volume "/dev/sdb1" successfully wiped
  Labels on physical volume "/dev/sdc" successfully wiped
  Labels on physical volume "/dev/sdd" successfully wiped
Lvm: pVmove, Меняем потенциально сбойный диск
Пример сценария использования: меняем потенциально сбойный диск (sdc) – добавляем еще один диск (sde) в группу, выносим данные с проблемного диска (pvmove) на все другие в volume group, выводим проблемный диск. Проверяем, что данные не потерялись (один файл имеет ту же контрольную сумму). Итог: поменяли диски (так можно вплоть до всех) без прерывания работы системы!- pvmove переносит побитно данные блочного устройства и процесс будет занимать значительное количество времени если даже на устройстве всего один файл 10MB.
- можно pvmove использовать с указанием logical volume, но с учетом что только данные указанного logical volume будут перенесены.
[root@localhost ~]# md5sum /lv1/random.txt bfb6d7f559bad2ccbd7f82a946494a5f /lv1/random.txt
[root@localhost ~]# pvcreate /dev/sde
Physical volume "/dev/sde" successfully created.

[root@localhost ~]# vgextend vg1 /dev/sde
Volume group "vg1" successfully extended

[root@localhost ~]# vgdisplay vg1
--- Volume group ---

VG Name               vg1
System ID
Format                lvm2
Metadata Areas        3
Metadata Sequence No  5
VG Access             read/write
VG Status             resizable
MAX LV                0
Cur LV                2
Open LV               2
Max PV                0
Cur PV                3
Act PV                3
VG Size               <95.99 GiB
PE Size               4.00 MiB
Total PE              24573
Alloc PE / Size       14336 / 56.00 GiB
Free  PE / Size       10237 / <39.99 GiB
VG UUID               Zf711y-zKz3-tzYF-McEH-u0MN-zC5F-DlX2mF

[root@localhost ~]# pvmove /dev/sdc
/dev/sdc: Moved: 0.02%
/dev/sdc: Moved: 1.99%
/dev/sdc: Moved: 4.00%
/dev/sdc: Moved: 6.00%
/dev/sdc: Moved: 8.06%
/dev/sdc: Moved: 10.09%
/dev/sdc: Moved: 12.12%
/dev/sdc: Moved: 14.14%
/dev/sdc: Moved: 16.18%
/dev/sdc: Moved: 18.19%

[root@localhost ~]# vgreduce vg1 /dev/sdc
Removed "/dev/sdc" from volume group "vg1"

[root@localhost ~]# pvremove /dev/sdc
Labels on physical volume "/dev/sdc" successfully wiped.

[root@localhost ~]# vgdisplay vg1
--- Volume group ---
VG Name               vg1
System ID
Format                lvm2
Metadata Areas        2
Metadata Sequence No  11
VG Access             read/write
VG Status             resizable
MAX LV                0
Cur LV                2
Open LV               2
Max PV                0
Cur PV                2
Act PV                2
VG Size               63.99 GiB
PE Size               4.00 MiB
Total PE              16382
Alloc PE / Size       14336 / 56.00 GiB
Free  PE / Size       2046 / 7.99 GiB
VG UUID               Zf711y-zKz3-tzYF-McEH-u0MN-zC5F-DlX2mF

[root@localhost ~]# md5sum /lv1/random.txt
bfb6d7f559bad2ccbd7f82a946494a5f  /lv1/random.txt
LVM: восстановление файла из snapshot
Можно просто откатить состояние volume на snapshot, но можно примантировать lv snapshot и восстановить отдельные файлы из него:
# предельный объем snapshot 1G [root@localhost ~]# lvcreate --size 1G --snapshot --name 20241118_lv1 /dev/mapper/vg1-lv1 # ИЛИ предельный объем 5% от объема volume group[root@localhost ~]# rm /lv1/random.txt [root@localhost ~]# mount -o nouuid /dev/mapper/vg1-20241118_lv1 /mnt/ [root@localhost ~]# cp /mnt/random.txt /lv1/random.txt
lvm: восстановление всего из snapshot
Основное – придется размонтировать во станавливуемую систему в отличии от восстановления конкретных файлов, описано тут https://linuxconfig.org/create-and-restore-manual-logical-volume-snapshots?ysclid=m4acas1sca264644470split
# To split a large text file into smaller files of 1000 lines each:
split <file> -l 1000

# To split a large binary file into smaller files of 10M each:
split <file> -b 10M

# Split a file into 5 files. File is split such that each split has same size (except the last split):
split -n 5 path/to/file
What is the default action of the split command on an input file?
A. It will break the file into new files of 1,024 byte pieces each.
B. It will break the file into new files of 1,000 line pieces each.
C. It will break the file into new files of 1,024 kilobyte pieces each.
D. It will break the file into new files that are no morethan 5% of the size of the original file.
Answer: B

The split command in Linux is used to split a large file into smaller files. It is commonly used when transferring large files over a network or for archival purposes. When you run the split command, you must specify the input file to split and the output file name prefix. By default, the split command uses a 1,000 line size for each output file. Therefore, the answer to the question is B. The default action of the split command on an input file is to break the file into new files of 1,000 line pieces each. However, it's important to note that you can specify different sizes for the output files using the -b or -loptions. The -b option is used to specify the size of each output file in bytes, while the -l option is used to specify the number of lines in each output file. For example, to split a file into 1,024 kilobyte pieces, you can use the following command: split -b 1024k inputfile outputfileprefix

Or, to split a file into pieces that are no more than 5% of the size of the original file, you can use the following command: split -C 5% inputfile outputfileprefix So, while the default action of the split command is to split the file into 1,000 line pieces, you can easily customize the size of the output files using the available options.
paste
# Merge two files side by side, each in its column, using TAB as delimiter:
paste file1 file2

# Merge two files side by side, each in its column, using the specified delimiter:
paste -d delimiter file1 file2
questions
Which command displays file names only and no additional information? Is -alh Is -a Is -Ih Is -1 Is -nlls -a
Опция «-l» в команде ls используется для длинного вывода содержимого (так называемого табличного представления), который содержит много дополнительной информации о файлах и папках. Поэтому правильный ответ не должен использовать опцию -l. В то время как опция «-a» означает «all» - "все" (включает в вывод записи, начинающиеся с точки).
Which of the following directories must be mounted with read and write access if it resides on its own dedicated file system?
/opt
/etc
/lib
/var
/usr
Каталог /var содержит файлы часто меняющихся данных. Сюда входят временные каталоги, административные данные и данные журналов (логи), а также другие временные файлы. Некоторые части каталога /var не могут использоваться разными системами.Which of the following devices represents a hard disk partition? /dev/part0 /dev/ttyS0 /dev/sata0 /dev/sda/p2 /dev/sda2
Во время установки Linux берет первый найденный жесткий диск и присваивает ему значение sda.

Если на жестком диске имеется несколько разделов, система последовательно добавляет номер, начиная с sda1  до sda15. На одном жестком диске может быть не более 15 разделов.

Таким образом, /dev/sda2 должен представлять собой второй раздел жесткого диска.
Which of the following directories contains information, documentation and example configuration files for installed software packages? /etc/defaults/ /var/info/ /doc/ /usr/examples/ /usr/share/doc/
/usr/share/doc— это папка, в которой вы можете найти файлы документации для программ, установленных в вашей системе./etcсодержит все общесистемные файлы конфигурации и некоторые скрипты, которые выполняются во время загрузки системы./varсодержит файлы с разным содержимым, поэтому их содержимое не является статичным и постоянно меняется, как файлы журналов (логов).
Which of the following commands will search for the file foo.txt under the directory /home?
A. find /home foo.txt
B. find /home – file foo.txt
C. search /home -file foo.txt
D. search /home foo. txt
E. find /home -name foo.txt
—-
B. find /home - file foo.txt

Во-первых, для поиска файлов в терминале Linux мы используем команду find. Затем мы определяем каталог, в котором будем выполнять поиск. И затем, после опции -name, мы можем указать имя файла или шаблон.

Более подробную информацию можно найти в консоли, набрав команду справки man find.
What is true about links in a Linux file system?
- A symbolic link can only point to a file and not to a directory.
- A hard link can only point to a directory and never to a file.
- When the target of the symbolic link is moved, the link is automatically updated.
- A symbolic link can point to a file on another file system.
- Only the root user can create hard links.
@ A symbolic link can point to a file on another file system.
- Символическая ссылка может указывать на файл или каталог.
- Жесткая ссылка может указывать только на файл, а не на каталог (в отличие от предлагаемого ответа).
- Когда цель символической ссылки перемещается, ссылка разрывается.
- Символическая ссылка может указывать на файл в другой файловой системе.
- По умолчанию пользователю не запрещено создавать жесткие ссылки.
Creating a hard link to an ordinary file returns an error. What could be the reason for this? A. The source file is hidden. B. The source file is read-only. C. The source file is a shell script. D. The source file is already a hard link. E. The source and the target are on different filesystems.
Answer: E

The most likely reason for getting an error when creating a hard link to an ordinary file is that the source and the target are on different filesystems. A hard link is a directory entry that points to the same inode as the original file. An inode is a data structure that stores the metadata and location of a file on a filesystem. A hard link cannot span across different filesystems because each filesystem has its own inode table and numbering scheme. Therefore, a hard link can only refer to a file that exists on the same filesystem as the link. This is mentioned in the article by How-To Geek1 and the man page of ln2. The other options are not valid reasons for getting an error when creating a hard link. The source file being hidden, read-only, or a shell script does not affect the ability to create a hard link, as long as the user has the appropriate permissions. The source file being already a hard link also does not prevent creating another hard link to the same file, as long as the maximum number of links per inode is not exceeded. This is explained in the article by Linuxize3 and the man page of ln
Which type of filesystem is created by mkfs when it is executed with the block device name only and without any additional parameters?
A. ext2
B. ext3
C. ext4
D. XFS
E. VFAT
Answer: A
as per the mkfs manpage,
-t, --type type
Specify the type of filesystem to be built. If not specified, the default filesystem type (currently ext2) is used. so yeah, the revealed answer is correct.
What is the purpose of the Filesystem Hierarchy Standard? A. It is a security model used to ensure files are organized according to their permissions and accessibility. B. It provides unified tools to create, maintain and manage multiple filesystems in a common way. C. It defines a common internal structure of inodes for all compliant filesystems. D. It is a distribution neutral description of locations of files and directories.
Answer: D
What does the command mount -a do?
A. It mounts all available filesystems onto the current directory.
B. It shows all mounted filesystems.
C. It mounts all user mountable filesystems for thecurrent user.
D. It mounts all filesystems listed in /etc/fstab which have the option auto set.
E. It mounts all filesystems listed in /etc/fstab which have the option noauto set.
Answer: D
Answer: DSoft linked directories cannot cross file system boundaries but hard linked directories can. True or False?
Наоборот
False
15. /boot is a memory-based file system. True or False?
False
16. Name the two types of paths.
Абсолютный и относительный17. What are the two indications in the ll command output that tells us if the file is a symlink?
Стрелка, указывающая с линка на корень.
Первый символ l в ls –la.
18. The rmdir command can be used to remove an entire directory structure. True or False?
No, только пустые директории, но rm –r может19. The –A option with the chattr command makes a file immutable. True or False?
А – only append
I - immutable
3 (LPIC, DISK)
1. What are the two commands that we can use to reduce the number of logical extents from a logical volume?
lvresize, lvreduce
2. Write the command to add physical volumes /dev/vdd1 and /dev/vdc to vg20 volume group.
vgextend vg20 /dev/vdd1 /dev/vdc -v
3. Where is the partition table information stored by default on BIOS-based systems?
MBR
4. What would vdd3 represent in a virtualized environment?
vdd3 points to the third partition on the fourth virtual disk.
5. What are the two commands that we can use to add logical extents to a logical volume?
Lvresize, lvrextend
6. What is the maximum number of partitions that can be created on a GPT disk?
128
7. Write the command to create a volume group called vg20 with physical extent size set to 64MB and include a physical volume /dev/vdd to the volume group.
vgcreate -s 64 vg20 /dev/vdd
8. Write the command to remove vg20 volume group along with any logical and physical volumes that it contains.
vgremove –f vg20
9. What is the default size of a physical extent in LVM?
4MB
10. The gdisk utility can be used to store partition information in MBR format. True or False?
no
11. Which file in the /proc file system stores the in-memory partitioning information?
/proc/partitions
12. What is the default name of the first logical volume in a volume group?
Lvol0
13. What is one difference between the pvs and pvdisplay commands?
-
- pvs brief info for volumes
- pvdisplay detail info for volumes
By default, an identical copy of the metadata is maintained in every metadata area in every physical volume within the volume group. LVM volume group metadata is stored as ASCII. A metadata area is a circular buffer.

/etc/lvm/backup — это папка, в которой LVM хранит резервную копию своей текущей конфигурации.
24. A single disk can be used by both parted and LVM at the same time. True or False? True, a single disk can be used by all three disk management solutions at a time. 25. When should we run the partprobe command? The partprobe command should be run whenever partitioning is modified on a disk. You may need to run the partprobe command after exiting the parted utility to inform the kernel of changes in the partition table if the disk previously had partitions. This is not required for new unpartitioned disks. 26. Write the command to remove /dev/vdd1 physical volume from vg20 volume group. vgreduce vg20 /dev/vdd1 27. A partition can be used as an LVM object. True or False? true
28. Which command would we use to view the details of a volume group and logical and physical volumes within it?
vgdisplay -v
——
Where does the BIOS search for a bootloader?
A. On all connected storage media regardless of the boot device order.
B. On all connected storage media in the defined boot device order.
C. Only on hard disk drives in the defined boot device order.
D. Only on the last added storage media.
E. The BIOS is not responsible to search for a valid bootloader.
Which of the following partition types is used for Linux swap spaces when partitioning hard disk drives?
A. 82
B. 83
C. 8e
D. fd
E. 7
Answer: B
Answer: A

Linux swap spaces are designated as type 82 on MBR (Master Boot Record) partition tables, which are used to store information about the partitions on a hard disk drive. This type code identifies the partition as a Linux swap area, which can be used by the Linux kernel to supplement the system RAM by holding idle memory pages. The mkswap command can be used to initialize a partition of type 82 as a swap partition. Other type codes are used for different purposes, such as 83 for Linux native partitions, 8e for Linux LVM partitions, fd for Linux RAID partitions, and 7 for NTFS partitions.
Instead of supplying an explicit device in /etc/fstab for mounting, what other options may be used to identify the intended partition? (Choose TWO correct answers.) A. FIND
B. ID
C. LABEL
D. NAME
E. UUID
Answer: CE

монтирование возможно по разным идентификаторам раздела (все три есть в выводе lsblk -f) - именно раздела т.к. каждый раздел рассматривается как независимый носитель с точки зрения хранилища в Linux
имя раздела (нежелательно т.к. может поменяться)
UUID (предпочтительно т.к. меньше вероятность изменения) (UUID=)
Label name - именная метка диска
What does the command mount -a do?
A. It ensures that all file systems listed with the option noauto in /etc/fstab are mounted.
B. It shows all mounted file systems that have been automatically mounted.
C. It opens an editor with root privileges and loads /etc/fstab for editing.
D. It ensures that all file systems listed with the option auto in /etc/fstab are mounted.
E. It ensures that all file systems listed in /etc/fstab are mounted regardless of their options.
Answer: D
Which of the following commands can be used to display the inode number of a given file?
A. inode
B. ls
C. ln
D. cp
Answer: B
Answer: AB
mke2fs man:
-t fs-type
              Specify the filesystem type (i.e., ext2, ext3, ext4, etc.) that is to  be  created. If  this  option  is  not  specified, mke2fs will pick a default either via how the command was run (for example, using a name of the form mkfs.ext2, mkfs.ext3,  etc.) or  via  a  default as defined by the /etc/mke2fs.conf file.   This option controls which filesystem options are used by default, based on  the  fstypes  configuration          stanza in /etc/mke2fs.conf.
Which command displays the current disk space usage for all mounted file systems? (Specify ONLY the command without any path or parameters.)
du - Summarize disk usage of each FILE, recursively for directories
df - displays the amount of disk space available on the file system containing each file

The correct answer is df. The df command displays information about the disk space usage for all currently mounted file systems. It does not require any path or parameters.
How would a new file named c.txt be created with the same inode number as a.txt (same Inode number)?
A. ln –h a.txt c.txt
B. ln c.txt a.txt
C. ln a.txt c.txt
D. ln –f c.txt a.txt
E. ln –i 525385 c.txt
Answer: C
# EXAMPLE WITH INODE ID
bash-3.2$ ln 123123 123123_hardlink
bash-3.2$ ls -li
4173801 -rw-r--r-- 2 petrredkin staff 0 Sep 1 22:56 123123
4173801 -rw-r--r-- 2 petrredkin staff 0 Sep 1 22:56 123123_hardlink
Which of the following commands list all files and directories within the /tmp/ directory and its subdirectories which are owned by the user root? (Choose two.) A. find /tmp –user root -print B. find –path /tmp –uid root C. find /tmp –uid root -print D. find /tmp –user root E. find –path /tmp –user root -print
Answer: AD

The find command can be used to search for files and directories that match certain criteria, such as ownership, permissions, size, type, name, etc. The syntax of the find command is:
find [options] [path...] [expression]
The options can modify the behavior of the find command, such as how to handle symbolic links, how to optimize the search, or how to enable debugging. The path argument specifies the starting point of the search, which can be one or more directories. The expression argument consists of one or more tests, actions, and operators that are applied to each file or directory that is found.
The -user test matches files or directories that are owned by a given user. The user can be specified by name or by numeric user ID (UID). The -print action prints the full file name of the matching file or directory on the standard output, followed by a newline. If no action is specified, -print is assumed by default.
Therefore, to list all files and directories within the /tmp/ directory and its subdirectories which are owned by the user root, we can use either of the following commands:
* find /tmp -user root -print
* find /tmp -user root
Both commands will search recursively from the /tmp/ directory and print the full file names of the files or directories that are owned by the user root. The -print action is optional in this case, since it is the default action.

The other commands are incorrect for the following reasons:
* find -path /tmp -uid root : The -path test matches files or directories whose full file name matches the given pattern. This command will not search recursively from the /tmp/ directory, but only match files or directories whose name is exactly /tmp. The -uid test is equivalent to the -user test, but it requires a numeric UID instead of a user name. This command will not match any files or directories, unless there is a file or directory named /tmp that is owned by the user with UID root (which is usually 0).
* find -path /tmp -user root -print : This command has the same problem as the previous one. It will not search recursively from the /tmp/ directory, but only match files or directories whose name is exactly
/tmp and are owned by the user root. This command will not match any files or directories, unless there is a file or directory named /tmp that is owned by the user root.
* find /tmp -uid root -print : This command will search recursively from the /tmp/ directory, but it will use the -uid test instead of the -user test. The -uid test requires a numeric UID instead of a user name. This command will match files or directories that are owned by the user with UID root (which is usually 0), but it will not match files or directories that are owned by other users who have the same user name as root (such as root2 or root3).
Which of the following commands overwrites the bootloader located on /dev/sda without overwriting the partition table or any data following it?
A. dd if=/dev/zero of=/dev/sda bs=512
B. dd if=/dev/zero of=/dev/sda bs=512 count=1
C. dd if=/dev/zero of=/dev/sda bs=440 count=1
D. dd if=/dev/zero of=/dev/sda bs=440
Answer: C

The command that overwrites the bootloader located on '/dev/sda' without overwriting the partition table or any data following it is 'dd if=/dev/zero of=/dev/sda bs=440 count=1'. The correct answer is Option C.

The 'dd' command is a utility for copying data from one location to another. It can be used to overwrite data on a device, such as a hard drive or a bootloader.
The 'if' option specifies the input file, and the 'of' option specifies the output file.
The 'bs' option specifies the block size, and the 'count' option specifies the number of blocks to copy.

In this case, the command will copy a single block of data ('count=1') from '/dev/zero' (a special file that provides an endless stream of zero bits) to '/dev/sda' using a block size of '440' bytes. This will overwrite the bootloader located on '/dev/sda' without overwriting the partition table or any data following it.

The other options will overwrite more data on the device, potentially causing data loss or corruption. Option C will overwrite the first 440 bytes of the device, which is the correct block size to overwrite the bootloader without overwriting the partition table or any data following it.

Option A will overwrite the entire device, including the partition table and all data.

Option B will overwrite the first 512 bytes of the device, potentially causing data loss or corruption.

Option D will overwrite the entire device, including the partition table and all data.
In a nested directory structure, which find command line option would be used to restrict the command to searching down a particular number of subdirectories?
A. -dirmax
B. -maxdepth
C. -maxlevels
D. -n
E. -s
Answer: BWhich utility would be used to change how often a filesystem check is performed on an ext2 filesystem without losing any data stored on that filesystem? A. mod2fs B. fsck C. tune2fs D. mke2fs E. fixe2fs
Answer: C The correct utility to change how often a filesystem check is performed on an ext2 filesystem without losing any data stored on that filesystem isWhich of the following options must be passed to a filesystem’s entry in /etc/fstab in order to mount the file system without root privileges? A. auto B. norestrict C. noauto D. usertune2fs. Explanation:tune2fsis a command-line utility that can be used to modify various parameters and settings of the ext2, ext3, and ext4 filesystems. One of the settings that can be modified usingtune2fsis the frequency of filesystem checks. When an ext2 filesystem is created, it is set up with a default frequency for filesystem checks. The default frequency is usually set to every 30 or 40 mounts, or every 180 days, whichever comes first. However, this frequency can be changed using thetune2fsutility. To change the frequency of filesystem checks usingtune2fs, you would use the-cor-ioption followed by the new value. The-coption is used to specify the maximum number of mounts after which a filesystem check should be performed. The-ioption is used to specify the maximum number of days after which a filesystem check should be performed. For example, to set the maximum number of mounts to 50 before a filesystem check is performed, you would use the following command:sudo tune2fs -c 50 /dev/sda1Similarly, to set the maximum number of days to 365 before a filesystem check is performed, you would use the following command: sudo tune2fs -i 365 /dev/sda1 Note that you need to specify the device file of the filesystem you want to modify after the options. In the above examples, we assumed the filesystem is located on/dev/sda1, but this may vary depending on your system's configuration. It is important to note that changing the frequency of filesystem checks usingtune2fsdoes not require the filesystem to be unmounted or formatted, so you can modify this setting without losing any data stored on the filesystem. Therefore, option C,tune2fs, is the correct utility to change the frequency of filesystem checks on an ext2 filesystem without losing any data stored on that filesystem.
Answer: D https://unix.stackexchange.com/questions/96625/how-to-allow-non-superusers-to-mount-any-filesystem You can do it, but you need to modify the entry in/etc/fstabcorresponding to the filesystem you want to mount, adding the flaguserto this entry. Non-privilege users would then be able to mount it. Seeman mountfor more details.
The non-superuser mounts.
Normally, only the superuser can mount filesystems. However, when fstab contains the user option on a line, anybody can mount the corresponding system.
Thus, given a line
 /dev/cdrom /cd iso9660 ro,user,noauto,unhide

any user can mount the iso9660 filesystem found on his CDROM using the command
When planning a partition scheme, which of the following directories could be considered for separate partitions? (Choose three.) A. /etc B. /home C. /var D. /lib E. /opt
Answer: BCE (dumps only B)
When planning a partition scheme, it is advisable to consider creating separate partitions for some directories that may contain large amounts of data, have different backup or security requirements, or benefit from being on different filesystems. Some of the common directories that could be considered for separate partitions are:

/home: This directory contains the personal files and settings of the users. Creating a separate partition for /home can make it easier to backup, restore, or upgrade the system without affecting the user data. It can also improve security by allowing different mount options such as noexec or nosuid. Additionally, it can help to prevent the system from becoming unusable if the users fill up their disk space with personal files.

/var: This directory contains variable data such as logs, caches, spool files, databases, and web server content. Creating a separate partition for /var can prevent the system from crashing or becoming unresponsive if the /var partition fills up due to excessive logging or caching. It can also improve performance by allowing different filesystem options such as noatime or nodiratime. Furthermore, it can enhance security by isolating the data that may be modified by external sources such as web applications or mail servers.

- noatime — не обновлять время последнего доступа к файлам.
- nodirtime — не обновлять время время последнего доступа к папкам.

atime — одна из трех временных меток для файлов в Linux. Поскольку atime обновляется каждый раз, когда к файлу обращаются, он может оказывать влияние на производительность системы. Если вы знаете, что не используете программное обеспечение, для которого требуется atime, вы можете слегка повысить производительность, включив опцию noatime в файле /etc /fstab. После этого ядро не будет постоянно обновлять atime. Используйте опцию noatime при монтировании файловой системы

/opt: This directory contains optional software packages that are not part of the standard distribution. Creating a separate partition for /opt can make it easier to manage, backup, or remove these packages without affecting the rest of the system. It can also allow different filesystem types or features that may be required by some of the software installed in /opt.

Other directories that could be considered for separate partitions are /boot, /tmp, /usr, and /srv, depending on the system requirements and preferences
Which of the following commands can be used to create a new file that is 100kB in size?
A. dd
B. file
C. mkfile
D. touch
Answer: A

You just want a file of a particular size, and don’t really care what’s in it or how many lines it contains – use /dev/zero. This is a special file on Linux that provides a null character every time you try to read from it. This means we can use it along with the dd command to quickly generate a file of any size.

dd if=/dev/zero of=file.txt count=1024 bs=1024

This command will create a file of size count*bs bytes, which in the above case will be 1Mb.
After running the command umount /mnt, the following error message is displayed: umount: /mnt: device is busy. What is a common reason for this message? A. The kernel has not finished flushing disk writes to the mounted device. B. A user has a file open in the /mnt directory. C. Another file system still contains a symlink to a file inside /mnt. D. The files in /mnt have been scanned and added to the locate database. E. The kernel thinks that a process is about to open a file in /mnt for reading.
Answer: B
https://medium.com/@umutasim999/understanding-unmount-target-is-busy-error-message-a8274d25e76a
Common Causes of the Error
Several factors can lead to the “Unmount target is busy” error:
1. Open Files or Processes: If any files or processes are accessing the target, the system will consider it busy and prevent unmounting.
2. Shell Sessions: Sometimes, shell sessions or terminal windows might be accessing files within the target directory, causing it to remain busy.
3. Mounted Devices: If the target is a mounted device, such as a USB drive or external hard disk, it could be in use by an application or system process.
Troubleshooting Steps
Now that we understand the possible causes, let’s explore some troubleshooting steps to resolve the “Unmount target is busy” error:
1. Identify Processes:
- Use the `lsof` command (short for “list open files”) to identify which processes are accessing files within the target directory or device.
- Run `lsof | grep /mount/point`, replacing `/mount/point` with the actual path of the target directory or device.
2. Terminate Processes:
- Once you’ve identified the processes using the `lsof` command, consider terminating them gracefully if possible.
- Use the `kill` command followed by the process ID (PID) to terminate a specific process. For example, `kill PID`.
3. Close Applications:
- If certain applications are accessing files within the target, close them to release the resources.
- Check for any open applications that might be using files on the target and close them before attempting to unmount.
4. Navigate Out of Target Directory:
- If you’re currently in the target directory within a shell session, navigate out of it using the `cd` command.
- Ensure that no shell sessions are accessing files within the target directory.
5. Unmount Dependencies:
- If the target is a mounted device and other devices or partitions depend on it, unmount them first before attempting to unmount the target.
- Use the `umount` command followed by the path of the dependent devices or partitions.
6. Force Unmount (if necessary):
- As a last resort, you can try forcefully unmounting the target using the `-f` option with the `umount` command. However, use this option with caution as it can potentially lead to data loss or corruption.
- Run `umount -f /mount/point` to force unmount the target.
Which of the following commands can be used to search for the executable file foo when it has been placed in a directory not included in $PATH? A. apropos B. which C. find D. query E. whereis
Answer: C

Explanation:

In Linux, when a command is entered in the terminal, the shell searches for the executable file in a set of directories specified in the environment variable $PATH. If the executable is not found in any of those directories, then the command will fail.

However, it's possible that an executable file may be located in a directory that is not included in $PATH. In this case, we can use the find command to search for the file.

The find command is used to search for files and directories in a given directory hierarchy. It can search for files based on various criteria, such as name, type, size, and date modified.

To use find to search for an executable file named foo in a specific directory, we can use the following command:

find /path/to/directory -name foo -type f -perm /a+x
Here, /path/to/directory is the path to the directory where we want to search for the file foo. The -name option specifies the name of the file we want to find, and the -type f option specifies that we are searching for a regular file. The -perm /a+x option specifies that we are searching for a file that is executable by anyone.

Once find locates the file, we can run it by specifying its full path in the command line, for example:

/path/to/directory/foo
Alternatively, we can add the directory containing the file to $PATH, so that we can run the file without specifying its full path each time. However, this may not always be desirable, especially if the file is located in a directory that is not meant to be used for general system-wide executables. In such cases, using find to locate the file is a more secure and controlled approach.
Which of the following commands will display the inode usage of each mounted filesystem? A. du –i B. df –i C. lsfs –i D. printfs –i
Answer: BWhich is the default percentage of reserved space for the root user on new ext4 filesystems? A. 10% B. 3% C. 15% D. 0% E . 5%
Answer: E

By default, the ext3 and ext4 filesystems reserve 5% space for use by the root user. This reserved space counts as Non DFS Used . The Reserved block count is the number of ext3 / ext4 filesystem blocks that are reserved.
What can the Logical Volume Manager (LVM) be used for? (Choose THREE correct answers.) A. To create RAID 9 arrays. B. To dynamically change the size of logical volumes. C. To encrypt logical volumes. D. To create snapshots. E. To dynamically create or delete logical volumes.
Answer: BDE
The Logical Volume Manager (LVM) is a tool that allows the creation and management of logical volumes on Linux systems. Logical volumes are partitions that can span multiple physical disks and can be resized or deleted without affecting the rest of the system. Some of the benefits of using LVM are:
* To dynamically change the size of logical volumes. LVM allows the user to increase or decrease the size of a logical volume without having to repartition the disk or reboot the system. This can be useful for allocating more space to a volume that is running out of space, or freeing up space from a volume that is not needed anymore.
* To create snapshots. LVM allows the user to create a snapshot of a logical volume, which is a copy of the volume at a certain point in time. Snapshots can be used for backup purposes, as they can be restored to the original volume if needed. Snapshots can also be used for testing purposes, as they can be mounted as read-only or read-write volumes without affecting the original volume.
* To dynamically create or delete logical volumes. LVM allows the user to create or delete logical volumes on the fly, without having to repartition the disk or reboot the system. This can be useful for creating temporary volumes for specific purposes, or deleting volumes that are no longer needed.
LVM cannot be used for the following purposes:
* To create RAID 9 arrays. RAID 9 is not a valid RAID level, and LVM does not support RAID functionality. RAID is a technique that uses multiple disks to provide redundancy, performance, or both.
RAID can be implemented at the hardware level, by using a RAID controller, or at the software level, by using tools such as mdadm or dmraid. LVM can work on top of RAID devices, but it cannot create them.
* To encrypt logical volumes. LVM does not provide encryption functionality. Encryption is a technique that protects data from unauthorized access by using a secret key to transform the data into an unreadable form. Encryption can be implemented at the disk level, by using tools such as dm-crypt or LUKS, or at the file system level, by using tools such as eCryptfs or EncFS. LVM can work on top of encrypted devices, but it cannot encrypt them.
Which command is used to create and initialize the files used to store quota information? (Specify ONLY the command without any path or parameters.)
quotacheck

The quotacheck command is used to create and initialize the files that store quota information on a file system. It is typically used in conjunction with disk quotas, which are a way to limit and monitor the disk space usage of users or groups on a file system.

Here are some key points about the quotacheck command:
Syntax: quotacheck [options] [filesystems] The filesystems parameter specifies the file systems on which to create and initialize the quota files. If no specific file systems are mentioned, quotacheck checks all file systems listed in the /etc/fstab file. The command needs to be run with administrative privileges, such as using sudo or being logged in as the root user. When executed, quotacheck scans the specified file systems and creates or updates the quota files (aquota.user and aquota.group) in the root directory of each file system. The quota files store the quota limits and current usage information for individual users (aquota.user) and groups (aquota.group) on the file system. The quotacheck command can be used as part of the initial setup of quotas or when changes are made to the file system that could affect the quota information.
Which of the following commands will change the quota for a specific user? A. edquota B. repquota C. quota -e D. quota
Answer: A
The correct answer is A. edquota Explanation:
 edquota: This command is specifically designed to edit user and group quotas. It opens a text editor (usually vi) where you can directly modify the quota limits for a specific user or group.

repquota: This command generates reports on disk usage and quotas for filesystems, but it doesn't allow you to change the quota values themselves
quota -e: There is no -e option for the quota command.
quota: This command displays the current quotas for a user or group, but it doesn't have a built-in way to modify them. Example: To change the quota for a user named "john," you would use the following command:
sudo edquota john

This will open the quota file for "john" in an editor, allowing you to modify the soft and hard limits for block usage and inode usage.
Which of the following commands is used to modify quota settings? (Choose two.) A. editquota B. setquota C. edquota D. quotaedit E. quotaset
Answer: BCWhich of the following commands will change the quota for a specific user? A. edquota B. repquota C. quota -e D. quotaКак установить квоты файловой системы (диска) в Ubuntu?Файловые системы, которые поддерживают систему квот: xfs, ext2, ext4 и ext3. ### install quota # apt install quota # quota --version Quota utilities version 4.04. ### check quota kernel modules (если отсутствуют ставим sudo apt install linux-image-extra-virtual) # find /lib/modules/`uname -r` -type f -name '*quota_v*.ko*' /lib/modules/4.19.0-16-amd64/kernel/fs/quota/quota_v2.ko /lib/modules/4.19.0-16-amd64/kernel/fs/quota/quota_v1.ko ### редактируем fstab - включаем квоты и перемонтируем раздел - строки будут изменены, чтобы обеспечить доступ к userquota и grpquota. Вы можете оставить ту квоту, которая не является частью окончательной конфигурации. Если у fstab было несколько опций, добавьте новые опции в конце строки. Добавляйте новые элементы через запятую, но без пробелов между ними (иначе будет ошибка /etc/fstab: parse error). Перемонтируйте файловую систему, чтобы изменения вступили в силу. nano /etc/fstab LABEL=cloudimg-rootfs / ext4 usrquota,grpquota 0 0 mount -o remount / ### создание дисковых квот ### quotacheck - команда создает два файла: quota user и quota group, в которых содержится информация об ограничении и использовании файловой системы. Эти файлы должны присутствовать перед началом использования квот. # quotacheck -ugm / quotacheck: Mountpoint (or device) / not found or has no quota enabled. quotacheck: Cannot find filesystem to check or filesystem not mounted with quota option. ### включение квот в файловой системе # quotaon -v / ### включение квот для пользователя и/или группы https://www.opennet.ru/cgi-bin/opennet/man.cgi?topic=edquota&category=8 команда edquota редактирует квоты, например, мы можем редактировать квоту, принадлежащую пользователю sedicomm, используя следующую функцию: $ sudo edquota -u sedicomm Использование параметра -u указывает, что квота принадлежит пользователю. Если вам нужно отредактировать квоту принадлежащую группе, используйте параметр -g.Выходные данные перечисляют имя пользователя, uid, файловую систему с активными квотами, использование блоков и inodes. Квоты на основе inode ограничивают количество файлов и каталогов, которые могут создавать пользователи, независимо от размера, который они используют на диске. Большинство администраторов предпочитают block-based quota, которая контролирует пространство диска. Каждый набор квот позволяет устанавливать soft и hard лимит. Пользователь, превышающий soft ограничение, может превысить свою квоту, но ему не запрещено использовать больше блоков или инодов. В таком случае у пользователя есть семь дней, чтобы освободить свое soft лимитное пространство. Если этого не сделать, то затрудняется процес сохранения или создания файлов. Hard лимит означает, что создание новых блоков или инодов прекращается в тот момент, когда вы достигаете лимита. Пользователь будет уведомлен о появлении предупреждений или ошибок при выполнении обычных задач. # установка дисковых квот https://www.opennet.ru/man.shtml?topic=setquota&category=8&russian=2 setquota обновляет информацию о квоте. Команда требует имя пользователя и установку как soft, так и hard ограничений, которые будут использовать блоки и inode. Команда задает квоты на основе блоков до 200 мегабайт и 220 мегабайт. Два «0 0» указывают на то, что hard и soft пределы не установлены. Вам также нужно будет указать путь, которую будет использовать квота. setquota -u tecmint 200M 220M 0 0 / # Установка периода превышения квоты (grace times for users/groups) - значение времени задаётся в секундах. sudo setquota -t 864000 864000 / sudo repquota -s / ### просмотр всех квот Отчёт о квотах должен указывать использование всех пользователей. Для этого используется команда repquota: sudo repquota -s /
Вывод выше представляет собой отчет о корневой файловой системе «/«. -S инструктирует repquota для получения результатов в удобном для чтения формате. Время отсрочки блокировки, по умолчанию, составляет 7 дней. Столбец отсрочки уведомляет пользователя о количестве дней до отказа в доступе к диску ресурса. ### просмотр квоты для пользователя tecmint quota -vs tecmint
ПРИМЕЧАНИЕ: Предоставьте пользователям возможность анализировать свои квоты, без вызова команды sudo, необходимо настроить для них доступ к чтению файлов квот на этапе создания. Один из простых способов сделать это — создать группу пользователей.
Answer: A The command that can be used to change the quota for a specific user isWhich of the following commands will mount an already inserted CD-ROM in /dev/sr0 onto an existing directory /mnt/cdrom when issued with root privileges? A. mount /dev/cdrom /mnt/cdrom B. mount /dev/sr0 /mnt/cdrom C. mount –t cdrom /dev/sr0 /mnt/cdrom D. mount –l cdrom /dev/sr0 /mnt/cdrom E. mount –f /dev/sr0/mnt/cdromedquota. Here is a brief explanation of the other options: -repquotais used to display the quota information for the file systems that are currently mounted. It does not allow you to modify the quota. -quota -eis used to edit the quota limits for all users at once. It does not allow you to modify the quota for a specific user. -quotais used to display the quota information for a specific user or for all users on the system. It does not allow you to modify the quota. Therefore, the correct answer is A.edquota. This command opens up a text editor that allows you to modify the quota settings for a specific user. You can specify the user whose quota you want to modify by providing their username as an argument to theedquotacommand. For example: edquota johndoe This will open up the quota configuration file for the userjohndoein the default text editor. You can then modify the quota settings as required and save the file to apply the changes.
Answer: B! https://linuxconfig.org/how-to-mount-cdrom-in-linux?ysclid=m3351flwo7716229847 $ sudo mount /dev/sr0 /mnt/cdrom mount: /mnt/cdrom: WARNING: device write-protected, mounted read-only. answer is correct if cdrom is alias for iso9660 ((по факту type iso9660! См. Скрин))why not B? I thought that the mount command automatically determines the type of mountable file system.
What is true about a recursive directory listing?
- It includes the permissions of the directory listed.
- It includes the content of sub-directories.
- It includes details of file system internals, such as inodes.
- It includes ownership information for the files.
- It includes a preview of content for each file in the directory.
@ It includes the content of sub-directories. Рекурсивный список каталогов можно вывести командой ls -R. И его вывод включает в себя содержимое подкаталогов. 
