
BASIC
- COMPARING NET-TOOLS VS. IPROUTE PACKAGE COMMANDS
-
Очереди сетевой карты (NIC queues), также известные как кольцевые буферы (ring buffers), используют оперативную память (RAM) компьютера, а не внутреннюю память самой карты. Очереди приема (Rx) и передачи (Tx) представляют собой области в системной RAM, которые выделяются драйвером сетевой карты при инициализации. Сетевая карта использует технологию DMA (Direct Memory Access — прямой доступ к памяти), чтобы записывать входящие пакеты напрямую в RAM или считывать их оттуда для отправки, минуя постоянное участие центрального процессора (CPU). На самой сетевой карте обычно есть лишь небольшой объем сверхбыстрой памяти (регистры и небольшие FIFO-буферы) для временного хранения дескрипторов (указателей), которые сообщают карте, по каким адресам в системной RAM находятся данные.
- veth – virtual eth
- nic в VM имеют имена типа ens32 как попытка избежать конфликта с физическими адаптерами
- В новом linux kernel 6.7. Добавлен новый тип виртуальных сетевых устройств “netkit”, логика передачи данных в которых задаётся при помощи BPF-программы.
- как отключить networkmanager описано в статье
- про недостатки классических net-tools/net-utils (напр. ifconfig) в статье, так же там как их установить 🙂
- (Hardware linux, nic) В общем случае если NIC есть в списке lspci, но отсутствует в ip a/ifconfig – она не привязана к ядру т.к. или драйвер неизвестен – не присвоено девайса имя в пространстве ядра или девайс находится в userspace (dpdk)
- (tcpdump/bmon-nload/ifconfig) Трафик может не фиксироваться на интерфейсе в счетчиках и соответственно в утилитах bmon/nload, которые строят графики на основе счетчиков. Причина отсутствия счетчиков может быть не отсутствие трафика, а необходимость перевода интерфейса в promisc режим. Проверить можно tcpdump – он это делает автоматически.
# ifconfig [interface] promisc
# ip link set [interface] promisc on
8: enp5s0f0: <BROADCAST,MULTICAST,PROMISC,UP,LOWER_UP> mtu 1500 qdisc mq state UP group default qlen 1000
link/ether d4:5d:64:bd:89:13 brd ff:ff:ff:ff:ff:ff
inet 172.16.0.1/16 scope global enp5s0f0
alid_lft forever preferred_lft forever
IP
Показать IP (-br – brief)
# ip -br add show
lo               UNKNOWN        127.0.0.1/8
ens34            UP             10.3.8.104/24
ip (-br) link или ifconfig -a – показывает все интерфейсы. В том числе те, которые не подняты. Мне помогло при дебаге неподнимания secondary ipif на виртуалке VirtualBox. Косяк оказался в том, что я неправильно в конфиге /etc/network/interfaces указал название интерфейса 🙂
# ip -br link show
lo UNKNOWN 00:00:00:00:00:00 <LOOPBACK,UP,LOWER_UP>
ens34 UP 00:50:56:a4:8d:45 <BROADCAST,MULTICAST,UP,LOWER_UP>

# ip netns exec VRF1 ip -d link show enp3s0f0
20: enp3s0f0: <BROADCAST,MULTICAST,UP,LOWER_UP> mtu 100 qdisc mq state UP mode DEFAULT group default qlen 1000
link/ether 00:e0:ed:96:da:4a brd ff:ff:ff:ff:ff:ff promiscuity 0 minmtu 68 maxmtu 9710 numtxqueues 64 numrxqueues 64 gso_max_size 65536 gso_max_segs 65535
ip a add 1.1.1.1/32 dev enp2s0 или ifconfig eth1 1.1.1.1/32 up – конфигурируем IP на интерфейсе. Можно и secondary создать обеими утилитами. Причем secondary можно огромное количество настроить – я пробовал настраивать 10 ТЫС IP адресов и они все работали (проверка корректности работы маршрутов /32).
# IP show
ip -br addr show
  lo UNKNOWN 127.0.0.1/8
  enp7s0 UP 172.17.1.174/24
  enp5s0f0 DOWN
  enp8s0 DOWN
  enp5s0f1 DOWN

# IPv4
ip addr add 172.17.0.2/24 dev enp3s0
ip addr del 172.17.0.2/24 dev enp3s0
ip link set enp3s0 up
ip link show enp3s0
ifconfig eth1 172.17.0.2/24 up

# IPv6
ip -6 addr add 2001:0db8:0:f101::2/64 dev enp3s0
ifconfig eth0 inet6 add 2001:0db8:0:f101::2/64

# SUBINT
ip addr add 172.17.0.2/24 dev enp3s0  # enps3s0:1 указывать смысла нет
ifconfig eth1:1 172.20.0.3/24 up
ip netns exec VRF2 ifconfig eth1:9615 172.17.38.155/32 up
ip netns exec VRF2 ifconfig eth1:9616 172.17.38.156/32 up
sudo dhclient -v ens192 – включение работы DHCP клиента на интерфейсе.
Включаем интерфейс, для работы ifup с enp интерфейсами нужно их переименовывать.
ifup eth0
ifconfig eth0 up
ip link set eth0 up

ifup and ifdown doesn’t supporting the latest interface device enpXXX names.
MTU
# ifconfig enp8s0
enp8s0: flags=4163<UP,BROADCAST,RUNNING,MULTICAST>  mtu 1500

# ifconfig enp8s0 mtu 9000

# ifconfig enp8s0
enp8s0: flags=4099<UP,BROADCAST,MULTICAST>  mtu 9000

# cat /sys/class/net/enp8s0/mtu
1500
MAC
Изменяем MAC на Wi-Fi интерфейсе MAC OS.
sudo ifconfig en0 ether XX:XX:XX:XX:XX:XX
PROMISCUOUS
ip link set enp2s0 promisc on # для работы сетевых утилит типа tcpdump, tcpreplay, wireshark, tshark зачастую нужно включение promiscuous режима (чаще всего включается утилитой автоматически перед стартом сбора сетевого трафика)
Tcpdump start/stop
[ 1691.019004] device eth0 entered promiscuous mode
[ 1699.783211] device eth0 left promiscuous mode
Переименование интерфейсов
Временное (до перезагрузки)
ip link set enp5s0f0 name eth0
ip link set enp5s0f1 name eth1
Сохраняется и после перезагрузки
sudo touch /etc/udev/rules.d/70-persistent-net.rules
SUBSYSTEM=="net", ACTION=="add", DRIVERS=="smsc95xx", ATTR{address}=="*", ATTR{dev_id}=="0x0", ATTR{type}=="1", KERNEL=="eth*", NAME="eth0"
IP multicast
-bash-4.4# ip m
1:      lo
        inet  224.0.0.1
4:      eth0
        link  01:00:5e:00:00:01
        inet  224.0.0.1
5:      eth1
        link  01:00:5e:00:00:01
        inet  224.0.0.1
6:      eth2
        link  01:00:5e:00:00:01
        inet  224.0.0.1
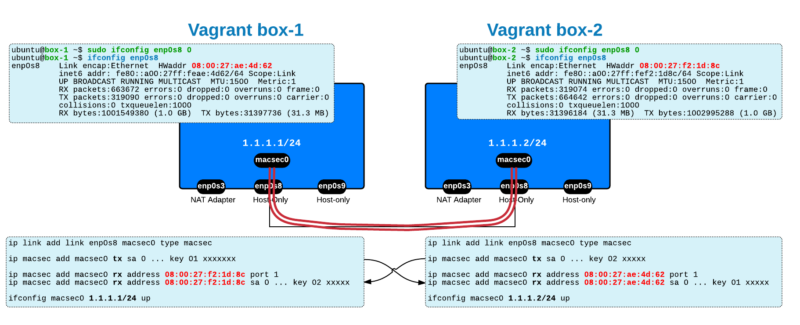
MACSEC
ip link add link enp8s0 macsec0 type macsec

# ip link | grep enp8s0
8: enp8s0: <BROADCAST,MULTICAST> mtu 1500 qdisc noop state DOWN mode DEFAULT group default qlen 1000
22: macsec0@enp8s0: <BROADCAST,MULTICAST,M-DOWN> mtu 1468 qdisc noop state DOWN mode DEFAULT group default qlen 1000
netplan, interfaces
В ubuntu, начиная с 18.04 по умолчанию используется настройка через netplan (/etc/netplan/config.yaml), а не interfaces (/etc/network/interfaces).
Static настройка интерфейса через файл /etc/network/interfaces
Если на сервере нет vim (есть только vi), возможно есть vim.tiny (на примере Debian).
vim.tiny /etc/network/interfaces
Пример настроек:
# общие опции: поднимать интерфейс автоматически при старте системы. Близкие по смыслу команды, в общем случае следует использовать auto.
allow-hotplug eth0
auto eth0
# primary interface + dhcp
auto eth0
iface eth0 inet dhcp

# subinterface + dhcp
auto eth0:1
iface eth0:1 inet dhcp

# subinterface static
auto eth0:1
iface eth0:1 inet static
address 172.20.1.50
netmask 255.255.255.0
# статический адрес, маска, шлюз
auto eht1
iface eth1 inet static
address 192.168.0.1
netmask 255.255.255.0
gateway 192.168.0.254
Пример файла с настройками интерфейса + статическими (permanent) маршрутами через файл interfaces.
$ cat /etc/network/interfaces
# This file describes the network interfaces available on your system
# and how to activate them. For more information, see interfaces(5).

source /etc/network/interfaces.d/*

# The loopback network interface
auto lo
iface lo inet loopback

# internal
auto eth1
iface eth1 inet static
address 172.17.0.2
netmask 255.255.0.0
post-up ip route add default via 172.17.0.1

# management
auto eth2
iface eth2 inet static
address 172.55.1.101
netmask 255.255.255.0
post-up ip route add 11.0.0.0/16 via 172.55.1.1
Стоит особое внимание обращать на первую строчку – source /etc/network/interfaces.d/*, она декларирует чтение и исполнение всех файлов в interfaces.d, как итог, если в этих файлах некорректная конфигурация – это может повлиять на работу сети. Пример – в конфиге файла /etc/network/interfaces.d/setup был указан некорректный naming интерфейса eth0 (по факту новый нейминг используется) и служба networking не работала (в том числе не продливала lease time полученных IP) из-за некорректной конфигурации сервиса. После удаления файла setup все ок.
serv:~# cat /etc/network/interfaces
source /etc/network/interfaces.d/*
...

serv:~# cat /etc/network/interfaces.d/setup
...
auto eth0
iface eth0 inet dhcp

serv:~# systemctl status networking
● networking.service - Raise network interfaces
Loaded: loaded (/lib/systemd/system/networking.service; enabled; vendor preset: enabled)
Active: failed (Result: exit-code) since Mon 2020-02-07 16:28:03 MSK; 10s ago
Docs: man:interfaces(5)
Process: 1133 ExecStart=/sbin/ifup -a --read-environment (code=exited, status=1/FAILURE)
Main PID: 1133 (code=exited, status=1/FAILURE)

Feb 07 16:28:03 serv dhclient[1162]: than a configuration issue please read the section on submitting
Feb 07 16:28:03 serv dhclient[1162]: bugs on either our web page at www.isc.org or in the README file
Feb 07 16:28:03 serv dhclient[1162]: before submitting a bug. These pages explain the proper
Feb 07 16:28:03 serv dhclient[1162]: process and the information we find helpful for debugging.
Feb 07 16:28:03 serv dhclient[1162]:
Feb 07 16:28:03 serv dhclient[1162]: exiting.
Feb 07 16:28:03 serv ifup[1133]: ifup: failed to bring up eth0
Feb 07 16:28:03 serv systemd[1]: networking.service: Main process exited, code=exited, status=1/FAILURE
Feb 07 16:28:03 serv systemd[1]: networking.service: Failed with result 'exit-code'.
Feb 07 16:28:03 serv systemd[1]: Failed to start Raise network interfaces.
После restart все ок - IP получается (169*) в том числе на интерфейсе без Link.
serv:~# ip a | grep inet
inet 127.0.0.1/8 scope host lo
inet 10.3.1.157/24 brd 10.3.1.255 scope global dynamic enp7s0
inet 169.254.7.83/16 brd 169.254.255.255 scope link enp8s0:avahi

serv:~# systemctl status networking
● networking.service - Raise network interfaces
Loaded: loaded (/lib/systemd/system/networking.service; enabled; vendor preset: enabled)
Active: active (exited) since Mon 2020-02-07 16:40:59 MSK; 3min 50s ago
Docs: man:interfaces(5)
Process: 495 ExecStart=/sbin/ifup -a --read-environment (code=exited, status=0/SUCCESS)
Main PID: 495 (code=exited, status=0/SUCCESS)
Tasks: 4 (limit: 4915)
Memory: 8.4M
CGroup: /system.slice/networking.service
├─534 /sbin/dhclient -4 -v -i -pf /run/dhclient.enp7s0.pid -lf /var/lib/dhcp/dhclient.enp7s0.leases -I -df /var/lib/dhcp/dhclient6.enp7s0.leases enp7s0
├─586 /sbin/dhclient -4 -v -i -pf /run/dhclient.enp8s0.pid -lf /var/lib/dhcp/dhclient.enp8s0.leases -I -df /var/lib/dhcp/dhclient6.enp8s0.leases enp8s0
Чистка
Удаляем все адреса с интерфейса eth0.
# To remove all addresses (in case you have multiple):
ip addr flush dev eth0
Рестарт
Для применения настроек через файл не обязательно перезагружать сервер. Можно за-флашить настройки (если интерфейсы уже есть в системе – иначе просто перезапустить), а потом перезапустить networking.service. Перезапускать службу в целом и flash’ить интерфейс по которому мы подключены при удаленном подключении обязательно одновременно с рестартом – иначе доступ потеряется.
# пока не пропишешь интерфейсы/адреса в файле /etc/network/interfaces - утилита ifup не найдет их, а в ethtool интерфейс будет в DOWN!

ip link set enp2s0 up

root@debian:~# ifup eth-0
Ignoring unknown interface eth-0=eth-0.
root@debian:~# ifup eth0
Ignoring unknown interface eth0=eth0.

ip addr flush eth4 && systemctl restart networking.service && ifup eth4 # после flash и restart чаще всего перестраховаться с ifup управляющего интерфейса

service networking restart # альтернатива systemctl
NETWORK INTERFACE CARD info (lshw, lspci)
(дублируется в NIC, Linux hardware)
lshw -class network # полный вывод
lshw -c network -short -numeric # вывод в виде удобной таблички (short – краткий, numeric – добавляем ID устройства)
# lshw -c network -short -numeric
H/W path Device Class Description
========================================================
/0/100/2/0 ens6f0 network I350 Gigabit Network Connection [8086:1521]
/0/100/2/0.1 ens6f1 network I350 Gigabit Network Connection [8086:1521]
/0/100/2.2/0 network 82599ES 10-Gigabit SFI/SFP+ Network Connection [8086:10FB]
/0/100/2.2/0.1 network 82599ES 10-Gigabit SFI/SFP+ Network Connection [8086:10FB]
/0/100/3.2/0 enp5s0f0 network BCM57840 NetXtreme II 10 Gigabit Ethernet [14E4:16A1]
/0/100/3.2/0.1 enp5s0f1 network BCM57840 NetXtreme II 10 Gigabit Ethernet [14E4:16A1]
/0/100/1c.4/0 enp7s0 network I210 Gigabit Network Connection [8086:1533]
/0/100/1c.5/0 enp8s0 network I210 Gigabit Network Connection [8086:1533]

# lshw -c network -short
H/W path Device Class Description
========================================================
/0/100/2/0 ens6f0 network I350 Gigabit Network Connection
/0/100/2/0.1 ens6f1 network I350 Gigabit Network Connection
/0/100/2.2/0 network 82599ES 10-Gigabit SFI/SFP+ Network Connection
/0/100/2.2/0.1 network 82599ES 10-Gigabit SFI/SFP+ Network Connection
/0/100/3.2/0 enp5s0f0 network BCM57840 NetXtreme II 10 Gigabit Ethernet
/0/100/3.2/0.1 enp5s0f1 network BCM57840 NetXtreme II 10 Gigabit Ethernet
/0/100/1c.4/0 enp7s0 network I210 Gigabit Network Connection
/0/100/1c.5/0 enp8s0 network I210 Gigabit Network Connection
Если девайс в списке есть, но без logical name, перезагрузить сервер или рестартовать службу командой выше. Если состояние DISABLED, то интерфейс нужно включить (ifup/ifconfig/ip link – выше примеры).
~$ sudo lshw -class network
*-network
description: Ethernet interface
product: VMXNET3 Ethernet Controller
vendor: VMware
physical id: 0
bus info: pci@0000:0b:00.0
logical name: eth0
version: 01
serial: 00:50:56:b6:78:b5
capacity: 1Gbit/s
width: 32 bits
clock: 33MHz
capabilities: pm pciexpress msi msix bus_master cap_list rom ethernet physical logical tp 1000bt-fd
configuration: autonegotiation=off broadcast=yes driver=vmxnet3 driverversion=1.4.14.0-k-NAPI duplex=full ip=78.107.63.120 latency=0 link=yes multicast=yes port=twisted pair
resources: irq:19 memory:fd4fb000-fd4fbfff memory:fd4fc000-fd4fcfff memory:fd4fe000-fd4fffff ioport:5000(size=16) memory:fd400000-fd40ffff

*-network
description: Ethernet interface
product: VMXNET3 Ethernet Controller
vendor: VMware
physical id: 0
bus info: pci@0000:13:00.0
logical name: eth1
version: 01
serial: 00:50:56:b6:7d:ab
capacity: 1Gbit/s
width: 32 bits
clock: 33MHz
capabilities: pm pciexpress msi msix bus_master cap_list rom ethernet physical logical tp 1000bt-fd
configuration: autonegotiation=off broadcast=yes driver=vmxnet3 driverversion=1.4.14.0-k-NAPI duplex=full ip=192.168.149.78 latency=0 link=yes multicast=yes port=twisted pair
resources: irq:16 memory:fd3fb000-fd3fbfff memory:fd3fc000-fd3fcfff memory:fd3fe000-fd3fffff ioport:6000(size=16) memory:fd300000-fd30ffff
Если в выводе Unclaimed – вероятнее всего нужно обновлять операционную систему для обновления драйверов.
*-network:0 UNCLAIMED
description: Ethernet controller
Очень удобно и наглядно и по дискам/RAM.
# lshw -c disk -short
H/W path Device Class Description
======================================================
/0/100/17/0 /dev/sda disk 4011MB 4GB SATA Flash D
/0/100/17/1 /dev/sdb disk 1TB TOSHIBA MG04ACA1

# lshw -c memory -short | grep iB
/0/0 memory 64KiB BIOS
/0/54 memory 8GiB System Memory
/0/54/0 memory 4GiB DIMM DDR4 Synchronous 2133 MHz (0.5 ns)
/0/54/8 memory 4GiB DIMM DDR4 Synchronous 2133 MHz (0.5 ns)
/0/6c memory 384KiB L1 cache
/0/6d memory 1536KiB L2 cache
/0/6e memory 15MiB L3 cache
/0/70 memory 384KiB L1 cache
/0/71 memory 1536KiB L2 cache
/0/72 memory 15MiB L3 cache
lspci | grep -i ‘network\|ethernet’
~$ lspci | grep -i 'network\|ethernet'
0b:00.0 Ethernet controller: VMware VMXNET3 Ethernet Controller (rev 01)
13:00.0 Ethernet controller: VMware VMXNET3 Ethernet Controller (rev 01)
lspci -knn | grep “Net\|Eth” -A2
ETHTOOL
ethtool ethX – смотрим данные по физ. интерфейсу.
~$ ethtool eth0
Settings for eth0:
Supported ports: [ TP ]
Supported link modes: 1000baseT/Full
10000baseT/Full
Supported pause frame use: No
Supports auto-negotiation: No
Advertised link modes: Not reported
Advertised pause frame use: No
Advertised auto-negotiation: No
Speed: 10000Mb/s
Duplex: Full
Port: Twisted Pair
PHYAD: 0
Transceiver: internal
Auto-negotiation: off
MDI-X: Unknown
Cannot get wake-on-lan settings: Operation not permitted
Link detected: yes

root@serv1:~# ethtool enP17060s1
Settings for enP17060s1:
Supported ports: [ ]
Supported link modes: Not reported
Supported pause frame use: Symmetric
Supports auto-negotiation: Yes
Supported FEC modes: Not reported
Advertised link modes: Not reported
Advertised pause frame use: No
Advertised auto-negotiation: No
Advertised FEC modes: Not reported
Speed: 50000Mb/s
Duplex: Unknown! (255)
Port: Other
PHYAD: 0
Transceiver: internal
Auto-negotiation: off
Supports Wake-on: d
Wake-on: d
Current message level: 0x00000004 (4)
link
Link detected: yes

~$ ethtool eth1
Settings for eth0:
Supported ports: [ FIBRE ]
Supported link modes: 1000baseT/Full
10000baseT/Full
Supported pause frame use: Symmetric Receive-only
Supports auto-negotiation: No
Advertised link modes: 10000baseT/Full
Advertised pause frame use: No
Advertised auto-negotiation: No
Speed: Unknown!
Duplex: Unknown! (255)
Port: FIBRE
PHYAD: 1
Transceiver: internal
Auto-negotiation: off
Supports Wake-on: g
Wake-on: g
Current message level: 0x00000000 (0)

Link detected: no
ethtool -i – информация по драйверам.
root@serv1:~# ethtool -i enP17060s1
driver: mlx5_core
version: 5.0-0
firmware-version: 14.25.8368 (MSF0010110035)
expansion-rom-version:
bus-info: f9a4:00:02.0
supports-statistics: yes
supports-test: yes
supports-eeprom-access: no
supports-register-dump: no
supports-priv-flags: yes
ethtool -p – blink.
Initiates adapter-specific action intended to enable an operator to easily identify the adapter by sight. Typically this involves blinking one or more LEDs on the specific network port.
ethtool –a ethX – можно посмотреть параметры flow control. Most switch vendors recommend that Ethernet flow-control be disabled for inter switch links, and at most be used on ports which are directly connected to computers. Even in this setup head of line blocking can still occur, and thus it is advisable to disable Ethernet flow-control. Higher level protocols such as TCP/IP and Coherence TCMP include their own flow-control mechanisms which are not subject to head of line blocking, and also negate the need for the lower level flow-control.
ethtool –A ethX [autoneg on|off] [rx on|off] [tx on|off] – можно изменить параметры flow control.
ethtool -C ethX [adaptive-rx on|off] [adaptive-tx on|off] [rx-usecs N] [rx-frames N] [rx-usecs-irq N] [rx-frames-irq N] [tx-usecs N] [tx-frames N] [tx-usecs-irq N] [tx-frames-irq N] [stats-block-usecs N] [pkt-rate-low N] [rx-usecs-low N] [rx-frames-low N] [tx-usecs-low N] [tx-frames-low N] [pkt-rate-high N] [rx-usecs-high N] [rx-frames-high N] [tx-usecs-high N] [tx-frames-high N] [sample-interval N] – позволяет изменить большое количество различных параметров.
LLDP
По умолчанию LLDP включен на сетевой карте X710 в драйвере Linux. Это для каких-то задач может быть недостаток, хорошо, что легко отключается.
Причем, очевидно, данные сообщения не фиксируются в tcpdump генерирующей системы т.к. формируются не в ядре.
         https://advantech-ncg.zendesk.com/hc/en-us/articles/360020364512-How-to-Disable-LLDP-agent-on-XL710-in-Linux
         # ethtool --set-priv-flags enp2s0f0 disable-fw-lldp on

         # ethtool --show-priv-flags enp2s0f0
         Private flags for enp2s0f0:
         MFP                     : off
         total-port-shutdown     : off
         LinkPolling             : off
         flow-director-atr       : on
         veb-stats               : off
         hw-atr-eviction         : off
         link-down-on-close      : off
         legacy-rx               : off
         disable-source-pruning  : off
         disable-fw-lldp         : on
         rs-fec                  : off
         base-r-fec              : off
         multiple-traffic-classes: off
         vf-vlan-prune-disable   : off
         vf-true-promisc-support : off
ETHTOOL: RSS (HASH) and queues
- soft RSS технологии: receive packet steering (RPS) и receive flow steering (RFS), используются когда RSS на сетевой карте не поддерживается для распределения нагрузки разных потоков одной сетевой карты на несколько CPU – If a NIC supports multiple queues, RPS is ineffective. RPS is mainly intended for single-queue NICs in a multi-CPU environment. If a NIC supports multiple queues, you can directly bind hard interrupts to CPUs by configuring the SMP IRQ affinity. They are mainly intended for single-queue NICs in a multi-CPU environment.
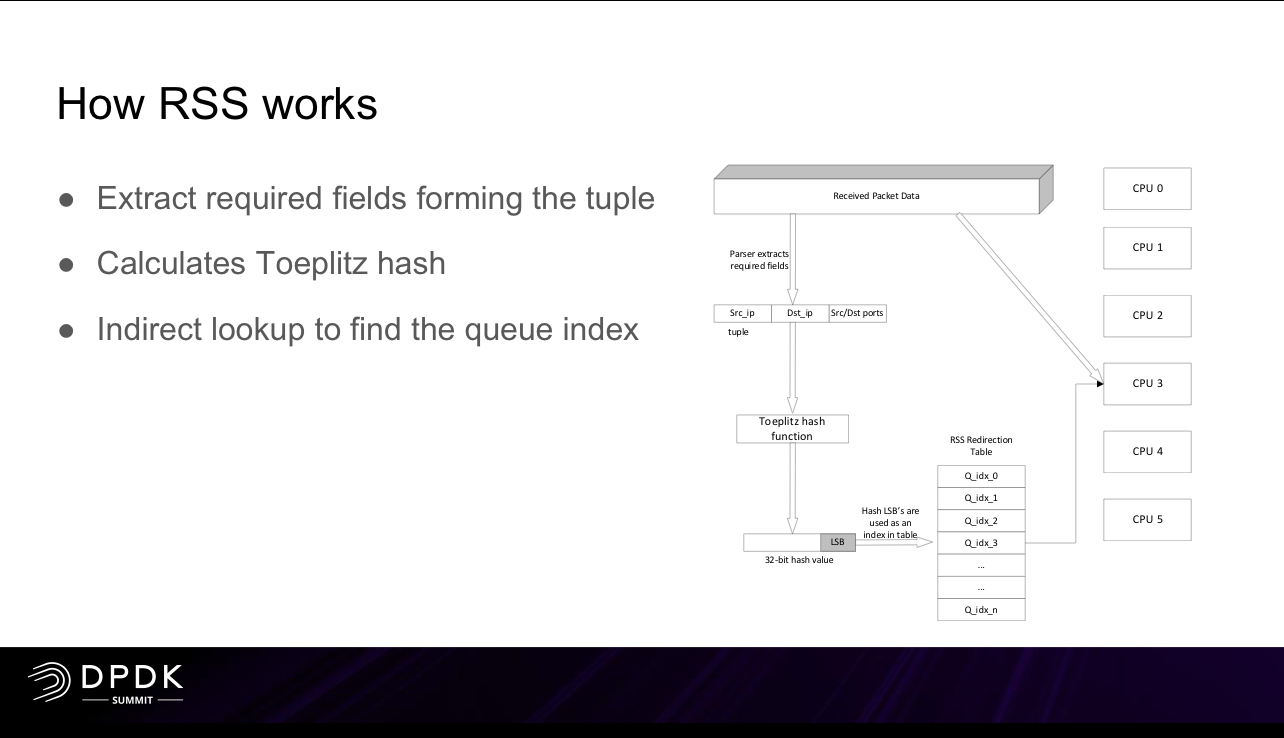
Receive side scaling (RSS) is a network driver technology that distributes the receiving of network traffic more efficiently by distributing receive processing across multiple CPUs in a multiprocessor system. In simple terms, RSS allows a system to process more received traffic because it uses all available CPUs instead of just one.
С помощью ethtool можно настроить перераспределение трафика по очередям сетевой карты на основе hash от каких-то данных на базе RSS. RSS в случае сетевых карт рассчитывается на основе чипа FPGA/ASIC. Такое (или софтовое) распределение использую очень многие вендоры, которые работают с сетевым трафиком – как вендоры производители оборудования, так и вендоры производители генераторов трафика.
For any physical NIC in DPDK the RSS value is calculated by ASIC before injecting the packets into final queue destination.

https://downloads.checkpoint.com/fileserver/SOURCE/direct/ID/7555/FILE/Performance_tests_methodology.pdf
CoreXL Testing
When testing CoreXL it is highly recommended that you simulate a real world scenario and test at least a class C range (that is, approximately a couple of hundred IP addresses). As a result, the connections will be distributed among the different cores and all the cores will be utilized.
По умолчанию сетевые интерфейсы имеют настройку hash SRC & DST IP для UDP трафика и hash SRC & DST IP and PORTs для TCP трафика. Для реализации симметричного (symmetric RSS) распределения по очередям может изменяться (поддерживает незначительное количество сетевых карт):
-
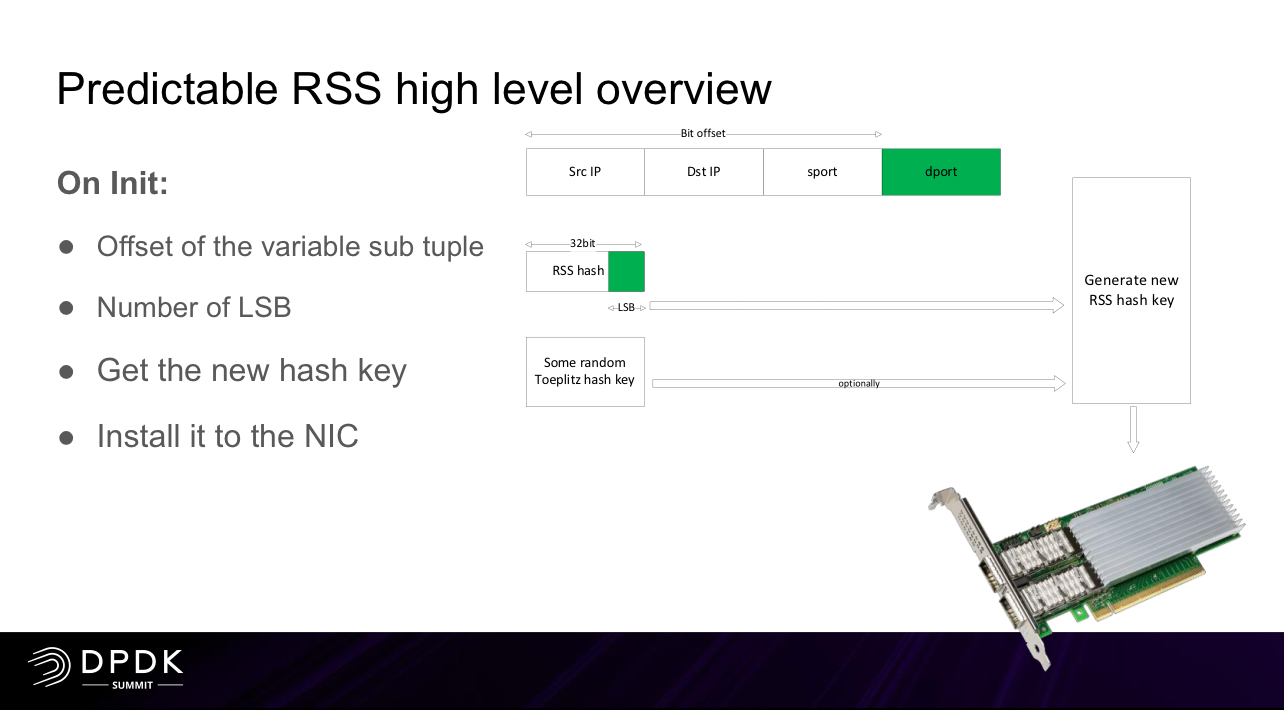
- можно посмотреть и изменить используемый ключ для hash (Random Secret Key, RSK) на ряде сетевых карт (напр. Intel X710) на симметричный с меньшей энтропией (т.е. балансировка в целом будет хуже, но это плата за симметричность)
- можно посмотреть и изменить XOR функцию на ряде сетевых карт (напр. Mellanox ConnectX-5)
Перераспределение может происходить к процессам ksoftirqd (их еще надо настроить, напр, с использованием qdisc). Количество очередей RSS обычно делается равным количеству процессов, на которые трафик распределяется (за исключением части для системных задач). Подробнее про распределение трафика в статье про CPU affinity.
# DESCRIPTION
rx-flow-hash tcp4|udp4|ah4|esp4|sctp4|tcp6|udp6|ah6|esp6|sctp6
          m|v|t|s|d|f|n|r...
          s   Hash on the IP source address of the rx packet.
          d   Hash on the IP destination address of the rx packet.
          f   Hash on bytes 0 and 1 of the Layer 4 header of the rx packet.
          n   Hash on bytes 2 and 3 of the Layer 4 header of the rx packet.

# CFG
ethtool -K eth1 rxhash off # disable RSS (может не работать на некоторых сетевых картах - отключить можно только указанием одной очереди)
ethtool -N eth1 rx-flow-hash tcp4 sdfn
ethtool -N eth1 rx-flow-hash udp4 sdfn
ethtool -N eth1 rx-flow-hash tcp6 sdfn
ethtool -N eth1 rx-flow-hash udp6 sdfn
ethtool -X eth1 hkey 6D:5A:6D:5A:6D:5A:6D:5A:6D:5A:6D:5A:6D:5A:6D:5A:6D:5A:6D:5A:6D:5A:6D:5A:6D:5A:6D:5A:6D:5A:6D:5A:6D:5A:6D:5A:6D:5A:6D:5A:6D:5A:6D:5A:6D:5A:6D:5A:6D:5A:6D:5A equal 8# symmetric RSS key Intel X710
ethtool -X eth1 hfunc xor # symmetric RSS key Mellanox

# SHOW
# ethtool -n enp3s0f0 rx-flow-hash udp4
UDP over IPV4 flows use these fields for computing Hash flow key:
IP SA
IP DA

# ethtool -n enp5s0f0 rx-flow-hash tcp4
TCP over IPV4 flows use these fields for computing Hash flow key:
IP SA
IP DA
L4 bytes 0 & 1 [TCP/UDP src port]
L4 bytes 2 & 3 [TCP/UDP dst port]

# ethtool --show-rxfh-indir eth4 # пример indirection table для 8 очередей (0-9), карта Intel X710
RX flow hash indirection table for eth4 with 8 RX ring(s):
0: 0 1 2 3 4 5 6 7
.....xxxx.....
504: 0 1 2 3 4 5 6 7
RSS hash key:
db:55:bb:ba:e2:e9:66:45:d7:e2:bd:7d:0d:de:71:28:d1:ba:bc:af:45:c4:d2:27:41:84:76:54:2f:dc:8b:ce:a7:bf:da:a3:fc:05:2e:c3:ef:9a:11:25:b3:e0:34:6b:38:2b:9e:54

# ethtool -x eth4 # пример indirection table для 3 очередей (0-2), карта Intel I350
-bash-4.2# ethtool --set-channels eth1 combined 3
-bash-4.2# ethtool -x eth1
RX flow hash indirection table for eth1 with 3 RX ring(s):
0: 0 0 0 0 0 0 0 0
8: 0 0 0 0 0 0 0 0
16: 0 0 0 0 0 0 0 0
24: 0 0 0 0 0 0 0 0
32: 0 0 0 0 0 0 0 0
40: 0 0 0 1 1 1 1 1
48: 1 1 1 1 1 1 1 1
56: 1 1 1 1 1 1 1 1
64: 1 1 1 1 1 1 1 1
72: 1 1 1 1 1 1 1 1
80: 1 1 1 1 1 1 2 2
88: 2 2 2 2 2 2 2 2
96: 2 2 2 2 2 2 2 2
104: 2 2 2 2 2 2 2 2
112: 2 2 2 2 2 2 2 2
120: 2 2 2 2 2 2 2 2
RSS hash key:
Operation not supported
QUEUES
Пример количества очередей RSS на сетевых картах.
ethernet-controller-i350-datasheet.pdf
Receive Side Scaling (RSS) number of queues per port
Up to 8 I350
Up to 8 82580
Up to 16 82599
Up to 16 82576
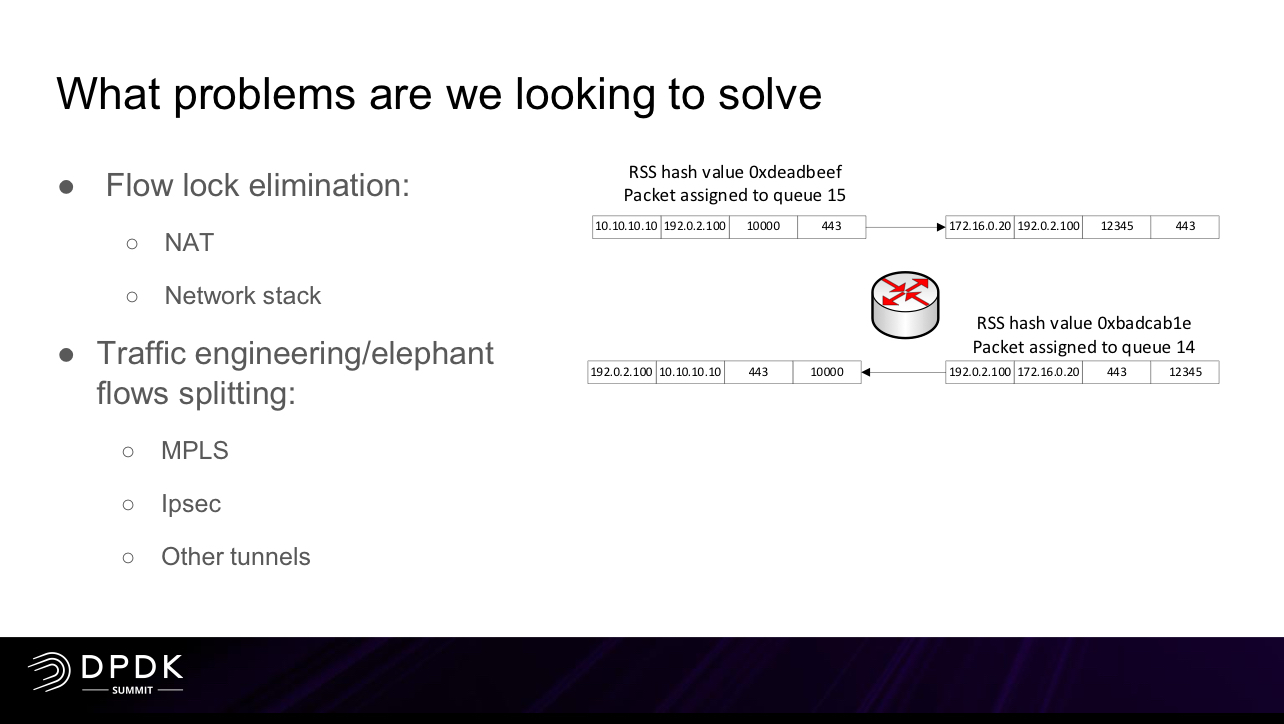
Описание логики symmetric HASH. Пример настройки на Mellanox, Intel картах выше. Необходимость symmetric hash есть в разных сетевых применениях, включая FW (NAT, conntrack, IPsec, etc).
332464-710_Series_Datasheet_v_3_9.pdf
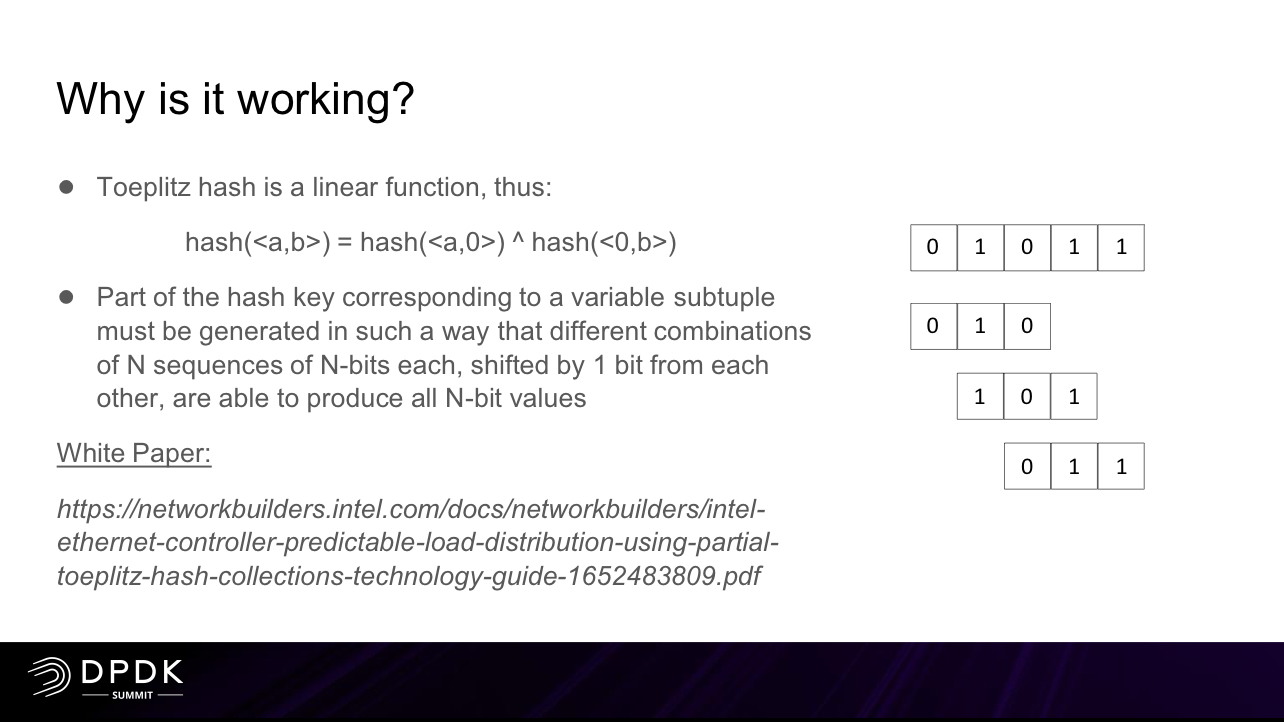
7.1.10.3 Symmetric hash
A symmetric hash provides the same value if its respective source and destination fields are swapped. For example, suppose that the hash is done on the frame source and destination IP addresses. A symmetric hash guarantees that: hash(src IP, dst IP) = hash(dst IP, src IP). The motivation behind symmetric hash is to route frames between two addresses to the same queue independent of the direction of transmission. The symmetric hash is useful for field pairs like IP addresses, L4 port numbers, MAC addresses, FC_IDs and FC exchange IDs. The field pairs are defined globally per packet type by the GLQF_SWAP registers.
The symmetric hash is obtained by replacing the original source and destination fields by a XOR value of these fields before calculating the hash.
For higher end systems/NICs a better and more performant solution could be utilizing the NIC itself a bit more. x710/i40 and similar Intel NICs or Mellanox MT27800 Family [ConnectX-5] for example can easily be set up to do a bigger chunk of the work using more RSS queues and symmetric hashing in order to allow for increased performance on the Suricata side by using af-packet with cluster-type: cluster_qm mode. In that mode with af-packet all packets linked by network card to a RSS queue are sent to the same socket.
По умолчанию выделяется по одной очереди RX/TX на виртуалки.
In a single virtio-net queue, the scale of the protocol stack in a guest is restricted, as the network performance does not scale as the number of vCPUs increases. Guests cannot transmit or retrieve packets in parallel, as virtio-net has only one TX and RX queue.
Multiqueue при использовании в виртуализации – спорная тема. Может приводить к деградации исходящего трафика.
Although the virtio-net multiqueue feature provides a performance benefit, it has some limitations and therefore should not be unconditionally enabled - virtio-net multiqueue works well for incoming traffic, but can occasionally cause a performance degradation, for outgoing traffic.

Multiqueue
If you are using the VirtIO driver, you can optionally activate the Multiqueue option. This option allows the guest OS to process networking packets using multiple virtual CPUs, providing an increase in the total number of packets transferred.
When using the VirtIO driver with Proxmox VE, each NIC network queue is passed to the host kernel, where the queue will be processed by a kernel thread spawned by the vhost driver. With this option activated, it is possible to pass multiple network queues to the host kernel for each NIC.
When using Multiqueue, it is recommended to set it to a value equal to the number of Total Cores of your guest. You also need to set in the VM the number of multi-purpose channels on each VirtIO NIC with the ethtool command:
ethtool -L ens1 combined X # where X is the number of the number of vcpus of the VM.
You should note that setting the Multiqueue parameter to a value greater than one will increase the CPU load on the host and guest systems as the traffic increases. We recommend to set this option only when the VM has to process a great number of incoming connections, such as when the VM is running as a router, reverse proxy or a busy HTTP server doing long polling.
Set
# ethtool --set-channels eth4 combined 1
# ethtool -L eth4 combined 8
# ethtool -G eth4 rx 4078 tx 4078
Show
"Combined" indicates the total number of queues. In the following example, the NIC has 8 queues.

# ethtool --show-channels enp5s0f0
# ethtool -l enp5s0f0
    Channel parameters for enp5s0f0:
    Pre-set maximums:
    RX:             0
    TX:             0
    Other:          0
    Combined:       30
    Current hardware settings:
    RX:             0
    TX:             0
    Other:          0
    Combined:       8
Неплохое объяснение работы очередей на сетевой карты – есть очереди пакетов, которые выступают по сути буфером для них перед отправкой если nic не может всю очередь отправить сразу в интерфейс. В случае переполнения очереди пакеты дропаются, но обычно можно управлять этими дропами с помощью QoS (какие пакеты будут дропаться).
Regarding queue-full, each NIC has queues, and in case it can't transmit/receive packets at a given rate, it will queue them and transmit/receive them later. Think of it as buffering. When queues are full, packets are dropped, since we can't store new packets.
There are different approaches how to implement which packets are dropped, for example FIFO. In case a packet is dropped because of queue-full, TRex will retransmit the packet. If you use --queue-drop, it will not.
nic Offload, ethtool
- (Nic, pt) Offload маршрутизации/routing на NIC- дублирование на NIC части соединений для fastpath, дублируем часть записей из connection tracking в nic (intel/mellanox) с замещением – чем больше поток например потребляет cpu, тем больше шанс что он попадает в offload, причем места хватит достаточно б%